Update 10/05/2016: Add a section on how to update the UI when the data in the database is changed without using the UI.
Introduction
Continuing the series of React-related articles, we’ll try to make a comprehensive tutorial to the redux framework and its integrations with React, using the react-redux library. Redux can be used as an alternative to Flux (which we discussed in a previous article) to orchestrate the message passing between ui/components/data.
This tutorial will also produce as a result an opinionated (my opinion) boilerplate project for creating react-redux Single Page Applications. I have used Django as the back end however you could use any server-side framework you like, Django is only used for implementing a bunch of REST APIs through django-rest-framework. You may replace it with any other REST framework you like.
I have also used browserify to pack the client-side code — I prefer it from webpack as I find it much easier, clear and less-magical, and, since it fills all my needs I don’t see any reason to take the webpack pill.
All client side code is written in ES6 javascript using the latest trends — I will try to explain anything I feel that is not very clear.
Before continuing, I have to mention that although I will provide an (as comprehensive as possible) introduction to redux, I will concentrate on the correct integration between redux, react-redux and React in a complex, production level application. I’ll try to explain everything I talk about, however, before reading the rest of this article I recommend reading the introduction and basics sections of redux documentation and watching the getting started with redux from the creator of redux — I can’t recommend the videos enough, they are really great!
One final thing: This is a really long article (more than 100 kb). It will require a lot of time to read and understand it, especially if you are not familiar with the concepts described here. Please take your time when reading it and try verifying what I say here through the project that accompanies this article @ https://github.com/spapas/react-tutorial/, tag react-redux.
Introduction to redux
I have to say that I got interested in redux because of all that buzz this framework generated. However, I got really interested in it when I understood how close its philosophy was to functional programming - this, when combined with the usage of react functional components will enable you to write great code and (most important for me) really enjoy coding with it (if you like functional programming of course :) )
Redux is simpler, having fewer and less complex concepts than the original Flux implementation and more opinionated - this is a good thing!
Here are the basic building blocks of redux:
- One (and only one) state: It is an object that keeps the global state of your application. Everything has to be in that object, both data and ui.
- A bunch of actions: These are simple objects that are created/dispatched when something happens (ui interaction, server response etc) with a mandatory property (their type) and a number of optional properties that define the data that accompanies each action.
- A bunch of action creators: These are very simple functions that create action objects. Usually, there are as many action creators as actions (unless you use redux-thunk, we’ll talk about it later).
- One (and only one) reducer: It is a function that retrieves the current state and an action and creates the resulting state. This is the central component of a redux application - every action along with the current state will be passed to the reducer and the state of the application will be the resulting, new state.
- One (and only one) store: It is an object that is created by redux and is used as a glue between the state, the reducer and the components
The general idea/flow is:
- Something (let’s call it event) happens (i.e a user clicks a button, a timeout is fired, an ajax request responds)
- An action describing that event is created by its the corresponding action creator and dispatched (i.e passed to the reducer along with the current state) through the store
- The dispach calls the reducer with the current state object and the action as parameters
- The reducer checks the type of the action and, depending on the action type and any other properties this action has, creates a new state object
- The store applies the new state to all components
One thing we can see from the above is that redux is not react-only (although its general architecture is a perfect fit to react) but could be also used with different view frameworks, or even with no view framework!
A simple example
I’ve implemented a very simple redux example @ jsfiddle that increases and decreases a number using two buttons to support the above:
Its html is:
<div id='state_container'>0</div>
<button onclick='increase()'>+</button>
<button onclick='decrease()'>-</button>
while its javascript (es6) code is:
let reducer = (state=0, action) => {
  switch (action.type) {
    case 'INCREASE': return state+1
    case 'DECREASE': return state-1
    default: return state
  }
}
let store = Redux.createStore(reducer)
let unsubscribe = store.subscribe(() =>
  document.getElementById('state_container').innerHTML = store.getState()
)
window.increase = e => store.dispatch({
  type: 'INCREASE'
})

window.decrease = e => store.dispatch({
  type: 'DECREASE'
})
The HTML just displays a div which keeps the current number value and two buttons that call the increase and decrease functions.
Now, for the javascript, we create a reducer function that gets the previous state value (which initially is the number 0) and the action that is dispatched. When the reducer is called it will check if the action type is ‘INCREASE’ or ‘DECREASE’ and correspondigly increase or decreases the state, which is just that number. Normally, the state will be a (rather fat) object.
We then create a store which gets the reducer as its only parameter then and call its subscribe method passing a callback. This callback will be called whenever the state is changed - in our case, the callback just updates the div with the current number from the state. Finally, the increase and decrease methods that are called when the butts are clicked will just dispatch the corresponding action.
Please notice that in the above example I didn’t use action creators for simplicity. For completeness, the action creator for increase would be something like
const increaseCreator = () => {
  type: 'INCREASE'
}
i.e it would just return an INCREASE action and window.increase would be window.increase = e => store.dispatch(increaseCreator()). Notice that the increaseCreator is called (has ()) so that dispatch will receive the resulting action object as a parameter.
The flow of the data when the increase button is clicked is the following:
- button.onClick
- increase()
- increaseCreator() (if we used action creators - this a param to dispatch so it will be called first)
- store.dispatch({type: 'INCREASE' })
- reducer(current_state, {type: 'INCREASE'})
- Reducer returns the new state (state+1)
- callback()
- value is updated
Having one and only one store/state makes the flow of the data crystal and resolves some of the dillemas I had when using the original Flux architecture! Some people may argue that although a single reducer function is nice for the above simple demo, having a huge (spaghetti-like) switch statement in your reducer is not a very good practice - thankfully redux has a bunch of tools that will presented later and greatly help on this (seperating the reducing logic, using different modules for each module etc).
Interlude: So what’s a reducer?
I’d like to talk a bit about the “reducer”, mainly for people not familiar with functional programming (although people writing Javascript should be familiar with functional programming since Javascript has functional features) to clarify my statement above that the redux philosophy is close to functional programming.
One basic concept of functional programming is the concept of “map-reduce”. Mapping means calling a function (let’s call it mapper) for all elements of a list and creating a new list with the output of each individual call. So, a mapper gets only one parameter, the current value of the list. For example the “double” mapper, defined like let double = x => x*2 would “map” the list [1,2,3] to [2,4,6].
Reducing means calling a function (let’s call it reducer) for all elements of a list and creating a single value that accumulates the result of each individual call. This can be done because the reducer gets two parameters, the accumulated value of the list until this point and the current value of the list. Also, when doing a reduce we need to define a starting value for the accumulator. For example, the “sum” reducer, defined like let sum = (s=0, x) => s+x, (which has an initial value of 0), would “reduce” the list [1,2,3] to 6 by calling the sum reducer three times:
tmp1 = sum(0, 1); // tmp1 = 1
tmp2 = sum(tmp1, 2); // tmp2 = 3
result = sum(tmp2, 3); // result = 6
So, a redux reducer is actually a (rather complex) functional reducer, getting the current state (as the accumulated value) and each individual action as the value and returning the new state which is the result of applying this action to the state!
Three extra things to make sure about your redux reducers are that:
- they should have an initial value (with the initial state of the application) or know how to handle an undefined initial state
- they must not not mutate (change) the state object but instead create and return a new one (not allowing object mutations is a general practice in functional programming but in redux also helps to quickly apply the changes to the components)
- always return a valid state as a result (or else the application will have invalid state)
What about react-redux?
React-redux is a rather simple framework that offers two helpful utilities for integrating redux with React:
- A connect function that “connects” React components to the redux store. This function (among others) retrieves a callback parameter that defines properties that will be passed to that component and each one will be (magically) mapped to state properties.
- A Provider component. This is a parent component that can be used to (magically) pass the store properties to its children components.
Please notice that nothing actually magical happens when the store properties are passed to the children components through connect and Provider! this is accomplished through the react context feature that allows you to “pass data through the component tree without having to pass the props down manually at every level”. So connect``ed components used context to retrieve the store properties that have been passed to the context by the ``Provider.
How react-redux is used be made more clear with another jsfiddle that will convert the previous example to React and react-redux:
The html is just <div id='container'></div> since the components will be rendered through react, while the es6/jsx code is:
let reducer = (state=0, action) => {
  switch (action.type) {
    case 'INCREASE': return state+1
    case 'DECREASE': return state-1
    default: return state
  }
}

let store = Redux.createStore(reducer)

class RootComponent extends React.Component {
  render() {
    let {number, increase, decrease} = this.props
    return <div>
      <div>{number}</div>
      <button onClick={e=>increase()}>+</button>
      <button onClick={e=>decrease()}> - </button>
    </div>
  }
}

let mapStateToProps = state => ({
  number: state
})

let mapDispatchToProps = dispatch => ({
  increase: () => dispatch({type: 'INCREASE'}),
  decrease: () => dispatch({type: 'DECREASE'})
})

const ConnectedRootComponent = ReactRedux.connect(
    mapStateToProps, mapDispatchToProps
)(RootComponent)

ReactDOM.render(
  <ReactRedux.Provider store={store}>
    <ConnectedRootComponent />
  </ReactRedux.Provider>,
  document.getElementById('container')
)
As we can see, the reducer and store are the same as the non-react version. What is new here is that I’ve added a React RootComponent that has two properties, one named number and one named dispatch that can be used to dispatch an action through the store.
Using react-redux’s connect function we create a new component, ConnnectedRootComponent which is a new component with the redux-enabled functionality (i.e it will have access to store). The connect() function takes a bunch of optional arguments. I won’t go into much detail since its a little complex (the react-redux documentation is clear enough), however in our example we have defined two objects named mapStateToProps and mapDispatchToProps which are passed to connect and define how the state and the dispatch are mapped to the properties the connected component will have.
The mapStateToProps is a function that will be called whenever the store’s state changes and should return an object whose attributes will be passed to the connected component as properties. In our example, we return an object with a number attribute having the current state (which don’t forget that is just a number) as its value - that’s why we can extract the number attribute from this.props when rendering.
The mapDispatchToProps as we use it, once again returns an object whose attributes will be passed to the connected component and will dispatch actions when called.
Of course, in order for the ConnectedRootComponent to actually have these properties that we passed through connect, it must be enclosed in a <Provider> parent component (so that the correct react context will be initialized). Notice that this is recursive so if we had something
<Provider store={store}>
  <Component1>
    <Component2>
      <ConnectedComponent>
      </ConnectedComponent>
    </Component2>
  </Component1>
</Provider>
the <ConnectedComponent> would still get the props (dispatch + state slice) we mentioned above even if its parent components were not connected.
Although we could have avoided using react-redux by passing the store directly to <RootComponent> and subscibing to the store changes from the RootComponent‘s componentWillMount method, the added-value of react-redux is that using connect and Provider we could pass dispatch and state slices deep inside our component hierarchy without the need to explicitly pass the store to each individual component and also that react-redux will make optimizations so that the each connected component will be re-rendered only when needed (depending on the state slice it uses) and not for every state change. Please be warned that this does not mean that you should connect everything so that everything will have access to the global state and be able to dispatch actions. You should be very careful to connect only the components that really need to be connected (redux calls them container components) and pass dispatch and state as properties to their children (which are called presentational components). Also, each connected component should receive only the part of the global state it needs and not everything (so that each particular component will update only when needed and not for every state update). The above is absolutely necessary if you want to crate re-usable (DRY) and easily testable components. I’ll discuss this a little more when describing the sample project.
Finally, notice how easy it is to create reusable container components using mapStateToProps and mapDispatchToProps: Both the way the component gets its state and calls its actions are defined through these two objects so you can create as many connected objects as you want by passing different mapStateToProps and mapDispatchToProps - more on this later.
Our project
After this rather lengthy introduction to redux and react-redux we may move on to our project. First of all, let’s see an example of what we’ll actually build here:
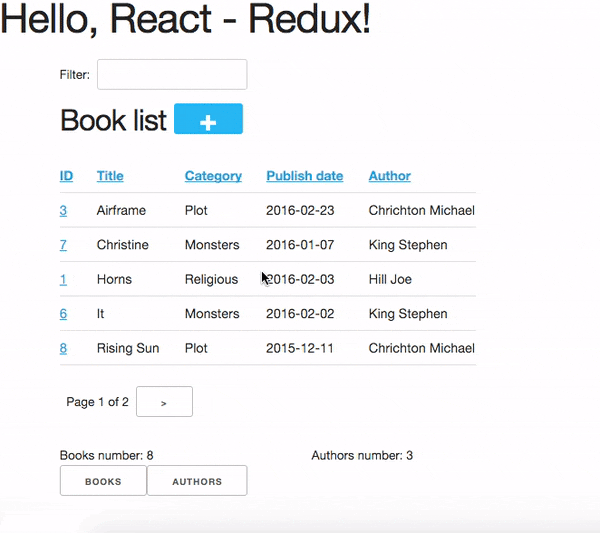
This is a single-page application that supports client side routing and has four different routes: A books list, an authors list, a book editing/create form and an author editing/create form. The books list supports searching (with the filter field), pagination (with 5 books per page) and per-column sorting when clicking the column name (ascending/descending). The book form supports validation (on the book title), cascading drop downs (changing category limits the subcategory choices) and a jquery ui datepicker to select the book publish date. Also, you can delete books or authors from their corresponding form. Notice that there’s a statistics panel showing the current number of authors and books. A nice loading spinner will be displayed when asynchronous ajax actions are executed and a snackbar notification will be shown when such an action is executed. Finally, although you won’t be able to see it, the url of the application is changed according to the choices the user makes.
Other libraries used
React (and redux) have a big ecosystem of great libraries. Some of these have been used for this project and will also be discussed in this article:
- redux-thunk: This is a nice add-on for redux that generalizes action creators.
- redux-form: A better way to use forms with react and redux. Always use it if you have non-trivial forms.
- react-router: A library to create routes for single page applications with React.
- react-router-redux (ex redux-simple-router): This library will help integrating react-router with redux.
- history: This is used bt react-router to crete the page history (so that back forward etc work).
- react-notification: A simple react component to display notifications.
The triplet react-router, react-router-redux and history needs to be used for projects that enable client side routing. The redux-form is really useful if you have non-trivial forms in your projects - you may skip it if you don’t use forms or for example you use a form for searching/filtering with a single input. react-notification just displays notifications, you can easily exchange it with other similar components or create your own.
redux-thunk?
Now, about redux-thunk. I won’t go into much detail here, you can read more about it in this great SO answer, however I’d like to point out here that everything that can be done with redux-thunk can also be done without it so you may safely skip it if you feel that you don’t really need it in your project.
But what does it do? Well, redux-thunk allows you to create action creators that don’t only return action objects but can do various other things, like calling other actions or dispatching actions conditionally. When using redux-thunk, an action returns a function that can do any of the above mentioned things, something like this:
const thunkAction = () => {
  return (dispatch, getState) => {
    // here you may
    // dispatch other actions (more than one) using the provided dispatch() parameter
    // or
    // check the current state using the getState() parameter and do conditional dispatches
    // or
    // call functions asynchronously so that these will use the provided
    // dispatch function when they return
  }
}
Let’s say that we wanted to implement an asynchronous, ajax call. If we don’t want to use redux thunk, then we need to create a normal function that gets dispatch as an argument, something like this:
import {showLoadingAction, hideLoadingAction, showDataAction } from './actions'

const getData = (dispatch) => {
  dispatch(showLoadingAction())
  $.get(data_url, data => {
      dispatch(hideLoadingAction())
      dispatch(showDataAction(data))
  })
}
The main problem with this approach is that the getData functions is not called like a normal action creator (like showLoadingAction, hideLoadingAction and showDataAction) since it actually returns nothing (so nothing will be dispatched), so you’ll need to remember to call it directly and pass it the dispatch instead of passing its return value to dispatch!
If however we used thunk, then we’d have something like this:
const getDataThunk = () => {
  return (dispatch, getState) => {
    dispatch(showLoadingAction())
    $.get(data_url, data => {
        dispatch(hideLoadingAction())
        dispatch(showDataAction(data))
    })
  }
}
Now, the above can be used like a normal action (i.e it can be called using dispatch(getDataThunk())). That’s more or less the main advantage of redux-thunk: You are able to create thunk action creators that can be called like normal actions and can do more complex things than just returning action objects so you don’t have to remember how to call each function.
I have to repeat again that everything that you be done with thunk action creators, can also be done with normal functions that get dispatch as a paremeter - the advantage of thunk action creators is that you don’t need to remember if an action creator needs to be called through disaptch(actionCreator()) or actionCreator(dispatch).
In this tutorial you’ll see heavy use of redux-thunk. This is just my personal preference - you may use it less or not at all (however, if you’ve configured your project to use redux-thunk then I propose to go all the way and use it all the time for those more complex action creators).
Explaining the application
In the following paragraphs we’ll see together the structure and source code of this application. I’ll try to go into as much detail as possible in order to solve any questions you may have (I know I had many when I tried setting up everything for the first time). I’ll skip imports and non-interesting components - after all the complete source code can be found @ https://github.com/spapas/react-tutorial/, checkout the tag react-redux. We’ll use a top down approach, starting from the main component where the client side routing is defined and the application is mounted to the DOM:
main.js
This module is used as an entry point for browserify (i.e we call browserify with browserify main.js -o bundle.js ) and uses components defined elsewhere to create the basic structure of our application. Let’s take a look at the important part of it:
const About = () => {
    return <div>
        <h2>About</h2>
        <Link to="/">Home</Link>
    </div>
}

render((
    <Provider store={store}>
        <Router history={history}>
            <Route path="/" component={App}>
                <IndexRoute component={BookPanel}/>
                <Route path="/book_create/" component={BookForm} />
                <Route path="/book_update/:id" component={BookForm} />

                <Route path="/authors/" component={AuthorPanel} />
                <Route path="/author_create/" component={AuthorForm} />
                <Route path="/author_update/:id" component={AuthorForm} />

                <Route path="/about" component={About}/>
                <Route path="*" component={NoMatch}/>
            </Route>
        </Router>
    </Provider>
  ), document.getElementById('content')
)
We can see the well-known render function from ReactDOM that gets a component and a DOM element to mount it to. The domponent we provide to render is the Provider from react-redux we talked about before in order to enable all children components to use connect to have access to the store properties and dispatch. This is the usual approact with react-redux: The outer component will always be the “Provider“.
The Provider component gets one parameter which is the store that redux will use. We have initialized our store in a different module which I will present below.
Inside the Provider we are defining a Router from react-router. This should be the parent component inside which all client-side routes of our appliccation are defined. The Router gets a history parameter which is initialized elsewhere (stick with me for now, I will talk about it later).
Now, inside Router we are defining the actual routes of this application. As we can see, there’s a parent Route that is connnected to the App component which actually contains everything else. The parent route contains an IndexRoute whose corresponding component (BookPanel) is called when no route is defined and a bunch of normal Route components whose components are called when the url matches their part. Notice how we pass parameters to urls (e.g /book_update/:id) and the match-all route (<Route path="*" component={NoMatch}/>).
Finally as an example of a routed-to component, notice the About component which is rendered when the route is /about. This is just a normal react component that- will be rendered inside the App component - the Link is a react-router component that renders a link to a defined route.
store.js
The store.js module contains the definition of the global store of our application (which is passed to the Provider). Here, we also define the history object we passed to the parent Router.
import { reducer as formReducer } from 'redux-form';

import createHistory from 'history/lib/createHashHistory'

// Opt-out of persistent state, not recommended.
// https://github.com/reactjs/history/blob/master/docs/HashHistoryCaveats.md
export const history = createHistory({
    queryKey: false
});
First of all, we see that our history object is of type HashHistory (more info about history types) and I’ve also opted out of using queryKey. If I hadn’t used the queryKey: false configuration then there’d be a ?_k=ckuvup query parameter in the URL. Now, this parameter is actually useful (it stores location state not present in the URL for example POST form data) but I don’t need it for this example (and generally I prefer cleaner URLS) - but if you don’t like the behavior of your history without it then go ahead and add it.
Also, notice that I’ve used HashHistory which will append a # to the URL and the client-side URL will come after that, so all URLs will be under (for example) /index.html like /index.html#/authors. The react-router documentation recommends using BrowserHistory which uses normal (clean) urls — so instead of /index.html#/authors we’d see /authors if we’d used BrowserHistory.
The problem with BrowserHistory is that you’ll need to configure correctly your HTTP server so that it will translate every URL (/foo) to the same URL under /index.html (/index.html#/foo) - as can be understood, without that configuration the HTTP server doesn’t know anything about the client side urls so when the webserver sees /authors it will pass /authors to your server side framework (which will return a 404 error) - that’s why this translation is needed.
However, in my case, I don’t think that configuring your HTTP server to rewrite urls is worth the trouble and also I do really prefer using # for client-side urls! This is a common patter, recognised by everybody and even without the HTTP server-configuration part I’d still prefer HashHistory over BrowserHistory - of course this is just my opinion, feel free to use BrowserHistory if you don’t like the hash #!
The next block of code from the store module creates the most important thing of a redux application, its reducer along with the global store:
const reducer = combineReducers(Object.assign({}, {
        books,
        notification,
        ui,
        categories,
        authors,
    }, {
        routing: routeReducer
    }, {
        form: formReducer
    })
)

const reduxRouterMiddleware = syncHistory(history)

const store = createStore(reducer, applyMiddleware(
    thunk, reduxRouterMiddleware
));

export default store
Please notice above that the Object.assign method is used - I’ll talk about it later — however, another common ES6 idiom that I’ve used here is that when you define an object you can change { x: x } to { x } (so {books} means {'books': books}).
The combineReducers function is provided by redux and is a helper function that helps you in … combining reducers! As you see, I’ve combined the reducers defined in this application (books, notification, ui, categories, authors) with the reducers of react-router-redux and redux-form to create the reducer. We’ll talk a bit in the next interlude on what does combining reducers is.
The routeReducer and formReducer reducers are provided by react-router-redux and refux-form to properly handle the routing and form-related actions.
The remaining of the code generates the store: First of all, a middleware (please see next-next interlude for more) is created with syncHistory that allows actions to call history methods (so that when the URL is changed through actions they will be reflected to the history). Then, the createStoreWithMiddleware function is called to generate the store that will be passed to the Provider. This function takes the reducer as a parameter along with any store enchancers that we’d like to apply. A store enchancer is a function that modifies the store. The only store enchanccer that we use now is the output of the applyMiddleware function that combines the two middlewares we’ve defined (one is for redux thunk, the other is for syncHistory). I know, your head hurts but I’ll try to clear things out below.
Interlude: Combining reducers
So, what does the combineReducers function do? As we’ve already seen, the reducer is a simple function that gets the current state and an action as parameters and returns the next state (which is the result of applying the action to the state). The reducer will have a big switch statement that checks the type of the action and returns the correct new state. Unfortunately, this switch statement may get way too fat and unmaintainable for large projects.
That’s where combining reducers comes to the rescue: Instead of having one big, monolithic reducer for all the parts of our application state tree, we can break it to individual reducers depending only on specific slices of the state object. What this means is that if we have for example a state tree like this:
{
  'data': {},
  'ui': {}
}
with actions that manipulate either data or ui, we could create two indivdual reducers, one for the data slice, and one for the ui slice of the state tree. These reducers would get only the slice of the state that they are interested in, so the dataReducer will get only the data part of the state tree and the uiReducer will get only the ui part of the state tree.
To combine these reducers the combineReducers function is used. This function gets an object with the name of the state part for each sub-reducer as attribute names and that sub-reducer as values and returns a reducer function that passes the action along with the correct state slice to each of the sub-reducers and creates the global state object by combining the output of each sub-reducer.
This may be clarified more with our own version of a combine reducers function:
const combineReducers2 = o => {
  return (state={}, action) => {
      const mapped = Object.keys(o).map(k => (
          {
              key: k,
              slice: o[k](state[k], action) // call k sub-reducer and get result
          }
      ))
      const reduced = mapped.reduce((s, x)=>{
          s[x['key']]=x['slice']
          return s
      }, {})

      return reduced;
  }
}
The above function gets an object (o) with state slices and sub-reducers as input and returns a function (that function is the resulting reducer) that:
- Creates an array (named mapped) of objects with two attributes: key for each attribute of o and slice after applying the sub-reducer to the corresponding state slice
- Reduces and returns the above array (reduced) to a single object that has attributes for each state slice and the resulting state slice as values (this is actually the global state)
To show-off the ES6 code (and my most sadistic tendencies), the above code could be also writen like this:
const combineReducers3 = o => (state={}, action) => Object.keys(o).map(k => [
    k, o[k](state[k], action)
]).reduce((s, x) => Object.assign(s, {
    [x[0]]: x[1]
}), {})
I wouldn’t like to explain this - its more or less a more functional version of combineReducers2.
Interlude: Middlewares
A redux middleware is rather difficult to explain technically but easier to explain conceptually: What it does it that it can be used to extend the store’s dispatch by providing extra functionality. We’ve already seen such functionality, the ability to use thunk action creators (for action creators that don’t return the next state object).
If you take a look at the createStore function, you’ll see that its second parameter is called enhancer. When enhancer is a function (like in our case where it is the result of applyMiddleware) the return value of createStore is enhancer(createStore(...)) so it will call the result of applyMiddleware with the store as parameter.
Now, what does applyMiddleware? It gets a variable number of functions (using the spread ... operator) as input arguments (let’s call them middlewares) and returns another function (this is the enhancer we mentioned in the previous paragraph) that gets a store as an input and returns the same store with its dispatch method modified so that it will call each middleware and pass the result to the next. So, in our case the resulting store’s dispatch function would be something like:
(action) => reduxRouterMiddleware(thunk(dispatch(action)))
Now, a middleware function looks like this:
const middleware = store => next => action => {
  //
}
it returns a function that gets the store as input and returns another function. This returned function gets next as an input. What is next? It’s just the next dispatch function to be called. So the first middleware will have the original store’s dispatch as its next parameter, the second middleware will have the result of passing the store’s dispatch from the first middleware, etc. Something like this: middleware2Dispatch(next=middleware1Dispatch(next=storeDispatch)).
Another explanation of the above is that a middleware:
- is a function (that gets a store to enhance as input) that returns
- another function (that gets the next dispatcher to be called as input) that returns
- another function (that gets an action as input) which is
- the dispatcher modified by this middleware
Let’s take a look at the thunk middleware to actually see what it looks like:
function thunkMiddleware({ dispatch, getState }) {
  return next => action =>
    typeof action === 'function' ?
      action(dispatch, getState) :
      next(action);
}
So, it gets the store (dispatch and getState are store attributes) as an input and returns a function that gets next (i.e the next dispatcher to be called) as input. This function returns another function (the modified dispatch). Since this function is a dispatcher, it will get an action as an input and if that action is a function it calls this function passing it dispatch (remember how we said if we didn’t want to use thunk then we’d just create normal functions to which we’d pass the dispatch as a parameter - that’s what it does here!). If this action is not a function (so it is a normal object) it just returns dispatch(action) to dispatch it.
Finally, we’ll create a simple middleware that will output the action type and the state for every dispatch:
const logStateMiddleware = ({dispatch, getState}) => next => action => {
  // log the action type
  console.log(action.type, getState())
  // now we must call next(action) to propagate and finally dispatch the action object
  next(action)
}
just put it in the applyMiddleware parameter list and observe all state changes!
reducers.js
This module contains the definition for our own defined sub-reducers that we combined in the previous paragraph (books, notification, ui, categories, authors) to create the global reducer of the application. I’ve put everything in a single file, however it is more common to create a reducers directory and put every sub-reducer inside it as a different module. Let’s start reviewing the code of the reducers.js module:
export const notification = (state={}, action) => {
    switch (action.type) {
        case 'SHOW_NOTIFICATION':
            let { notification_type, message } = action
            return Object.assign({}, state, {
                message,
                notification_type,
            })
        case 'CLEAR_NOTIFICATION':
            return {}
    }
    return state;
}


export const ui = (state={}, action) => {
    switch (action.type) {
        case 'IS_LOADING':
            return Object.assign({}, state, {
                isLoading: action.isLoading
            });
            break;
        case 'IS_SUBMITTING':
            return Object.assign({}, state, {
                isSubmitting: action.isSubmitting
            });
            break;
    }
    return state;
}
The notification and ui are two sub-reducers that control the state of the notification popup and if the application is loading / is submitting. I won’t go into much detail about them, they are really simple. However, notice that they both create a new state object for each of their actions. To achieve this, the Object.assign() method is used. This method is defined like this: Object.assign(target, ...sources). Its first parameter is an object (a new, empty object) while the rest parameters (sources) are other objects whose properties will be assigned target. The rightmost members of sources overwrite the previous ones if they have the same names. So, for example the code
Object.assign({}, state, {
    rows: action.books.results,
    count: action.books.count,
});
creates a new object which will have all the properties of the current state with the exception of the rows and count attributes which will get their values from the action. This is a common idiom in redux and you are going to see it all the time so please make sure that you grok it before continuing. Also, notice that the new state is a new, empty object in which all the attributes of the new state are copied - this is because the old state cannot be mutated.
Now we’ll see the reducer that handles books. Before understanding the actual reducer, I will present the initial value of the books state slice:
//http://stackoverflow.com/a/5158301/119071
function getParameterByName(name) {
    var match = RegExp('[?&]' + name + '=([^&]*)').exec(window.location.hash);
    return match && decodeURIComponent(match[1].replace(/\+/g, ' '));
}

const BOOKS_INITIAL = {
    rows: [],
    count: 0,
    page: 1,
    sorting: getParameterByName('sorting'),
    search: getParameterByName('search'),
    book: {},
}
As we see, the BOOK_INITIAL constant is used to setup an initial state for the books slice of the global state. The BOOKS_INITIAL attributs are:
- rows: The rows of the book table
- count: The number of rows that are displayed
- page: The current page we are on
- sorting: User-defined sorting
- search: User-search / filtering
- book: The data of the book to be edited/displayed
The BOOK_INITIAL constant gets the sorting and the search initial values from the URL to allow these parameters to be initialized from the URL (so that using a url like #?search=foo will show all books containing foo). To get the parameters from the URL I’m using the getParameterByName function. Now, the actual reducer is:
export const books = (state=BOOKS_INITIAL, action) => {
    let idx = 0;
    switch (action.type) {
        case 'SHOW_BOOKS':
            return Object.assign({}, state, {
                rows: action.books.results,
                count: action.books.count,
            });
            break;
        case 'SHOW_BOOK':
            return Object.assign({}, state, {
                book: action.book
            });
            break;
        case 'CHANGE_PAGE':
            return Object.assign({}, state, {
                page: action.page
            });
            break;
        case 'TOGGLE_SORTING':
            return Object.assign({}, state, {
                sorting: (state.sorting==action.sorting)?('-'+action.sorting):action.sorting
            });
            break;
        case 'CHANGE_SEARCH':
            return Object.assign({}, state, {
                search: action.search
            });
            break;
        case 'ADD_BOOK':
            return Object.assign({}, state, {
                book: action.book,
                count: state.count+1,
                rows: [
                    ...state.rows,
                    action.book,
                ]
            });
        case 'UPDATE_BOOK':
            idx = state.rows.findIndex( r => r.id === action.book.id)
            if(idx==-1) {
                return Object.assign({}, state, {
                    book: action.book
                });
            } else {
                return Object.assign({}, state, {
                    book: action.book,
                    rows: [
                        ...state.rows.slice(0, idx),
                        action.book,
                        ...state.rows.slice(idx+1),
                    ]
                });
            }
            break;
        case 'DELETE_BOOK':
            idx = state.rows.findIndex( r => r.id == action.id)
            if(idx==-1) {
                return Object.assign({}, state, {
                    book: undefined
                });
            } else {
                return Object.assign({}, state, {
                    book: undefined,
                    count: state.count-1,
                    rows: [
                        ...state.rows.slice(0, idx),
                        ...state.rows.slice(idx+1),
                    ]
                });
            }
            break;
    }
    return state;
}
The books subreducer handles the SHOW_BOOKS, SHOW_BOOK, CHANGE_PAGE, TOGGLE_SORTING and CHANGE_SEARCH actions by retrieving the paramaters of these actions and returning a new books-state-slice object with the correct parameters using Object.assign.
The ADD_BOOK action is a little more complicated: This action will be dispached when a new book is added with the data of that new book as a parameter (action.book). In order to make everything easier, I just append the new book to the end of the books that are displayed on the current page and increase the count number (I also set the new book to be the book attribute of the state). This means that the newly created book will not go to its correct place (based on the ordering) and that the visible items will be more than the ajax page coun (also notice that if you add another book then the visible items will also be increased by one more). This is not a problem (for me) since if the user changes page or does a search everything will fall back to its place. However, if you don’t like it there are two solutions, one easier and one more difficult:
- Easier solution: When adding a book just invalidate (make undefined) the books state attribute. This will result in an ajax call to reload the books and everything will be in place. However the user may not see the newly added book if it does not fall to the currently selected page (and there’d be an extra, unnecessary ajax call)
- Harder solution: Depending on the sorting you may check if the current books should be displayed or not on the current page and push it to its correct place (and remove the last item of rows so that count is not increased). Once again, the newly book may no be displayed at all if it does not belong to the visible page
The UPDATE_BOOK and DELETE_BOOK actions are even more complex. I’ll only explain update, delete is more or less the same (with the difference that update has the updated book as an action parameter while delete has only its id as an acton parameter): First of all we check if the updated book is currently displayed (if one of the books of rows has the same id as the updated book). If the book is not displayed then only the current edited book is set to the new state. However, if it is displayed then it would need to be updated because the rows array does not know anything about the updated values of the book!
So, inside the else branch, the idx variable will hold its current index and the rows attribute of the new state will get the following value:
[
    ...state.rows.slice(0, idx),
    action.book,
    ...state.rows.slice(idx+1),
]
The ... spread operator expands an array so, for example [ ...[1,2,3] ] would be like [1,2,3] and the slice method gets two parameters and returns a copy of the array elements between them. Using this knowledge, we can understand that the above code returns an array ([]) that contains the books of rows from the first to the updated one (not including the updated one), the updated book object (which we get from action) and the rest of the books of rows (after the updated one).
The code for the authors and categories sub-reducers does not have any surprises so I won’t go into detail about it.
const AUTHORS_INITIAL = {
    // ...
}
export const authors = (state=AUTHORS_INITIAL, action) => {
    // ...
}

const CATEGORIES_INITIAL = {
    // ...
}

export const categories = (state=CATEGORIES_INITIAL, action) => {
    // ...
}
The global state tree
Remember that all the above are sub-reducers, each one taking only a slice of the global state tree. They are all combined, along with the routing and form reducers to create the global reducer function.
This also means, that the global state object will be something like this:
{
  books: {},
  notification: {},
  ui: {},
  categories: {},
  authors: {},
  routing: {},
  form: {},
}
We won’t see this object anywhere because each sub-reducer will get its corresponding slice of that object.
actions.js
The actions.js module should probably have been named action_creators.js since it actually contains redux action creators. Also, a common practice is create a folder named actions and put there individual modules that contain action creators for the sub-reducers (in our case, for example there would be books.js, authors.s etc).
In any case, for simplicity I chose to just use a module named actions.js and put everything there. One important thing to keep in mind is that actions.js contains both normal action creators (i.e functions that return actions and should be “dispatched”) and thunk action creators (i.e functions that not necessarily return actions but can be “dispatcher”) - please see the discussion about redux-thunk on a previous paragraph.
First of all, there’s a bunch of some simple action creators that just return the corresponding action object with the correct parameters. Notice that the action creators that end in *Result are called when an (async) ajax request returns, for example showBooksResult will be called when the book loading has returned and pass its result data to the reducer. The other action creators change various parts of the state object, for example loadingChanged will create an action that when dispatched it will set ui.isLoading attribute to the action parameter.
showBooksResult(books) for "SHOW_BOOKS",
showBookResult(book) for "SHOW_BOOK",
addBookResult(book) for "ADD_BOOK",
updateBookResult(book) for "UPDATE_BOOK",
deleteBookResult(id) for "DELETE_BOOK",

showAuthorsResult(authors) for "SHOW_AUTHORS",
showAuthorResult(author) for "SHOW_AUTHOR",
addAuthorResult(author) for "ADD_AUTHOR",
updateAuthorResult(author) for "UPDATE_AUTHOR",
deleteAuthorResult(id) "DELETE_AUTHOR",

showCategoriesResult(categories) for "SHOW_CATEGORIES",
showSubCategoriesResult(subcategories) for "SHOW_SUBCATEGORIES",
loadingChanged(isLoading) for "IS_LOADING",
submittingChanged(isSubmitting) for "IS_SUBMITTING",
toggleSorting(sorting) for "TOGGLE_SORTING",
changePage(page) for "CHANGE_PAGE",
changeSearch(search) for 'CHANGE_SEARCH',
showSuccessNotification(message) for 'SHOW_NOTIFICATION' (type: success),
showErrorNotification(message) for 'SHOW_NOTIFICATION', (type: error)
hideNotification() for 'CLEAR_NOTIFICATION'
The following two are thunk action creators that are called when either the user sorting or the search/filtering parameters of the displayed books are changed:
export function changeSearchAndLoadBooks(search) {
    return (dispatch, getState) => {
        dispatch(changeSearch(search))
        history.push( {
            search: formatUrl(getState().books)
        } )
        dispatch(loadBooks())
    }
}

export function toggleSortingAndLoadBooks(sorting) {
    return (dispatch, getState) => {
        dispatch(toggleSorting(sorting))
        history.push( {
            search: formatUrl(getState().books)
        } )
        dispatch(loadBooks())
    }
}
Notice that these are thunk action creators (they return a function) and the important thing that they do is that they call two other action creators (toggleSorting or changeSearch and loadBooks) and update the URL using history.push. The history object is the one we had created in the store.js and its push method changes the displayed URL. This method uses a location descriptor that contains an attribute for the path name and an attribute for the query parameters - in or case we just want to update the query parameters (i.e #/url/?search=query1&sorting=query2), so we pass an obect with only the search attribute. The formatUrl function, to which the books state slice is passsed, is a rather simple function that checks if either the sorting or the search should exist in th URL and returns the full URL. This function is contained in the util/formatters.s module.
The following thunk action creators are used for asynchronous, ajax queries:
export function loadBooks(page=1) {
    return (dispatch, getState) => {
        let state = getState();
        let { page, sorting, search } = state.books
        let url = `//127.0.0.1:8000/api/books/?format=json&page=${page}`;
        if(sorting) {
            url+=`&ordering=${sorting}`
        }
        if(search) {
            url+=`&search=${search}`
        }
        dispatch(loadingChanged(true));
        $.get(url, data => {
            setTimeout(() => {
                dispatch(showBooksResult(data));
                dispatch(loadingChanged(false));
            }, 1000);
        });
    }
}


export function loadBookAction(id) {
    return (dispatch, getState) => {
        let url = `//127.0.0.1:8000/api/books/${id}/?format=json`;
        dispatch(loadingChanged(true));
        $.get(url, function(data) {
            dispatch(showBookResult(data));
            dispatch(loadingChanged(false));
            dispatch(loadSubCategories(data.category));
        });
    }
}

export function loadAuthors(page=1) {
    // similar to loadBooks
}


export function loadAuthor(id) {
    // similar to loadBook
}

export function loadCategories() {
    // similar to loadBooks
}

export function loadSubCategories(category) {
    return (dispatch, getState) => {

        if(!category) {
            dispatch(showSubCategoriesResult([]));
            return
        }
        let url = `//127.0.0.1:8000/api/subcategories/?format=json&category=${category}`;

        $.get(url, data => {
            dispatch(showSubCategoriesResult(data));
        });
    }
}
The loadBooks thunk action creator creates the URL parameters that should be passed to the REST API using the getState() method that returns the current state. It then dispatches the loadingChanged action so that the ui.isLoading will be changed to true. After that it asynchronously calls the load books REST API passing it the created url and returns. Since this is a thunk action there’s no problem that nothing is returned. When the ajax call returns it will dispatch the showBooksResult, passing the book data to change the state with the loaded book data and the loadingChanged to hide the loading spinner. Also, please notice that I’ve put the return of the ajax call inside a setTimeout to emulate a 1 second delay and be able to see the loading spinner.
I may have used setTimeout in some other places to make sure to be able to emulate server-side delays so please don’t forget to remove these “setTimeout“s from your code!
The loadBook is more or less the same - however here only a single book’s data will be loaded. When this book is loaded the loadSubCategories action will also be dispatched, passing it the loaded book’s category (so that the correct subcategories based on the category will be displayed to the form).
I won’t go into any detail about the other thunk action creators, they are simpler than those we’ve already described, except loadSubCategories: This one, checks if there’s a category and if not it will just set the displayed subcategories to and empty list (by dispatching showSubCategoriesResult([])). If the category is not empty, it will retrieve asynchronously the subcategories of the passed category.
components/app.js
We’ll now start explaining the actual react components (modified to be used through redux of course). The parent of all other components is the App which, as we’ve already seen in main.js is connected with the parent route:
class App extends React.Component {

    render() {
        const { isLoading } = this.props.ui;
        return <div>

            {this.props.children}

            <NotificationContainer />
            <LoadingContainer isLoading={isLoading} />

            <br />

            <StatPanel bookLength={this.props.books.count} authorLength={this.props.authors.rows.length} />
            <Link className='button' to="/">Books</Link>
            <Link className='button' to="/authors/">Authors</Link>

        </div>
    }

    componentDidMount() {
        let { loadBooks, loadAuthors } = this.props;

        if(this.props.books.rows.length==0) {
            loadBooks();
        }
        if(this.props.authors.rows.length==0) {
            loadAuthors();
        }
    }
}

const mapStateToProps = state => ({
    books:state.books,
    authors:state.authors,
    ui:state.ui,
})

const mapDispatchToProps = dispatch => bindActionCreators({
    loadBooks, loadAuthors
}, dispatch)

export default connect(mapStateToProps, mapDispatchToProps)(App);
As we can see, there’s an internal component (named App) but we export the connect``ed component. One interesting thing to notice is that ``App is an ES6 class based react component (i.e it extends React.Component — I’ll talk a bit about these components while taking a look at the BookSearchPanel which has some more interesting features).
Concerning the exported, connected component, it uses mapStateToProps for defining the state attributes that should be passed as properties to the componnt (state.{books, authors, ui}) and mapDispatchToProps for defining the props methods that will dispatch actions. To make mapDispatchToProps more compact I’ve used the bindActionCreators method from redux. This method gets an object whose values are action creators and the dispatch (from store) and returns an object whose values are the dispatch-enabled corresponding action creators. So, in our case the returned object would be something like:
{
    loadBooks: () => dispatch(loadBooks()),
    loadAuthors: () => dispatch(loadAuthors()),
}
This object of course could be created by hand, however bindActionCreators would be really useful if we wanted to dispatch lots of actions in a component (or if we had seperated our action creators to different modules) — we could for example do something like this:
import * as actions from '../actions'

const mapDispatchToProps = dispatch => bindActionCreators(actions, dispatch)
The import * statemenet will create an object named item that will have all the exported actions and then bindActionCreators will return an object that dispatches these actions — passing this mapDispatchToProps to connect will allow your component to call every action and automatically dispatch it.
The internal component returns a <div /> containing, among others {this.props.children} - this will be provided by rendering the child routes. It also renders a NotificationContainer to render the notifications, a LoadingContainer to display a css “loading” spinner and a StatPanel to display some stats about books and authors. It also renders two Links one for the books table and one for the authors table.
Beyond these, when the component is mounted it checks if the authors and books have been loaded and if not, it dispatches the loadBooks and loadAuthors actions (remember, because we used mapDispatchToProps by calling these methods from props they’ll be automatically dspatched when called).
Let’s take a quick look at the three small components that are contained in App
components/notification.js
This component is responsible for displaying a notification if there’s an active one. It also defines an internal component and exports a connected version of it, passing it the notification slice of the state tree and an onHide method that dispatches the hidNotification action.
When the internal component is rendered, it checks to see if the notification should be displayed (isActive will be true if there’s an actual message) and select the color of the background. Finally, it passes this information along with some styling to the real Notification component from react-notification.
const NotificationContainer = (props) => {
    let { message, notification_type } = props.notification;
    let { onHide } = props;
    let isActive = message?true:false;
    let color;

    switch(notification_type) {
        case 'SUCCESS':
            color = colors.success
            break;
        case 'ERROR':
            color = colors.danger
            break;
        case 'INFO':
            color = colors.info
            break;
    }

    return <Notification
        isActive={isActive}
        message={message?message:''}
        dismissAfter={5000}
        onDismiss={ ()=>onHide() }
        action='X'
        onClick={ ()=>onHide() }
        style={{
            bar: {
                background: color,
                color: 'black',
                fontSize: '2rem',
            },
            active: {
                left: '3rem',
            },
            action: {
                color: '#FFCCBC',
                fontSize: '3rem',
                border: '1 pt solid black'
            }
        }}
    />
}

let mapStateToProps = state => ({
    notification: state.notification
})

let mapDispatchToProps = dispatch => ({
    onHide: () => {
        dispatch(hideNotification())
    }
})

export default connect(mapStateToProps, mapDispatchToProps)(NotificationContainer);
Notice the style={{ .. }} snippet above: The external {} are the Javascript code inclusion tags of JSX while the internal {} are for creating a normal javascript object that defines the styling of the notification.
Creating a re-usable notification
Please notice that although I’ve implemented this as a connected component this is not the only way to do it! Actually, probably my implementation is less-reusable from the others I will propose…
In any case, instead of implementing NotificationContainer as a connected component we could have implemented it as a normal, non connected component that would receive two properties from its parent: the notification slice of state and an onHide function that would dispatch hideNotification. Doing this would be very easy, just change App so that its mapDispatchToProps would also return the notification slice of the state - and pass this slice as a property to the NotificationContainer. Also, the onHide method should have been also defined in the mapDispatchToProps of App and passed as a property to NotificationContainer. Notice that this makes NotificationContainer a reusable component since we could pass anything we wanted as the notification object and onHide method.
Also, if we needed to implement NotificationContainer as a connected object but we still needed it to be reusable we’d then export the non-connected NotificationContainer and create a bunch of ConnectedNotificationContainer that would define mapStateToProps and mapDispatchToProps and export the connected component. This way, each ConnecteNotificationContainer would receive a different state slice and a different onHide method, for example we may had different notifications for books and different notifications for authors. Notice that this approach, i.e create a reusable non-connected component and use it to create connected components by defining their mapStateToProps and mapDispatchToProps is the approach proposed by react-redux to create components.
Finally, one last comment on this approach that may clarify more the purpose of mapStateToProps and mapDispatchToProps of connected components is that these two functions are dual (mirror):
- Using mapStateToProps we define which parts of the state will actually be passed to the component (= reading the state).
- Using mapDispatchToProps we define the actions which will be dispatched by the component (= changing/writing the state)
components/loading.js
This is a really simple component: If the isLoading parameter is true, display a div with the loading class:
export default ({isLoading}) => <div>
{isLoading?<div className="loading">Loading…</div>:null}
</div>
The important thing here is what the loading class does to display the spinner - I’m leaving it to you to check it at static/cssloader.css (this is not my css code - I’ve copied it from http://codepen.io/MattIn4D/pen/LiKFC ).
Also, please notice that in this module we just export a function, taking an object which has an isLoading attribute as a parameter. That’s a functional react component: A function that gets a params object as an input and implements the render method, returning a component.
Using functional components is recommended for reasons that are far too obvious (easy to test - just call the function, idemponent - no state to keep track of, less code to write, easier to the eye, functional ) - you should use class based components only when absolutely necessary (i.e when the component needs to keep some local state or when it needs to do stuff on componentWillMount).
components/StatPanel.js
Another very simple functional component - just display the number of books and authors from the passed parameter.
components/BookPanel.js
Continuing our top-down approach on exploring the project, we’ll now talk about the BookPanel component which is displayed by the IndexRoute. Before talking about the actual component, I’d like to present the getCols function that is used to create an array of the columns that will be displayed by the Table we render in this panel.
As we can see, the getCols gets one parameter which is the sort method — this method gets a string and uses it to toggle sorting by this string. We use a function to create the columns instead of a constant because that sort_function needs to dispatch an action — dispatch is available from the props that the functional BookPanel component receives so the function will be called from inside that functional component.
Each column, has up to four parameters:
- A key which is the attribute of the row object to display
- A title which is the column title
- A format (optional) which may be used to display the value of that column and
- A sorting (optional) which is a function that will be called when the column title is clicked (so that the sorting is changed ) - this attribute is created using the sort_method
We’ll see how these attributes are used by the Table in the corresponding section. Five columns have been defined: id (which, when clicked will update the book that’s where format is used), title, category_name, publish_date and author_name:
const getCols = sort_method => [
    {
        key: 'id',
        label: 'ID',
        format: x=><Link to={`/book_update/${x.id}/`}>{x.id}</Link>,
        sorting: sort_method('id')
    },
    {key: 'title', label: 'Title', sorting: sort_method('title')},
    {key: 'category_name', label: 'Category', sorting: sort_method('subcategory__name')},
    {key: 'publish_date', label: 'Publish date', sorting: sort_method('publish_date')},
    {key: 'author_name', label: 'Author', sorting: sort_method('author__last_name')},
]
The actual (exported) BookPanel is a connected component - we need to use connect because we can’t actually pass properties or dispatch to this component since it is rendered through a route (and not as a child of another component), so it must be connected to the store through connect to be able to receive state attributes and dispatch. We pass the books state slice as a property using mapStateToProps and use the same techique as before in App with bindActionCreators to create auto-dispatchable actions.
As we can see, after retrieving the needed properties from the books state slice and the actions to dispatch, we define an onSearchChanged function that will be passed to the BookSearchPanel to be called when the search query is changed.
Next, the sort_method is defined. This is a function that gets a key parameter and returns another function that dispatches toggleSortingAndLoadBooks passing it that key. This is the parameter that is passed to getCols. So, for example for the id, the result of the sort_method would be the following function: () => toggleSortingAndLoadBooks('id').
Finally, the BookPanel renders the following:
- A BookSearchPanel passing it the search property and the onSearchChanged action
- A Link to create a new book
- A Table passing it the sorting and rows parameters and the cols constant we just defined
- A PagingPanel passing it the total number of books (count), the current page (page) and two methods onNextPage and onPreviousPage that will be called when switch to the next or previous page.
As we can see, the onNextPage and onPreviousPage functions dispach the changePage action passing it the page to change to and reload the books by dispatch loadBooks. Instead of this we could create a changePageAndLoadBooks thunk action creator that would call these two methods when dispatched (similarly to how changeSearchAndLoadBooks and toggleSortingAndLoadBooks have been implemented) - I’m leaving it like this to show all possibilities:
const BookPanel = (props) => {
    const { rows, count, page, sorting, search } = props.books;
    const { loadBooks, changePage, toggleSortingAndLoadBooks, changeSearchAndLoadBooks  } = props;

    const onSearchChanged = query => changeSearchAndLoadBooks(query)
    const sort_method = key => () => toggleSortingAndLoadBooks(key)
    const cols = getCols(sort_method)

    return <div>
        <BookSearchPanel search={search} onSearchChanged={onSearchChanged} />
        <div className="row">
            <div className="twelve columns">
                <h3>Book list <Link className='button button-primary' style={{fontSize:'1em'}} to="/book_create/">+</Link></h3>
                <Table sorting={sorting} cols={cols} rows={rows} />
            </div>
        </div>
        <PagingPanel count={count} page={page} onNextPage={() => {
            changePage(page+1);
            loadBooks()
        }} onPreviousPage={ () => {
            changePage(page-1);
            loadBooks()
        }} />
    </div>
}

const mapStateToProps = state => ({
    books:state.books,
})

const mapDispatchToProps = dispatch => bindActionCreators({
    loadBooks, changePage, toggleSortingAndLoadBooks, changeSearchAndLoadBooks
}, dispatch)

export default connect(mapStateToProps, mapDispatchToProps)(BookPanel);
components/BookSearchPanel.js
The BookSearchPanel is a component used for searching books. What is interesting about this component is that it has internal state (i.e state that is not reflected to the global search tree). Notice that BookSearchPanel is an ES6 class component. Here are some of its characteristics as opposed to non-ES6 react components:
- It extends React.Component instead of using React.CreateClass
- It has a constructor that initializes the local state instead of implementing getInitialState
- It does not automatically bind the methods to this so we do it in the constructor (or else this would be undefined in onSearchChange and onClearSearch) - be very careful with that, its a common problem
So, what happens here? We render an HTML input element and call this.onSearchChange method. This method retrieves the current value of the input (using this.refs) and, if the previous change was more than 400 ms ago calls the provided (through props) onSearchChanged method that will dispatch the changeSearchAndLoadBooks action with the current value as a parameter (notice however that this.setState is always called immediately or else the user keypresses wouldn’t be reflected to the input).
The whole thing with the ths.promise and clearInterval is to make sure that the provided onSearchChanged will not be called too often (i.e it will be called 400 ms after the last keypress):
export default class SearchPanel extends React.Component {
constructor() {
super()
this.onSearchChange = this.onSearchChange.bind(this)
this.onClearSearch = this.onClearSearch.bind(this)
this.state = {}
}
render() {
return (
<div className="row">
<div className="one-fourth column">
Filter:
<input ref='search' name='search' type='text' defaultValue={this.props.search} value={this.state.search} onChange={this.onSearchChange } />
{(this.state.search||this.props.search)?<button onClick={this.onClearSearch} >x</button>:''}
</div>
</div>
)
}
onSearchChange() {
let query = ReactDOM.findDOMNode(this.refs.search).value;
if (this.promise) {
clearInterval(this.promise)
}
this.setState({
search: query
});
this.promise = setTimeout(() => this.props.onSearchChanged(query), 400);
}
onClearSearch() {
this.setState({
search: ''
});
this.props.onSearchChanged(undefined)
}
}
Let’s take a closer look at the <input> element:
<input ref='search' name='search' type='text' defaultValue={this.props.search} value={this.state.search} onChange={this.onSearchChange } />
The ref property is used to reference this element using ReactDOM.findDOMNode - that’s one possible way to retrieve the value of this object. Another way would be to add an event parameter to onSearchChange - this parameter would receive the DOM event of the change so the value of the element could be retrieved using event.target.value.
The difference between the defaultValue and value parameters is really important: The defaultValue is just the initial value of this specific input and it will be equal to props.search (so that if the user enters a URL which has a search query parameter this will be pre-filled here). On the other hand, the value parameter is the current value of the element and will be equal to the state.search. When the user types in the input, the onSearchChange will be called which will always change the state.search and the value will get the correct, new value (or else the change wouldn’t be reflected to the user)!
Finally concerning the clear search query button, when there’s a search query a x button will be displayed if there’s something to the input field which, when clicked the search local state will be cleared and the provided onSearchChanged will be called with an empty query.
components/Table.js
The Table is a reusable, functional react component that is used for both books and authors.
First of all, we define a formatHeader function that is used to format the table header: This function gets an object with key and label as parameters (which is the column to be formated) and a sorting parameter (which is the current table’s sorting) and returns the label with a '+' in front of it if the sorting is ascending by this column or a '-' if the sorting is descending by this column or just the label if this column is not used for sorting:
const formatHeader = ({key, label}, sorting) => (sorting==key)?('+'+label):(
    (sorting=='-'+key)?('-'+label):label
)
The Table uses the props we mentioned before when talking about BookPanel. When it is rendered, the headers of the table are constructed by applying a map method on the items of the cols attribute. Remember that map will apply a function to all items of a list and return a new list with the results. So this will create a list of correctly formatted <th> elements.
In our case, the mapper checks if each column has a sorting attribute and if yes it creates a clickable header that calls sorting when clicked and is formatted with formatHeader (remember sort_method we talked about in BookPanel). If there’s no sorting for that column it just displays the column header.
The rows of the table are created using two maps, one that maps the rows which, for each row maps cols to get the individual values for this row and column. So, for the rows a list of <tr> elements each one including the correct <td> elements will be created:
export default (props) => {
    const headers = props.cols.map(col => <th key={col.key}>
        {col.sorting?<a href='#' onClick={e => {
            e.preventDefault();
            col.sorting()
        }}>
            {formatHeader(col, props.sorting)}
        </a>:col.label
        }
    </th>)
    const rows = props.rows.map(row => <tr key={row.id}>
        {
            props.cols.map(col => <td key={col.key}>
                {(col.format?col.format(row):row[col.key])}
            </td>)
        }
    </tr>)

    return <table>
        <thead>
            <tr>
                {headers}
            </tr>
        </thead>
        <tbody>
            {rows}
        </tbody>
    </table>
}
The key property I am passing to all elements that belong to a list is to help React identify these child elements - we’d get a Warning: Each child in an array or iterator should have a unique "key" prop. error without this property.
Also, please notice that the const headers and rows we’ve defined are there just for clarity - we could instead put them directly inside the returned <table> and have a cool, totally functional function!
components/PagingPanel.js
Another functional and reusable component - this one has params with the attributes page, page_size, count, onNextPage, onPreviousPage and, after finding out the total number of pages it renders the current page number and the total pages number along with two buttons that will execute the onNextPage and onPreviousPage that are passed as properties (these methods will dispatch the changePage and loadBooks actions as we’ve already seen in BookPanel). One thing to notice here is that the next and previous page buttons will only be rendered if we are not in the first or last page (so if there’s only one page you won’t see any buttons).
export default ({page=1, page_size=5, count, onNextPage, onPreviousPage, ...props}) => {
const total_pages = Math.ceil(count / page_size);
return <div className="row">
{page==1?null:<button onClick={e => {
e.preventDefault();
onPreviousPage();
}}><</button>}
Page {page} of {total_pages}
{page==total_pages?null:<button onClick={e => {
e.preventDefault();
onNextPage();
}}>></button>}
</div>
}
The same paging panel could be used for any table we wanted to have paging: Just pass it the page number, page size, total number of items and what to do when next or previous page buttons are clicked.
Interlude: A more functional component
How could we make PagingPanel more functional (i.e how could we remove the const total_pages definition) ? The easy way would be to just substitute it with its definition inside the returned <div> however we’d need to substitute it two times so we’d loose our precious DRYness! So we’d need to think of another way.
People from the django world will be familiar with the with template tag. This tag is used in django templates to assign a complex value to a constant and use this value instead of the complex value. Something like this
{% with simple=a.complex|calculation %}
    In here I can just use {{ simple }} instead of {{ a.complex|calculation }}!
{% endwith %}
Having such a concept in ES6 would be ideal for our case! I am not sure if something like with actually exists, however we can really easy emulate it with a function closure, something like this:
export default ({page=1, page_size=5, count, onNextPage, onPreviousPage, ...props}) => (
total_pages => <div className="row">
{page==1?null:<button onClick={e => { /* ... */ }}><</button>}
Page {page} of {total_pages}
{page==total_pages?null:<button onClick={e => { /* ... */ }}>></button>}
</div>
)(Math.ceil(count / page_size))
We define a function that gets total_pages as a parameter and returns another function ( this one is the actual render method of the PagingPanel) and call the outer function passing it the value we want to give to total_pages. This way, the total_pages will have a value in the inner function! Thank you, function closure!!!
Now PagingPanel is also a completely functional function component!
components/BookForm
The last book-related component is BookForm. This component is used to both create and update a book. It also has a delete button for removing books. To decide if this is a create or an update form, it relies on the parameter passed from the route - remember how the two routes have been defined in main.js:
<Route path="/book_create/" component={BookForm} />
<Route path="/book_update/:id" component={BookForm} />
So, although create and update render the same component, their difference is that update will contain the id of the book to be updated in the url. This (along with any other url parameters) is passed by react-router as a property through an object named params to the BookForm component, so, when updating a book the props.params.id of BookForm should have a value.
The BookForm is a connected component (because it needs access to the state slice and dispatch and is rendered through a route), however because it is also a redux-form, a special method (reduxForm) is used to connect the component and pass the form-related props to the component:
const mapStateToProps = (state, props) => {
    let initial = {}
    const { book } = state.books

    if(props.params.id && book) {
        initial = book
    }

    return {
        book: state.books.book,
        categories: state.categories,
        authors: state.authors,
        ui: state.ui,
        initialValues: initial,
    }
};

export default reduxForm({
    form: 'bookForm',
    fields: ['title', 'category', 'subcategory', 'publish_date', 'author' ],
    validate
}, mapStateToProps)(BookForm);
The mapStateToProps contains a bunch of required things from the state (we need the current book that is edited, the categories to select from, the authors to also select from and the ui to find out if submitting has finished and render the buttons as enabled/disabled). Beyond these, we see that there’s an initialValues attribute to the object returned from mapStateToProps. This attribute is used to initialize the form fields. So if our form has fields named title and category, if the initial object had title and category attributes the form fields would be initialized by them. In our case, we just check if the props.params.id method is defined and the to-be-updated book has been loaded to the state and just assign the to-be-updated book to initialValues.
The reduxForm method is used to connect the form component: Beyond the usual mapStateToProps and mapDispatchToProps (we don’t actually use mapDispatchToProps here because I feel that just getting dispatch is more clear), it needs a required parameter which is the object used to initialize the redux-form form: This object should have
- A form attribute with the name of the form. This must be unique among all forms in your application and will be used as a parameter to the actions that redux-form will dispatch
- A fields string array with the names of the form fields. For each one of them a field will be passed to the props.fields array in the form component
- A optional validate attribute that is a function that will be called when the form fields are changed
The validate function gets an object with the field names with their corresponding values as attributes and should return another object with the field names that have an error and the error message. In our case, we want the title to be required and the date to be valid (if exists), so the validate is:
const validate = values => {
    const errors = {};
    if (!values.title) {
        errors.title = 'Required';
    }
    if(values.publish_date) {
        const re = /^\d{4}-\d{2}-\d{2}$/;
        if(!re.exec(values.publish_date)) {
            errors.publish_date = 'Invalid';
        }
    }
    return errors;
}
I just used a very simple regular expression to check the validity of the date (it must be in the format YYYY-MM-DD) - this is just to make a point, for normal date rendered you should use moment.js.
This validate function is called whenever a form field is changed so, depending on the implementation of course, the error messages will be shown and hidden as the user types in the fields. Please notice that when the user starts typing in a field in an empty form, this field may be valid but all other fields will be empty - to avoid displaying an error message for fields that the user has not been yet been able to modify, we can use the touched property of each field — only display the field’s error message if this field has been touched. When the form is submitted all fields are changed to touched so all error messages will be displayed.
The internal BookForm is an ES6 class based component that needs to do some things when the componentDidMount method is called:
- Check if the categories have been loaded - if not dispatch the loadCategories action
- Check if the this is an update and if yes, check to see if the to-be-updated book needs to be loaded and, if it needs dispatch loadBook with the book’s id
class BookForm extends React.Component {

    componentDidMount() {
        if(this.props.categories.categories.length==0) {
            this.props.dispatch(loadCategories());
        }

        if (this.props.params.id) {
            if(!this.props.book || this.props.book.id != this.props.params.id) {
                this.props.dispatch(loadBook(this.props.params.id));
            }
        } else {
            // New book
        }
    }

    render() {
        const {fields: {
            title, category, subcategory, publish_date, author
        }, handleSubmit, dispatch } = this.props;
        const { id } = this.props.params;
        const { isSubmitting } = this.props.ui;
        const { categories, subcategories } = this.props.categories;
        const authors = this.props.authors.rows;

        const tsubmit = submit.bind(undefined,id);
        const dsubmit = del.bind(undefined,id, dispatch);

        return <form onSubmit={handleSubmit(tsubmit)}>
            <div className='row'>
                <div className='six columns'>
                    <Input label='Title' field={title} />
                </div>
            </div>
            <div className='row'>
                <div className='six columns'>
                    <Select label='Category' field={category} options={categories} onChange={ event => {
                        category.onChange(event);
                        dispatch(loadSubCategories(event.target.value))
                    }}/>
                </div>
                <div className='six columns'>
                    <Select label='Subcategory' field={subcategory} options={subcategories} />
                </div>
            </div>
            <div className='row'>
                <div className='six columns'>
                    <DatePicker className="u-full-width" label='Publish Date' field={publish_date} />
                </div>
                <div className='six columns'>
                    <Select label='Author' field={author} options={
                        authors.map(a => ({'id': a.id, 'name': `${a.first_name} ${a.last_name}`}))
                    } />
                </div>
            </div>
            <button disabled={isSubmitting} className='button button-primary' onClick={handleSubmit(tsubmit)}>
                Save
            </button>
            {id?<button disabled={isSubmitting} type='button' className='button button-primary' style={{backgroundColor: danger}} onClick={dsubmit}>
                Delete
            </button>:null}
        </form>
    }
};
The render method of BookForm defines (for convenience) a bunch of constants which are attributes of props:
- The fields object contains the field attributes of the form which have been defined through the reduxForm function.
- The handleSubmit is also provided by reduxForm and is used to submit the form - I’ll explain it a bit later
- The dispatch is provided by connect (remember, reduxForm is a special connect). If you don’t use mapDispatchToProps then connect will provide dispatch to props to use it as you like
- The id is from the route - it will have value when updating and will be undefined when creating a new book
- The isSubmitting, categories, subcategories and authors are provided from the state attributes through mapStateToProps
- The tsubmit and dsubmit are used when the form is submitted or the Delete button is clicked. As we’ll see the tsubmit is passed as an argument to handleSubmit while the dsubmit` is used as it is.
Beyond fields and handleSubmit a reduxForm enabled form component has various other properties that you can use, like active, dirty, error, pristine etc. Each field provided from reduxForm also has a bunch of properties, like active, checked, dirty, error, onBlur, onChange, onFocus, pristine, touched, valid, value, visited. I won’t use most of these here however please make sure that you are familiar with these when using redux-form.
After defining the constants, the render method returns the actual component. Here we are using a bunch of child components we’ve defined to render the input fields, like Input, DatePicker and Select which will be explained later. For each one of these components we pass the corresponding field property along with the label we want to show. There are some interesting things in the parameters we pass to these input components:
All fields except category use their own onChange. For the category field we pass a custom onChange function that will override the field onChange in order to dispatch loadSubCategories when the category is changed (notice that in the custom onChange I actually call the category.onChange first and then use event.target.value to get the current value of the dropdown to pass it to the dispatched loadSubCategories).
The Select fields get an options parameter which should be an array with id/name objects. For authors we create that array on the fly using map (since an author object has a first_name and last_name).
The submit and delete buttons will be enabled or disabled depending on the isSubmitting flag, and will call handleClick(tsubmit) or dsubmit correspondingly. Also, the Delete button will be hidden if no id is provided.
The handleSubmit method provided by reduxForm will run the validate function passing it the values from the form (notice that this is synchronous validation, we could also do asynchronous - on the server- validation for example to immediately check if a username is already used), and if the validation does not return any errors, it will submit the form. Submitting the form means that handleSubmit will either call this.props.onSubmit or will call the argument of handleSubmit (that’s what we’ve done here), passing it the data of the form.
In our case, we want to pass the id of the book to be updated (or undefined when the form is used to create a book) to the submit function, that’s why I am assigning submit.bind(undefined,id) to tsubmit (which is what is passed to handleSubmit) - this will return a new function with the id as its first argument. The handleSubmit also passes the values of the form as an object along with the dispatch function, so submit is a function with three arguments:
const submit = (id, values, dispatch) => {
    let url = '//127.0.0.1:8000/api/books/'
    let type = 'POST'

    if(id) {
        url = `//127.0.0.1:8000/api/books/${id}/`
        type = 'PUT'
    }

    dispatch(submittingChanged(true))

    $.ajax({
        type,
        url,
        data: values,
        success: (d) => {
            dispatch(submittingChanged(false))
            dispatch(showSuccessNotification('Success!'))
            if(id) {
                dispatch(updateBookResult(d))
            } else {
                dispatch(addBookResult(d))
            }
            dispatch(routeActions.push('/'));

        },
        error: (d) => {
            dispatch(submittingChanged(false))
            console.log(d);
            dispatch(showErrorNotification(`Error (${d.status} - ${d.statusText}) while saving: ${d.responseText}` ))
        }
    });
};
As we can see it just checks if the id has a value and creates the url and the HTTP method for the update (either a POST when creatign a new book or a PUT when updating an existing one). It will then dispatch the submittingChanged action to change the UI (disable the buttons) and do the ajax call. When the call returns, if everything was ok it will dispatch the submittingChanged (with false as a parameter), the showSuccessNotification (with success as parameter), either updateBookResult or addBookResult with the retrieved data as paramater (depending if there was an id) and finally it will change the URL to / to display the books table. If there was an error it will once again dispatch the submittingChanged action to turn off the submit flag of the state and showErrorNotification with information on the error. The url won’t change so that the user will be able to fix the error and retry submitting.
The del function is a little different. We bind not only with id but also with dispatch because we don’t call it through handleSubmit (since when deleting no validation is actually needed) but directly as the onclick handler of the delete button (so we must pass dispatch manually):
const del = (id, dispatch) => {
    const url = `//127.0.0.1:8000/api/books/${id}/`
    const type='DELETE';
    $.ajax({
        type,
        url,
        success: (d) => {
            dispatch(showSuccessNotification('Success!'))
            dispatch(deleteBookResult(id))
            dispatch(routeActions.push('/'));
        },
        error: (d) => {
            dispatch(showErrorNotification(`Error (${d.status} - ${d.statusText}) while saving: ${d.responseText}` ))
        }
    });
};
This function sends a DELETE method to the correct url and, if everything was ok dispatches the showSuccessNotification, deleteBookResult and routeActions.push, similarly with submit.
One thing that I’d like to discuss here is the nature of the submit and del functions: These function do dispatch other actions but they are not implemented as thunks so, in order to be able to actually dispatch something they need to retrieve dispatch as a parameter (please remember the discussion on the redux-thunk section and the difference between dispatch(actionCreator) and actionCreator(dispatch) ). The submit function receives dispatch from handleSubmit while we pass dispatch directly (using bind) to the del function.
I could have implemented them as thunks (and put them to the actions module) however I feel that leaving them here will make the API of the application more compact (since if these functions had been put in the actions module they would need to be exported so they’d be a part of the public API of this application - however these two are only called from BookForm) and also their purpose and integration with handleSubmit is more clear if we leave them as plain functions. This is just my personal opinion - if for example you wanted to allow deleting a book not only from the BookForm but also from the BookPanel (by adding a delete button to each book row) then you’d definitely need to export del as an action creator (preferably as a thunk action creator to be consistent with the others).
components/Input
This is a simple functional component that gets a redux-form text field and a label as properties and renders a text input with a <label> and an optional error message. The error message will only be rendered if the field has been touched (i.e the user has changed the field or the form has been submitted) and there’s an actual error:
export default ({field, label}) => <div>
    <label forHtml={field.name}>{label}</label>
    <input type='text' className="u-full-width" {...field} />
    {field.touched && field.error && <div style={{color: 'white', backgroundColor: danger}}>{field.error}</div>}
</div>
One thing I’d like to explain is the {...field} snippet I pass to <input>. This is the object spread operator and will convert each attribute of the field object to a corresponding attr=value pair, i.e
<input ... name=field.name onChange=field.onChange value=field.value onBlur=field.OnBlur etc />
components/Select
The Select component renders a dropdown (select) input. It should receive a redux-form field, a label and an array of objects with id and name attributes that will be rendered as the options. The label and error` will be rendered similarly to ``Input:
export default ({field, label, options, ...props}) => <div>
    <label forHtml={field.name}>{label}</label>
    <select type='text' className="u-full-width" {...field} {...props} >
        <option></option>
        {options.map(c => <option value={c.id} key={c.id} >{c.name}</option>)}
    </select>
    {field.touched && field.error && <div style={{color: 'white', backgroundColor: danger}}>{field.error}</div>}
</div>
For the options we include an empty option (as a default value) and the other options are created with the help of a map. Finally, notice that I have also used ...props here in the the function parameter list to capture all parameters not captured by field, label and options and then pass both {...field} and {...props} to the select component. This is to capture the custom onChange (that I pass for the categories Select) and use that custom onChange when the select value changes. The custom onChange will override the field.onChange because the {…props} is after {…field}, so the resulting select will be something like:
<select ... onChange=field.onChange ... onChange=props.onChange >
This is a common idiom for overriding properties of objects that are passed to components - for example I could pass a className property to <Select> to override the default one (className="u-full-width").
components/DatePicker
This component is used to render a jquery-ui datepicker. Similarly to the other input components it receives a redux-form field and a label. However, this is a class based component because it needs to have this for attaching the datepicker to an input. Beyond the normal rendering, we can see that we have added a ref='date' to the input to allow us to refer to it later. This ref is used by componentDidMount and handleChange:
class DatePicker extends React.Component {
    render() {
        const { field, label } = this.props
        return(
            <div>
                <label forHtml={field.name}>{label}</label>
                <input type='text' ref='date' className="u-full-width" {...field} />
                {field.touched && field.error && <div style={{color: 'white', backgroundColor: danger}}>{field.error}</div>}
            </div>
        );
    }

    componentDidMount() {
        $(ReactDOM.findDOMNode(this.refs.date)).datepicker({ dateFormat: 'yy-mm-dd' });
        $(ReactDOM.findDOMNode(this.refs.date)).on('change', this.handleChange.bind(this));
    }

    componentWillUnmount() {

    }

    handleChange(e) {
        e.preventDefault()
        let date = ReactDOM.findDOMNode(this.refs.date).value
        this.props.field.onChange(date);
    }
}
The componentDidMount retrieves the input DOM element through the ref and makes it a datepicker. It also sets its onchange method to the handleChange method (notice the bind(this) part — this is needed so that this will be defined correctly inside the handleChange). The handleChange retrieves the current date (once again from the ref) and just calls the onChange of the provided field, passing it the date value.
Should I create my own input components?
As you’ve seen, I’ve created my own custom input components. These components are created with the correct styling for the css framework I use here (skeleton.css) but of course with small changes could easily be modified to be used with other css frameworks (I am using bootstrap 3 in most of my normal apps and such components work great). They also have been created for exactly my needs (i.e get the redux-form field as input, allow overriding onChange etc).
Instead of creating your own components by hand, you could of course use some specific component libraries like material-ui or react-bootstrap. These libraries contain components such as the Input or Select we implemented here with a consistent API and styling. Unfortunately, these components are a little more difficult to use than just creating your own:
- You need to learn their API (the names of the properties they get, their behavior in various conditions etc)
- You need to learn their styling API (most of them make it difficult to customize their appearence)
- It is not very easy to integrate them to your existing css framework (if you have one), so you’ll need to go all the way to use their styles
- You may need to use custom components anyway because you want to use a different javascript component that is not provided by these libraries
It all boils down to how big is your project and if you already have some styling for your pages. If you want to build a rather small project or your project already has a consistent styling then its better to create the required input components by hand. If on the other hand you want to build a big project from scratch then probably it would be better to bite the bullet and use a component library, but keep in mind that you may actually need to create your own components.
components/AuthorPanel
The AuthorPanel uses Table to list the authors. Since I haven’t used pagination or sorting here the component is very simple:
const cols = [
    {key: 'id', label: 'id', format: x=><Link to={`/author_update/${x.id}/`}>{x.id}</Link>},
    {key: 'last_name', label: 'Last name',},
    {key: 'first_name', label: 'First name',},
]

const AuthorPanel = (props) => <div className="row">
    <div className="twelve columns">
        <h3>Author list <Link className='button button-primary' style={{fontSize:'1em'}} to="/author_create/">+</Link></h3>
        <Table cols={cols} rows={props.authors.rows} />
    </div>
</div>

const mapStateToProps = (state) => ({
    authors:state.authors,
})
components/AuthorForm
The AuthorForm is similar to BookForm and is used to create a new author, update or delete an existing one. It uses the Input component to edit the first and last name of each author. I won’t go into more detail about this component since everything must be clear by now.
Changing the UI when the data is changed
Commenter Tomas Jacobsen asked for a tutorial on how the UI will be updated when the data is changed in a different window. Well, requirements like this is actually the reason for using react and redux I decided to add that capability to this application. If you want to check it out, please git checkout the tag react-redux-poll-update of the same repository (https://github.com/spapas/react-tutorial/).
This extra functionality simply checks (using polling) every few seconds if the number of authors has changed and if it has, it will reload the authors and dispaly a notification. Beyond the ES6 code, I’ve added a small REST API view that returns the number of authors in the database (it just returns a number) and a django management command that adds an author. So, to test the new functionality, run the django application and thhen run python manage.py add_author in a different window - after a few seconds you should see that the authors have been updated along with a notification.
To implement the UI update in ES6, I’ve added a file named scheduler.js with the following contents:
import store from './store'
import {loadAuthors, showSuccessNotification} from './actions';

export default () => {
    console.log("Starting scheduler")
    window.setInterval( () => {

        let url = 'http://127.0.0.1:8000/api/authors/get_author_number/';
        $.get(url, realAuthorNumber => {
            let authorNumber = store.getState().authors.rows.length;
            if(authorNumber!=realAuthorNumber) {
                store.dispatch(showSuccessNotification("Authors have changed - reloading ..."));
                store.dispatch(loadAuthors());
            }
        });

    }, 2000);
};
and then just import the default function from main.js and call it:
import schedule from './scheduler';

schedule();
So, we can see that every 2 seconds we retrieve (using Ajax) the number of authors and, if their number is different than the current number of authors in the UI (which we retrieve from the store using its getState method) display the notification and reload the authors (by dispatching two actions (which are created through the corresponding actions creators)! That’s all that is needed to update the UI!
Notice that, although I’ve used ajax and polling to find out when the UI needs to be updated you could instead use whatever different method you like, for example WebSockets.
Conclusion
In the above sections we presented and explained a more or less complete single page react / redux application, almost ready to be deployed to production. I tried to explain every concept I came across that’s why this article became more fat that I was expecting when I started writing it! The presented application supports nearly everything you’ll want to use when creating your own apps:
- Complex forms
- Custom components
- Asynchronous actions / Ajax
- Creating / updating / deleting objects
- Client side routing
- Result lists with pagination, sorting and filtering
The above have been implemented using the following technologies / libraries:
- Django / django-rest-framework
- ES6 with babel
- browserify / watchify / babelify
- React / redux / react-redux
- redux-thunk / redux-form / react-router-redux / react-notification
What could be missing from the application we presented here:
- Tests!
- Integrating redux-devtools
- Using envify to seperate development/production client side code (this is needeed if you actually integrate redux-devtools)
- Intagration with a component library
I advice you to research these subjects a bit - I’ll also try to write another (hopefully thinner) post with more info about these.
Finally, two thing I’d like to point out and keep in mind are that using redux/react-redux the flow of the data is crystal and that as you’ve already seen by now, writing functional components and reducers is pure fun!