Intro
In this small post I’ll present a small tutorial on how to add a timelne of your Wagtail posts using the Horizontal Timeline jquery plugin.
This will be a step by step tutorial to help you understand the concepts. As a base we’ll use the bakerydemo wagtail demo. After you’ve properly followed the instructions you’ll see that this demo site has a “Blog” that contains articles about breads. Following we’ll add a timeline of these articles grouped by their publish month.
Decisions, decisions
For this demo we’ll include all the “blog” pages in the timeline. However we may wanted to select which pages we want to include in the timeline. This could be done either by adding an extra field in our blog pages (class blog.models.BlogPage) like include_in_timeline or by using the Wagtail ModelAdmin functionality. For the ModelAdmin we’d create an extra Django model (i.e BlogTimeLineEntry) that would contain a link to the original page. We could enchance this field with extra fields that we may want to display in the timeline, for example a smaller description. Something like this:
The other decision is where to actually output the timeline. For the demo we’ll just put it in the BlogIndexPage page. If we wanted to add the timeline in a number of different page types then we’d need to add a template tag that would include it. But since it will be available only to a single page type we’ll just need to override the get_context method and the template of that particular type.
Overriding the get_context
As we described above, we want to group the timeline entries based on their publish month. For this, we’ll use the following code in the BlogIndexPage.get_context method:
def get_context(self, request):
    context = super(BlogIndexPage, self).get_context(request)
    context['posts'] = BlogPage.objects.descendant_of(
        self).live().order_by(
        '-date_published')

    entries = context['posts']
    dentries = {}
    for e in entries:
        month = e.date_published.strftime("%m/%Y")
        month_entries = dentries.get(month, [])
        month_entries.append(e)
        dentries[month] = month_entries

    lentries = sorted(
        [
            {
                "date_small": k,
                "date_large": v[0].date_published.strftime("%B %Y"),
                "entries": v,
            }
            for (k, v) in dentries.items()
        ],
        key=lambda z: z["entries"][0].date_published,
    )

    context.update(timeline=lentries)
    return context
So what’s the purpose of the above? First of all we use super to retrieve the context that any parent classes may have setup. After that we add a posts attribute to the context that is a queryset of all the published children of the current page (which is the BlogIndexPage), sorted by their published date.
In the for loop that follows, do some dict trickery to “gather” all entries for a particlular month/year in a list under that particular key in the dentries dict.
Finally, we create the lentries list which will be a list of the form:
[{
        "date_small": "09/2020"
        "date_large": "September 2020"
        "entries: [BlogPage, BlogPage, BlogPage...]
}, {...}, ...]
This struct will help us in the next step when we implement the timeline template.
Fixing the template
To use the horizontal timeline we need to add a couple of css/js dependencies to our template. For this, we’ll first go to the bakerydemotemplatesbase.html file and add the following snippet near the end of the file just before </body>:
{% block extra_script %}
{% endblock %}
The above is required to give us a placeholder for adding some needed js dependencies and code.
After that we’ll go to the bakerydemo\templates\blog\blog_index_page.html file and add the following just before {% block content %}
{% block head-extra %}
        <link rel="stylesheet" type="text/css" href="//cdn.jsdelivr.net/gh/ycodetech/horizontal-timeline-2.0@2/css/horizontal_timeline.2.0.min.css">
        <style>

                .timeline .selected {
                        font-size: 24px;
                        font-weight: bold;
                }

                #timeline ol {
                        list-style: none;
                }

                .horizontal-timeline .events-content li {
                        background: #f2f2f2;
                        font-size: .8em;
                }

                #timeline img {
                        width: 200px;
                }
        </style>

{% endblock head-extra %}
And the following at the end of the file
{% block extra_script %}

        <script src="//cdn.jsdelivr.net/gh/ycodetech/horizontal-timeline-2.0@2/JavaScript/horizontal_timeline.2.0.min.js"></script>

        <script>

        $(function() {
                $('#timeline').horizontalTimeline({
                dateIntervals: {
                        "desktop": 200,
                        "tablet": 150,
                        "mobile": 120,
                        "minimal": true
                }
                });
        })

        </script>
{% endblock %}
Notice that the head-extra block is already there in the base.html file so we don’t need to add it again. It just has some styling changes for the timeline to be displayed nice. Also the <script> tags we added just include the needed dependency and initialize the timeline component.
Of course we haven’t yet added the actual timeline! To do that, we’ll need to add a file named timeline_partial.html under the blog/templates/blog folder (same folder that blog_index_page.html is) with the following:
{% load wagtailcore_tags wagtailimages_tags %}
<div class="horizontal-timeline" id="timeline">
  <div class="events-content">
        <ol>

          {% for month in timeline %}
                <li class="{% if forloop.last %}selected{% endif %}" data-horizontal-timeline='{"date": "{{ month.date_small }}"}'>
                  <h3>{{ month.date_large }}</h3>

                  {% for te in month.entries %}
                        <div class='row'>

                                <div class='col-md-6'>
                                  <h4><a href='{% pageurl te %}'>{{ te.title }}</a></h4>
                                  <span>{{ te.introduction }}</span>
                                </div>
                                <div class='col-md-6'>
                                  {% with img=te.image %}
                                        {% image img width-200 as img_thumb %}
                                        <img class="" src="{{ img_thumb.url }}" alt="{{ img.title }}">
                                  {% endwith %}
                                </div>

                        </div>
                        <div class="clear bottommargin-sm"></div>
                  {% endfor %}
                </li>
          {% endfor %}

        </ol>
  </div>
</div>
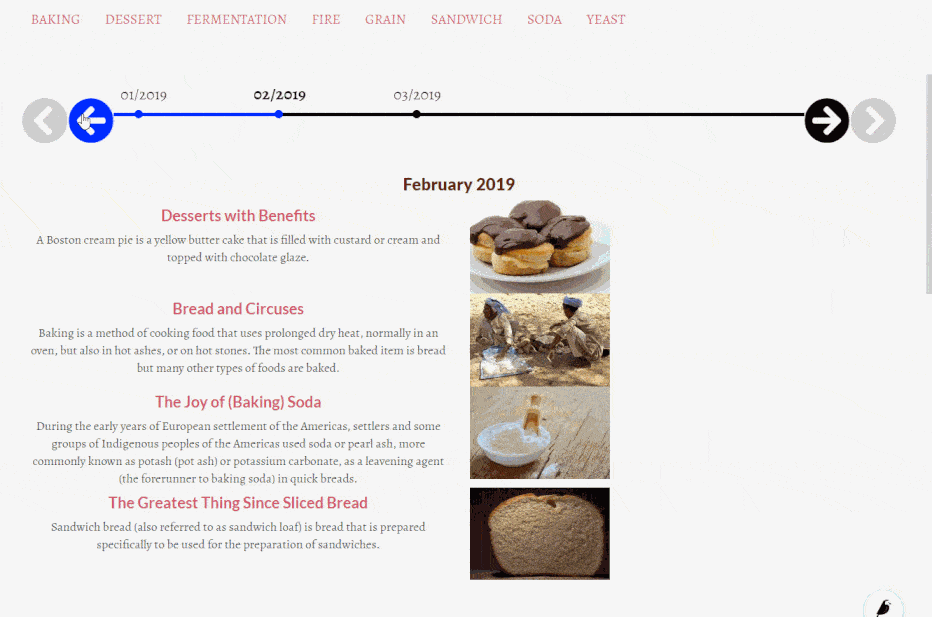
The above will generate a <li data-horizontal-timeline='{"date": "01/2020"}> list element for all months and inside that it will add an <h3> with the full name of the month and a bunch of bootstrap rows, one for the entries of that particular month (including its title, description and their image at the side). It should be easy enough to follow.
Finally, we need to incldue the above partial template. So add the line {% include "blog/timeline_partial.html" %} immediately above the <div class="row row-eq-height blog-list"> line in the file blog_index_page.html.
If you’ve followed the instructions you should be able to see something like this: