/var/

Various programming stuff

Hello! If you are using an ad blocker but find something useful here and want to support me please consider disabling your ad blocker for this site.

Thank you,
Serafeim

Getting alerts from OS Mon in your Elixir application

When I upgraded my Phoenix template application to Phoenix 1.5.1 I also enabled the new Phoenix LiveDashboard and its “OS Data” tab. To enable that OS Data tab you have to enable the :os_mon erlang application by adding it (along with :logger and :runtime_tools) to your extra_applications setting as described here.

When I enabled the os_mon application I immediately saw a warning in my logs that one of disks is almost full (which is a fact). I knew that I wanted to understand how these warnings are generated and if I could handle them with some custom code to send an email for example.

This journey lead me to an interesting erlang rabbit hole which I’ll describe in this small post.

The os_mon erlang application

os_mon is an erlang application that, when started will run 4 processes for monitoring CPU load, disk, memory and some OS settings. These don’t work for all operating systems but memory and disk which are the most interesting to me do work on both unix and Windows.

The disk and memory monitoring processes are called memsup and disksup and run a periodic configurable check that checks if the memory or disk space usage is above a (configurable) threshold. If the usage is over the threashold then an error will be reported to the SASL alarm handler (SASL is erlang’s System Architecture Support Libraries).

The alarm handler situation

The SASL alarm handler is a process that implements the gen_event behavior. It must be noted that this behavior is rather controversial and should not be used for your own event handling (you can use your own gen server solution or gen stage). A gen_event process is an event manager. This event manager keeps a list of event handlers; when an event happens the event manager will notify each of the event handlers. Each event handler is just a module so when an event occurs all event handlers will be run in the same process one after the other (that’s the actual reason of why gen_event is not very loved).

The SASL alarm handler (the gen_event event manager) is implemented in a module named :alarm_handler. A rather unfortunate decision is that the default simple alarm handler (the gen_event event handler) is also implemented in the same module so in the following you’ll see :alarm_handler twice!

The default simple alarm handler can be exchanged with your own custom implementation or you can even add additional alarm handlers so they’ll be called one after the other.

To add another custom event handler for alarms, you’ll use the add_handler method of gen_event. To change it with your own, you’ll use the swap_handler of gen_event. When the default simple alarm handler is swapped it will return a list of the existing alarms in the system which will the be passed to the new alarm handler.

A simple alarm handler implementation

As noted in the docs, an alarm handler implementation must handle the following two events:

{:set_alarm, {alarm_id, alarm_description}} and {:clear_alarm, alarm_id}. The first one will be called from the event manager when a new alarm is created and the send one when the cause of the alarm not longer exists.

Let’s see a simple implementation of an alarm event handler:

  defmodule Phxcrd.AlarmHandler do
  import Bamboo.Email
  require Logger

  def init({_args, {:alarm_handler, alarms}}) do
    Logger.debug  "Custom alarm handler init!"
    for {alarm_id, alarm_description} <- alarms, do: handle_alarm(alarm_id, alarm_description)
    {:ok, []}
  end

  def handle_event({:set_alarm, {alarm_id, alarm_description}}, state) do
    Logger.warn  "Got an alarm " <> Atom.to_string(alarm_id) <> " " <> alarm_description
    handle_alarm(alarm_id, alarm_description)
    {:ok, state}
  end

  def handle_event({:clear_alarm, alarm_id}, state) do
    Logger.debug  "Clearing the alarm  " <>  Atom.to_string(alarm_id)
    state |> IO.inspect
    {:ok, state}
  end

  def handle_alarm(alarm_id, alarm_description) do
    Logger.debug  "Handling alarm " <>  Atom.to_string(alarm_id)

    new_email(
      to: "foo@foo.com",
      from: "bar@bar.gr",
      subject: "New alarm!",
      html_body: "<strong>Alert:"  <>  Atom.to_string(alarm_id) <> " " <> alarm_description <>  "</strong>",
      text_body: "Alert:" <>  Atom.to_string(alarm_id) <> " " <> alarm_description
    )
    |> Phxcrd.Mailer.deliver_later()

    Logger.debug  "End handling alarm " <> Atom.to_string(alarm_id)
  end

end

This implementation also has an init function that is called when the handler is first started. Notice that it receives a list of the existing alarms; for each one of them I’ll calle the handle_alarm function. This is needed to handle any existing alarms when the application is starting. The :set_alarm handler also calls handle_alarm passing the alarm_id and alarm_description it received.

The clear_alarm doesn’t do anything (it would be useful if this module used state to keep a list of the current alarms). Finally, the handle_alarm will just send an email using bamboo_smtp. Notice that I use deliver_later() to send the mail asynchronously.

As you can see this is a very simple example. You can do more things here but I think that getting the Alarm email should be enough for most situations!

Integrating the alarm handler into your elixir app

To use the above mentioned custom alarm event handler I’ve added the following line to the start of my Application.start function:

:gen_event.swap_handler(:alarm_handler, {:alarm_handler, :swap}, {Phxcrd.AlarmHandler, :ok})

Please notice that the :alarm_handler atom is encountered twice: The first is the event manager module (for which we want to swich the event handler) while the second is the event handler module (which is the one we want to replace).

os_mon configuration

The are a number of options you can configure for os_mon. You can find them all at the manual page. For example, just add the following to your config.exs:

config :os_mon,
  disk_space_check_interval: 1,
  memory_check_interval: 5,
  disk_almost_full_threshold: 0.90,
  start_cpu_sup: false

This will set the interval for disk space check to 1 minute, for memory check to 5 minutes, the disk usage threshold to 90% and will not start the cpu_sup process to get CPU info.

Testing with the terminal

If no alerts are active in your system, you can test your custom event handler using something like this from an iex -S mix terminal:

:alarm_handler.set_alarm({:koko, "ZZZZZZZZZ"}
# or
:alarm_handler.clear_alarm(:koko)

Also you can see some of the current data or configuration options:

iex(4)> :disksup.get_disk_data
[{'C:\\', 234195964, 55}, {'E:\\', 822396924, 2}]

# or
iex(7)> :disksup.get_check_interval
60000

Please notice that the check interval is in seconds when you set it, in ms when you retrieve it.

Conclusion

The above should help you if you also want to better understand alert_handler, os_mon and how to configure it to run your own custom alert handlers. Of course in a production server you should have proper monitoring tools for the health of your server but since os_mon is more or less free thanks to erlang, why not add another safety valve?

If you want to take a look at an application that has everything configured, take a look at my Phoenix template application.
Adding a latest-changes list to your Wagtail site

I think that a very important tool for a new production Wagtail site is to have a list where you’ll be able to take a look at the latest changes. Most editors are not experienced enough when using a new tool so it’s easy to make bad quality edits. A user could take a look at their changes and guide them if something’s not up to good standards.

In this article I’ll present a simple way to add a latest-changes list in your Wagtail site. This is working excellent with Wagtail 2.9, I haven’t tested it with other wagtail versions so your milage may vary. In the meantime, I’ll also introduce a bunch of concepts of Wagtail I find interesting.

Update 08/05/2020 Please notice that this article was originally written for Wagtail 2.8 projects. However, Wagtail 2.8 didn’t have an official API for adding reports thus I had to check the source code for some things. Those things since were not part of any API have been changed and are not working in Wagtail 2.9.

Thus I’ve updated the project to use the proper APIs and work with Wagtail 2.9 (and hopefully the next versions). If you want to see what’s changed between the two versions you can take a look at this commit from the companion project. You may also want to take a look at the adding reports tutorial on the Wagtail docs.

A starter project

Let’s create a simple wagtail-starter project (this is for windows you should be able to easily follow the same steps in Unix like systems):

C:\progr\py3>mkdir wagtail-starter
C:\progr\py3>cd wagtail-starter
C:\progr\py3\wagtail-starter>py -3 -m venv venv
C:\progr\py3\wagtail-starter>venv\Scripts\activate
(venv) C:\progr\py3\wagtail-starter>pip install wagtail
(venv) C:\progr\py3\wagtail-starter>wagtail.exe start wagtail_starter
(venv) C:\progr\py3\wagtail-starter>cd wagtail_starter
(venv) C:\progr\py3\wagtail-starter\wagtail_starter>python manage.py migrate
(venv) C:\progr\py3\wagtail-starter\wagtail_starter>python manage.py createsuperuser
(venv) C:\progr\py3\wagtail-starter\wagtail_starter>python manage.py runserver

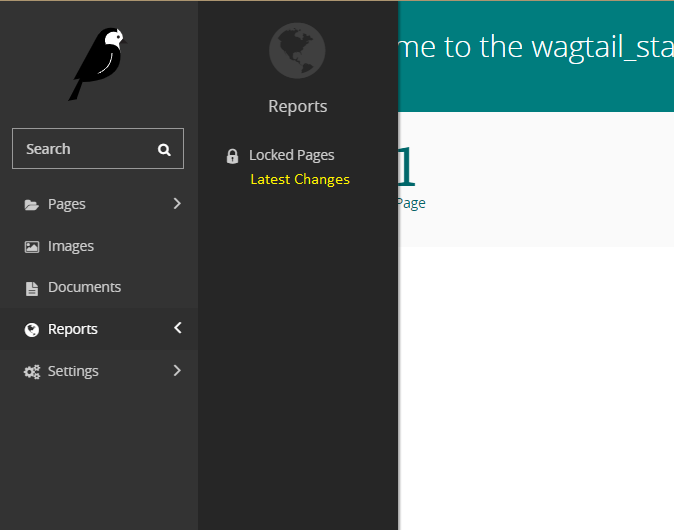
When you’ve finished all the above you should be able to go to http://127.0.0.1/ and see your homepage and then visit http://127.0.0.1/admin/ and login with your superuser. What we’d like to do is add a “Latest changes” link in the “Reports” admin section like this:

New menu

Implementing the latest-changes menu

Start with a new app

To start the menu implementation I recommend putting everything related to it in a separate django application so you can easily re-use it to multiple sites. For this, let’s create a new django app using:

(venv) C:\progr\py3\wagtail-starter\wagtail_starter>python manage.py startapp latest_changes

And add 'latest_changes' to the list of our INSTALLED_APPS at the file wagtail_starter\settings\base.py.

Add the view

Let’s add the code for the view that will display the latest changes page. Modify the latest_changes/views.py file like this:

from django.shortcuts import render
from wagtail.admin.views.reports import PageReportView
from wagtail.core.models import UserPagePermissionsProxy
from wagtail.core.models import Page


class LatestChangesView(PageReportView):
    template_name = "reports/latest_changes.html"
    title = "Latest changes"
    header_icon = "date"

    def get_queryset(self):
        self.queryset = Page.objects.order_by("-last_published_at")
        return super().get_queryset()

    def dispatch(self, request, *args, **kwargs):
        if not UserPagePermissionsProxy(request.user).can_remove_locks():
            return permission_denied(request)
        return super().dispatch(request, *args, **kwargs)

As you can see the above code adds a very small view that overrides PageReportView which is used also by the locked pages view so most things are already implemented by that view. The only thing we do here is to override the get_queryset method to denote which pages we want to display and the dispatch to add some permission checks. Here we check that a user can_remove_locks but we could do other checks if needed. Finally, notice that we have overriden the template name which we’ll define in a minute.

Beyond PageReportView that should be used for generating Page reports, you can override ReportView which can be used to implement generic reports.

To properly add that view in our urls.py we can use a wagtail hook named register_admin_py. Wagtail hooks are a great way to excend the wagtail admin; to use them, you have to generate a file name wagtail_hooks.py in one of your apps. This file will be auto-impoted by wagtail when your app is started.

Thus, in our case we’ll add a wagtail_hooks.py file in the latest_changes app with the following code:

from django.http import HttpResponse
from django.conf.urls import url
from wagtail.core import hooks
from .views import LatestChangesView

@hooks.register('register_admin_urls')
def urlconf_time():
  return [
    url(r'^latest_changes/$', LatestChangesView.as_view(), name='latest_changes'),
  ]

The above just hooks up the LatestChangesView we defined before to the /admin/latest_changes/ url.

If everything’s ok till now you should be able to visit: http://127.0.0.1:8000/admin/latest_changes/ and get an error for a missing template - remember that we haven’t yet defined utils/reports/latest_changes.html.

Add the template

To add the template we’ll need to create a folder named templates under our latest_changes app and then add a reports folder to it. Finally in that folder add a latest_changes.html. So the full path of the latest_changes.html should be: wagtail_starter\latest_changes\templates\reports\latest_changes.html:

{% extends 'wagtailadmin/reports/base_page_report.html' %}
{% load i18n %}
{% block listing %}
    {% include "reports/_list_latest.html" %}
{% endblock %}

{% block no_results %}
    <p>{% trans "No changes found." %}</p>
{% endblock %}

I’ve selected the reports subfolder just to be compatible with what wagtail does, you can just put latest_changes.html directly under templates; don’t forget to update the LatestChangesView defined before though! This template extends the base_page_report.html template that Wagtail provides for page reports. It also includes a snippet named reports/_list_latest.html" thus you also need to add a ``_list_latest.html file in the same folder with the following contents:

{% extends "wagtailadmin/pages/listing/_list_explore.html" %}

{% load i18n wagtailadmin_tags %}

{% block post_parent_page_headers %}
<tr>
<th>Title</th>
<th>Last update</th>
<th>Kind</th>
<th>Status</th>
<th>Owner / last publish / last edit</th>
</tr>
{% endblock %}

{% block page_navigation %}
    <td>
        {{ page.owner }} / {{ page.live_revision.user }} / {{ page.get_latest_revision.user }}
    </td>
{% endblock %}

Please notice that my _list_latest.html snippet extends the Wagtail provided _list_explore.html template and overrides some things that can be overriden from that file. If you want to do more changes you’ll need to copy over everything and change things as you wish instead of extending.

Also, keep in mind that because you added a templates folder you’ll need to restart your django development server.

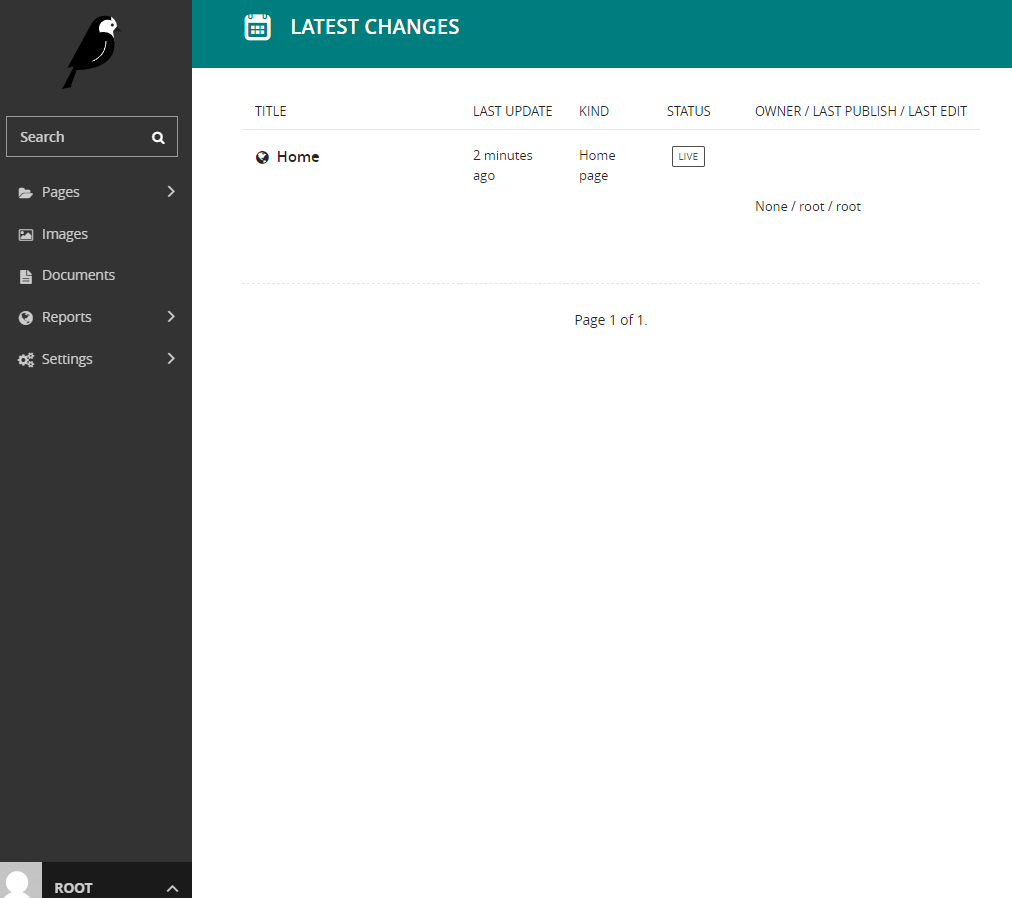
Finally, if everything is ok until now you should be able to visit http://127.0.0.1:8000/admin/latest_changes/ and see your view! It will say “No changes found” if you’ve followed the steps here; just go to Pages - Home from the wagtail menu and edit that page (just save it). Now visit http://127.0.0.1:8000/admin/latest_changes/ again and behold! Your own latest changes view:

The view

Displaying our menu item

The last piece of the puzzle missing is to actually display a menu item under the Reports menu of wagtail admin. For this we are going to use our friends, the wagtail hooks. So, change the wagtail_hooks.py file like this (I’m also including the code from adding the url):

from django.http import HttpResponse
from django.conf.urls import url
from django.urls import reverse
from wagtail.admin.menu import MenuItem
from wagtail.core import hooks
from wagtail.core.models import UserPagePermissionsProxy
from .views import LatestChangesView

@hooks.register('register_admin_urls')
def urlconf_time():
    return [
      url(r'^latest_changes/$', LatestChangesView.as_view(), name='latest_changes'),
    ]


class LatestChangesPagesMenuItem(MenuItem):
    def is_shown(self, request):
        return UserPagePermissionsProxy(request.user).can_remove_locks()


@hooks.register("register_reports_menu_item")
def register_latest_changes_menu_item():
    return LatestChangesPagesMenuItem(
        "Latest changes", reverse("latest_changes"), classnames="icon icon-date", order=100,
    )

The above code uses the register_reports_menu_item which is a hook that can be used to add a child specifically to the Reports menu item. Notice that it uses the LatestChangesPagesMenuItem which is a class that inherits from MenuItem; the only thing that is overriden there is the is_shown method so it will have the same permissions as the LatestChangesView we defined above so user that will see the menu item will also have permissions to display the view. Here’s the final menu item:

The menu item

Conclusion

We’ve seen the steps required to add a latest pages view to your wagtail admin site. I have to admit that it is a little work however the nice thing is that this is all self-included in a single application. You can just get tha application and copy over it to your wagtail site; after you add that application to INSTALLED_APPS you should get the whole functionality without any more modifications to your project. To help you more with this I’ve included the whole code of this project in the https://github.com/spapas/wagtail-latest-changes repository.

You can either clone this repository to see the functionality or just copy over the latest_changes folder to your wagtail project to include the functionality directly (don’t forget to fix the INSTALLED_APPS setting)! It should work with all Wagtail 2.9 and later projects.

Quick and easy layout of django forms using django-crispy-forms and django-widget-tweaks

One of the first problems you have when you want to create a traditional HTML django site (i.e not an SPA one) is how to properly and beautifully layout your forms. In this small article I’ll talk about two very useful django packages that will help you have great layouts in your forms: django-crispy-forms and django-widget-tweaks.

django-crispy-forms

The django-crispy-forms django package is a great way to properly format your forms. If you don’t already use it I totally recommend to check it out; it’s very useful and you’ll definitely love it if you are a heavy django forms user. It helps you properly layout your forms either implicitly or explicitly.

For explicitly laying out your forms you should add a FormHelper to your django form class and use the {% crispy %} template tag. You can use this to explicitly define your form layout with as much detail as you want since you have full control. I won’t go into more details about this since it’s explained thoroughly in the docs.

For implicitly laying out your forms, you will just use the |crispy template filter. This gets a normal django form (without any modifications) and converts it to a crispy form based on the template pack you are using. This works great for many situations however sometimes you’ll need to have more control over this without going to the extra effort to add a complete layout to each of your forms using the FormHelper.

So how do you resolve this? Enter the |as_crispy_field template filter. To use that filter you’ll need to add the {% load crispy_forms_tags %} lines to your template and then you can pass any one of your form’s fields to it so it will be properly “crispified”! Let’s see a quick example of adding the fields of a form in a <div class='col-md-6'> so they will be in two columns (using bootstrap):

<form class='form' method="POST">
    <div class='row'>
        {% for field in form %}
            <div class='col-md-6'>
              {{ field|as_crispy_field }}
            </div>
        {% endfor %}
        {% csrf_token %}
    </div>
    <input class='btn btn-primary' type='submit'>
</form>

So the above code enumerates all form fields and uses the |as_crispy_field to properly add the crispified information to it. If you want to re-use the above two column layout in multiple forms and be more dry you can create a template snippet and {% include %} it in the part of your code you want the form to be rendered.

django-widget-tweaks

Using the as_crispy_field is excellent however sometimes you may need even more control of your for fields, for example add an extra class (like form-control-lg) to your form controls. The answer to this is the django-widget-tweaks package: It enables you to easily modify form fields by adding classes, attributes etc to them from within your django templates.

To use it you need to add a {% load widget_tweaks %} to your templates. Then you’ll be able to use the |add_class form field to add a class to your form field. For example the previous example can be modified like this to have smaller controls:

<form class='form' method="POST">
    <div class='row'>
        {% for field in form %}
            <div class='col-md-6'>
              {{ field|add_class:"form-control-sm"|as_crispy_field }}
            </div>
        {% endfor %}
        {% csrf_token %}
    </div>
    <input class='btn btn-primary' type='submit'>
</form>

Please notice that I use both add_class and as_crispy_fields together; notice the order, the add_class needs to be before the as_crispy_field or you’ll get an error. This way the django form field will have the form-control-sm class and then be rendered as a crispy field.

Let’s now suppose that you need to more control over your fields. For example you need to add a class only to your select fields or even only to a particular field (depending on its name). To do that you can use the name and field.widget.input_type attributes of each for field. So, to make select fields smaller and with a warning background and fields that have a name of name or year larger you can use something like this:

<form class='form' method="POST">
    <div class='row'>
        {% for field in form %}
          {% if field.name == 'name' or field.name == 'year' %}
              {{ field|add_class:"form-control-lg"|as_crispy_field }}
          {% elif field.field.widget.input_type == 'select' %}
              {{ field|add_class:"form-control-sm"|add_class:"bg-warning"|as_crispy_field }}
          {% else %}
              {{ field|as_crispy_field }}
          {% endif %}
        {% endfor %}
        {% csrf_token %}
    </div>
    <input class='btn btn-primary' type='submit'>
</form>

Using the above techniques you should be able to quickly layout and format your form fields with much control! If you need something more I recommend going the FormLayout route I mentioned in the beginning.

Declarative Ecto query sorting

In a previous article I presented a method for declaring dynamic filters for your ecto queries. Continuing this article, I’ll present here a way to allow dynamic sorting for your queries using fields that may even span relations.

What will it do

The solution is a couple of function that can be put inside the QueryFilterEx I mentioned in the previous article. Please make sure that you’ve completely read and understand this article before continuing here.

To use the dynamic sorting function you’ll need to declare the fields that would allow sorting using a simple array of strings. The sort fields should then be added as links to your phoenix page which will then pass an order_by=field_name query parameter to your controller.

The module has a very simple API consisting of a single function:

  • sort_by_params(query, params, allowed_sort_fields): Pass it the query, the GET request parameters you got from your form and the declared sort fields array to return you a sorted query

You can find a sample of the technique presented in this article in my PHXCRD repository: https://github.com/spapas/phxcrd for example in the user_controller or authority_controller.

Preparing the query

In order to use dynamic sorting you’ll need to properly “prepare” your Ecto query by naming all your relations as I’ve already explained in the previous article.

Declaring the sort fields

To declare the sort fields you’ll just add an array of fields you’ll want to allow sorting on. Each field should have the form binding_name__field_name where binding_name is the name of the table you’ve declared in your query and field_name is the name of the field that the query will be sorted by. This is the way that the sort fields will also be declared in the phoenix html page. Django users will definitely remember the model__field convention.

Declaring the sort fields here and using them again in the html page may seem reduntant, however it is absolute necessary to declare a priori which fields are allowed because the sort http params will be received as strings and to be used in queries these strings will be converted to atoms. The number of atoms is finite (there’s an absolute limit of allowed atoms in an erlang program; if that limit is surpassed your program will crash) so you can’t allow the user to pass whatever he wants (so if the order_by parameter does not contain one of the fields you declare here then no strings will be converted to atoms).

Integrating with a controller

As an example let’s see how the dynamic sort fields will be integrated with the phxcrd user_controller. The query I’d like to filter on is the following (see that everything I’ll need is named using :as):

from(u in User, as: :user,
  left_join: a in Authority, as: :authority,
  on: a.id == u.authority_id,
  left_join: up in UserPermission,
  on: up.user_id == u.id,
  left_join: p in Permission, as: :permission,
  on: up.permission_id == p.id,
  preload: [authority: a, permissions: p]
)

To declare the sort fields I like to create a module attribute ending with sort_fields, something like @user_sort_fields for example. Here’s the sort fields I’m going to use for user_controller:

@user_sort_fields [
  "user__username", "user__name", "user__last_login"
]

So it will only allow the user.username, user.name and user.last_login fields for sorting. I could easily sort by authority.name or permission.name in a similar fashion.

Finally, here’s the full code of the index controller:

def index(conn, params) do
  changeset = QueryFilterEx.get_changeset_from_params(params, @user_filters)

  users =
    from(u in User,
      as: :user,
      left_join: a in Authority, as: :authority,
      on: a.id == u.authority_id,

      left_join: up in UserPermission,
      on: up.user_id == u.id,
      left_join: p in Permission, as: :permission,
      on: up.permission_id == p.id,
      preload: [authority: a, permissions: p]
    )
    |> QueryFilterEx.filter(changeset, @user_filters)
    |> QueryFilterEx.sort_by_params(params, @user_sort_fields)
    |> Repo.all()

  render(conn, "index.html", users: users, changeset: changeset)
end

Notice that this is exactly the same as the controller I discussed in the dynamic filters article with the addition of the QueryFilterEx.sort_by_params(params, @user_sort_fields) pipe to do the sorting.

The template

The template for the user index action is also the same with a couple of minor changes: Instead of using a static header for the table title I will use a link that will change the sorting order:

<thead>
  <tr>
    <th>
      <%= link gettext("Username"), to: create_order_url(@conn, "user__username") %>
    </th>
    <th>
      <%= link gettext("Name"), to: create_order_url(@conn, "user__name") %>
    </th>
    <th>First name</th>
    <th>Last name</th>
    <th>Email</th>
    <th>Am / Am phxcrd</th>
    <th>Kind</th>

    <th>
      <%= link gettext("Last login"), to: create_order_url(@conn, "user__last_login") %>
    </th>
    <th>Is enabled</th>

    <th></th>
  </tr>
</thead>

Notice that I just used the create_order_url function passing it the @conn and the sort field. This create_order_url function is implemented in a module I include in all my views and will properly add an order_by=field in the url (it will also add an order_by=-field if the same header is clicked twice). I will explain it more in the following sections.

Finally, please notice that if you use pagination and sorting you need to properly handle the order_by query parameter when creating the next-previous page links. Actually, there are three things competing on their url parameter dominance; I’d like to talk about that in the next interlude.

Interlude: HTTP GET parameter priority

Now, in an index page you will probably have three things all of which will want to put parameters to your urls to be activated:

  • Query filtering; this will put a filter query parameter to filter your query. Notice that because of how phoenix works (it allows maps in the query parameters) the filter can be a single query parameter but contain multiple filters (i.e the filter will be something like %{"key1" => "value1", "key2" => "value2"}
  • Order by: This will put an order_by query parameter to denote the field that the query will be sorted
  • Pagination: This will put an page query parameter to denote the current page

I like to give them a priority in the order I’ve listed them; when one of them is changed, it will clear the ones following it. So if the query filters are changed both the pagination and the order by fields will be cleared, if the order by field is changed then only the pagination field will be cleared but if the pagination field is changed both the query filters and the order by fields will be kept there.

I think that’s the best way to do it from an UX point of view; try to think about it and you’ll probably agree.

How does this work?

In this section I’ll try to explain exactly how the dynamic sort fields work.

So I’ll split this explanation in two parts: Explain create_order_url and then explain sort_by_params.

create_order_url

This function receives three parameters: The current @conn, the name of a field to sort by and an optional list of query parameters that need to be kept while creating the order by links. I’ve put this function in a ViewHelpers module that I am including to all my views (by adding an import PhxcrdWeb.ViewHelpers line to the PhxcrdWeb module).

Let’s take a look at the code:

def create_order_url(conn, field_name, allowed_keys \\ ["filter"]) do
  Phoenix.Controller.current_url(conn, get_order_params(conn.params, allowed_keys, field_name))
end

This doesn’t do much, it just uses the phoenix’s current_url that generates a new url to the current page, passing it a dictionary of http get parameters that should be appended to the url that are created through get_order_params. Notice that there’s an allowed_keys parameter that contains the query parameters that we need to keep after the sorting (see the previous interlude). By default I pass the filter query parameter so if theres a filter (check my previous article) it will keep it when sorting (but any pagination will be cleared; if I sort by a new field I want to go to the first page there’s no reason for me to keep seeing the page I was on before changing the order by).

The get_order_params receives the query parameters of the current connection (as a map), the allowed keys I mentioned before and the actual name of the field to sort on. This method is a little more complex:

defp get_order_params(params, allowed_keys, order_key) do
  params
  |> Map.take(allowed_keys ++ ["order_by"])
  |> Enum.map(fn {k, v} -> {String.to_atom(k), v} end)
  |> Map.new()
  |> Map.update(
    :order_by,
    order_key,
    &case &1 do
      "-" <> ^order_key -> order_key
      ^order_key -> "-" <> order_key
      _ -> "-" <> order_key
    end
  )
end

It only keeps the parameters in the allowed_keys list and the current order_by parameter (if there’s one) discarding everything else. It will then convert the keys of the map to atoms and put them in a new map. Finally, it will update the order_by field (if exists) either by switching the - in front of the field to declare asc/desc sorting or adding it for the field that was clicked. Actually the logic of that Map.update is the following:

  • If there’s no :order_by key then add it and assign the passed order_key
  • If the current value of :order_by is equal to order_key with or without a - then toggle the - (this happens when you click on a field that is already used for sorting)
  • If the current value of :order_by is anything else (i.e not the same as the order_key) then just change :order_by to -orderKey (this happens when there’s sorting but you click on a different field, not the one used for the sorting)

Notice that this juggling between map, list of keywords and then map again (using Enum.map and then Map.new etc) is needed because the query parameters are in a map with strings as keys form (%{"key" => "value"}) while the current_url function needs the query params in a map with atoms as keys form (%{key: "value"}).

sort_by_params

The sort_by_params method gets three parameters: The query that will be sorted, the existing http parameters map (so as to retrieve the order_by value) and the declared list of allowed sorting fields. Let’s take a look at it:

def sort_by_params(qs, %{"order_by" => "-" <> val}, allowed),
  do: do_sort_by_params(qs, val, :asc, allowed)

def sort_by_params(qs, %{"order_by" => val}, allowed),
  do: do_sort_by_params(qs, val, :desc, allowed)

def sort_by_params(qs, _, _), do: qs

This multi-legged function will only do something if there’s an order_by parameter in the http parameters (else it will just return the query as is) and will call do_sort_by_params passing it the received query, either :asc or :desc (depending if there’s a - in front of the value) and the received allowed fields list.

The do_sort_by_params makes sure that the passed parameter is in the allowed list and if yes it creates the atoms of the binding and field name (using String.to_atom) and does the actual sorting to the passed query:

defp do_sort_by_params(qs, val, ord, allowed) do
  if val in allowed do
    [binding, name] = val |> String.split("__") |> Enum.map(&String.to_atom/1)
    qs |> order_by([{^binding, t}], [{^ord, field(t, ^name)}])
  else
    qs
  end
end

The line qs |> order_by([{^binding, t}], [{^ord, field(t, ^name)}]) may seem a little complex but it has been thoroughly explained in the previous article.

Conclusion

By using the methods described here you can easily add a dynamic sorting to your queries through fields that may span relations just by creating a bunch of http GET links and passing them an order_by query parameter.

How to properly handle an HTML form

One of the simplest things somebody would like to do in a web application is to display a form to the user and then handle the data the application received from the form. This is a very common task however there are many loose ends and things that a new developer can do wrong. Recently, I tried to explain this to somebody however I couldn’t find a tutorial containing all the information I think it is important. So I decided to write it here.

To make it very easy to test it and understand it I decided to use PHP to handle the form submission. I must confess that I don’t like PHP and I never use it in production apps (unless I need to support an existing one). However, for such simple tasks and examples PHP is probably the easiest thing for a new developer to understand: Just create a .php file and put it in a folder in your apache htdocs; there now you can test the behavior!

This tutorial will be as comprehensive as possible and will try to explain all things that I feel that need explaining. However I won’t go into details about HTML or PHP syntax; you’ll need to know some things about them to understand what’s going on here; after all the important thing is to understand the big picture so you can re-implement them in your case (or understand why your web framework does what it does).

A quick HTTP primer

So, what happens during a form display and submission? To properly understand that you need to know what an HTTP request is. An HTTP request is the way the browser “requests” a URL from a web server. This is thoroughly explained in the HTTP protocol however, for our purposes here it should suffice to say that an HTTP request is a text message that is send from the browser/HTTP Client to the HTTP/web server. This message should have the following format:

METHOD PATH HTTP/VERSION
Header 1: Value 1
Header 2: Value 2

Request data

The METHOD can be one of various methods supported in the HTTP protocol like GET, POST, PUT, OPTIONS etc however the most popular and the ones we’ll talk about here are GET and POST. The PATH is the actual url of the “page” you want to view without the server part. So if you are visiting http://www.example.com/path/to/page.html the path parameter will have a value of /path/to/page.html. The HTTP/VERSION will contain the version of HTTP the client uses; usually it is something like HTTP/1.1. Finally, after that first line there’s a bunch of optional headers with various extra information the client wants to pass to the server (for example what encoding it supports, what’s the host it connects to etc).

Additionally, in case of a POST request the headers are followed by a blank line which in turn is followed by a chunk of “data” that the client passes to the server.

The server will then response back with a text message similar to this (HTTP Response):

HTTP/VERSION STATUS
Header 1: Value 1
Header 2: Value 2

Response data

The HTTP/VERSION will also be something like HTTP/1.1 while the STATUS will be the status of the response. This status is a 3-digit numeric value followed by a textual description of the status. There are various statuses that you can receive, however the statuses can be grouped by the number they start with like this:

  • 1xx: Information; rarely used
  • 2xx: Success; status 200 is the most common one
  • 3xx: Redirection (browser must visit another page); either permanent or temporary
  • 4xx: Client error; 404 is page not found (also access denied errors will be 40x)
  • 5xx: Server error; something fishy happened to the server while responding

In this article we’ll mainly talk about 2xx and 3xx: A 200 OK answer is the most common one, it means that the HTTP request was completed successfully. A 302 FOUND request means that the browser should display a “different” path; that path will be provided in a Location: path header. When the browser receives a redirect it will do another GET request to retrieve the redirect to page.

Notice that the Headers and Data parts of the server reply may also be optional like for the client however they usually exist (especially with a 200 response; without the data the client won’t have anything to display).

So when a browser “requests” a page it will send an HTTP GET to the path. This happens all the time when we visit(click) links or entering urls to our browser. However, when we submit an HTML form the situation is a little more complex.

Form methods

An html form is a <form> tag that contains a bunch of <input> elements each one of which should have at least a name property. One of the inputs will usually be is a submit button.

Also, the form tag has two important attributes:

  • action: Defines the url where the post will be submitted to; it can be omitted to submit the form to the current path
  • method: Will be either GET or POST

Thus, a sample form is something like:

<form method="GET" action="form.php" >
  <input type='text' name='input1'>
  <input type='text' name='input2'>
  <input type='submit'>
</form>

So what are the differences between a <form method='GET'> and a <form method='POST'>?

  • Submitting an HTML form will translate to either an HTTP GET request or an HTTP POST request to the server depending on the method attribute
  • The data of a GET form will be encoded in the PATH of the HTTP request while the data of the POST form will be in the corresponding data part of the HTTP Request
  • A form that is submitted with GET should be idempotent i.e it should not modify anything in the server; a form that is submitted with POST should modify something the server

So, the form we defined previously (that has a GET method) will issue the following HTTP request (if we fill the values value1 and value2 to the inputs):

GET /form.php?input1=value1&input2=value2 HTTP/1.1

One the other hand if the form had a POST method the HTTP request would be like this:

POST /form.php HTTP/1.1

input1=value1&input2=value2

Notice that in the first case the data is in the PATH in the 1st line of the request while in the second case it is passed in the data section. Also, in both cases the encoded data of the form is similar to input1=value1&input2=value2: it is a list of key=value pairs seperated with & where the name attribute of each input is used as the key.

Concerning the idempotency of the action; this is not something that the HTTP protocol can enforce but it relies on the developer to implement it. When a form will not change anything to the server then it should be implemented as a method=GET. For example when you have a form with a search box that just returns some results. On the other hand, when a form does change things for example when you create a new item in an application then it should be implemented as a method=POST.

The browser has a different behavior after a GET vs after a POST because it expects that when you do a GET request then it won’t matter if that request is repeated many times. One the other hand, the browser will try to prevent you from submitting a request many times (because something is changed in the server so the user must do it intentionally by for example pressing a button to submit the form).

Proper form handling

So, following the previous section we can now explain how to handle a form properly:

For a GET form we don’t have to do anything fancy; we just retrieve the parameter values and we display the data these parameters correspond to just like if we displayed any other page.

For a POST form however we need to be extra careful as to avoid re-duplication of data and have a good user experience: When a POST form is submitted we need first to make sure that the submitted parameters are valid (for example there are no missing required fields). If the form is not valid then we will return a status 200 OK explaining to the user what went wrong; we usually return the same page containing the initial form with the fields that had errors marked.

On the other hand, if the form was valid we need to do the actual action that the form corresponds to; for example insert something to the database. After this is finished we should return a redirect (302) to either a different or even the same page. This will result to the browsing doing a GET request to the page we redirect to so there would be no danger of the user refreshing the page and resubmitting the form. We should not return a 200 OK after a POST request because then the user would be able to press F5 to duplicate the previous POST request (and re-insert the data).

One extra thing that we need to consider is how should we inform the user that his action was successful after the form submission and redirection? As we said, we can’t return a 200 OK message so we can’t really “create” the response, we instead need to redirect to another page. A common practice for this is to use a “flash” message; this is offered by many web frameworks through specific functions but can be easily implemented. I’ll explain how in the next section.

Implementing flash messages

Before talking about the flash message I’d like to quickly explain what’s a cookie and a browser session in HTTP, because the flash message builds upon these concepts:

A cookie is a way for the server to tell the client to store some information to be re-used later. What happens is that the server returns an HTTP header line similar to Set-Cookie: cookie-name=cookie-value. When the client receives that header line it will pass an HTTP header line similar to Cookie:  cookie-name=cookie-value to all future requests so the server will know which value it had send to the client (there are various options for expiring cookies etc but they are not important here). This may seem like a primitive solution however because HTTP is a stateless protocol that’s the only way for the server to store information about a client. If you disable cookies completely in a browser then there won’t be a way for the server to remember you, for example you won’t be able to login anywhere!

A session is a better way to store info about the client that builds upon the cookies. What happens is that when a client visits a site for the first time (so it has no cookies for that particular site) the server will send back a cookie named session_id (or something like that) containing a very big random number. The server will save this session id number in a persistent storage (for example in a database or a text file) and will correlate that number with information for that particular client. When the client sends back that session_id cookie the server will fetch the correlated info for that particular client from the persistent storage (and may update them etc). This way the server can store whatever info it wants about a particular client. The server usually keeps a a dictionary (map) of key-values for each session.

Now, a flash message is some information (message) that should be displayed to the user once. For example a message like “Your form has been submitted!”.

A simple way to implement this is to add a message attribute to the session when you want to display the flash message. The next page that is displayed (irrelevantly if there’s a redirect involved) will check to see if there’s a message attribute to the session; if yes it will display the actual message and remove the message attribute from the session (so it won’t be displayed again).

Implementing the form submission

Following the above guidelines I’ll present here a typical, production-ready form submission for PHP. Some choices I’ve made:

  • I am going to implement a POST form since a GET form doesn’t need any special handling
  • The form handler will be the same PHP page as the one displaying the form. This is a usual thing to do, you check the HTTP method and either display the form as-is (if it is GET) or handle the submission (if it is POST)
  • When the form is submitted successfully redirect to the same page and display a flash message
  • Check for valid input and display the error message

So without further ado here’s the complete php code that will submit your form; store it in a file named test.php:

<!DOCTYPE HTML>
<html>

<head>
  <meta charset="UTF-8">
  <meta name="viewport" content="width=device-width, initial-scale=1.0">
  <meta http-equiv="X-UA-Compatible" content="ie=edge">
  <title>TEST FORM</title>
  <link href="https://unpkg.com/tailwindcss@^1.0/dist/tailwind.min.css" rel="stylesheet">
</head>

<body class="bg-gray-100">
  <div class="px-8 py-8 w-1/2 m-auto">

    <?php
    session_start();
    if ($_SESSION['message'] ?? '') {
      echo '<div class="rounded bg-green-300 px-2 py-2">'.$_SESSION['message'].'</div>';
      unset($_SESSION['message']);
    }

    $nameErr = $wsErr = $name = $comment = "";
    $formValid = true;

    if ($_SERVER["REQUEST_METHOD"] == "POST") {
      if (empty($_POST["name"])) {
        $nameErr = "Name is required";
        $formValid = false;
      } else {
        $name = $_POST["name"];
      }

      if (empty($_POST["comment"])) {
        $comment = "";
      } else {
        $comment = $_POST["comment"];
      }

      if ($formValid) {
        if (1 == rand(1, 2)) {
          $_SESSION['message'] = "Success! You have submitted the values: <b>" . $name . " / " . $comment . "</b>";
          header('Location: ./test.php');
          exit();
        } else {
          $wsErr = "Error while trying to submit the form!";
        }
      }
    }
    ?>

    <h1 class="text-4xl font-bold text-indigo-500">Test a PHP form!</h1>

    <form class='border border-blue-800 rounded p-2' method="POST">

      <?= $wsErr ? "<div class='text-red-600 py-3'>" . $wsErr . "</div>" : "" ?>

      <div class="p-1">
        <label for="name">Name:</label> <input class="border border-blue-800 rounded" id="name" type="text" name="name" value="<?= $name ?>">
        <span class="text-red-600">* <?= $nameErr; ?></span>
      </div>

      <div class="p-1">
        <label for="comment">Comment:</label> <textarea class="border border-blue-800 rounded" id="comment" name="comment" rows="5" cols="40"><?= $comment ?></textarea>
      </div>

      <input class="rounded px-2 my-4 py-2 bg-blue-800 text-gray-100" type="submit" name="submit" value="Save">
    </form>
  </div>
</body>
</html>

So how is that working? As we can see there’s the php code first and the html is following (with some sprinkles of php). The HTML code is rather simple: It will display a POST form with two inputs named name and comment. Notice that we pass the $name and $comment php variables as their values. It also has a submit button and will display the $wsErr variable if it is not null (which means that there was an error while submitting the data). The PHP code now first starts the session (i.e it passes the session_id cookie to the client if such a cookie does not exist) checks to see if there’s a message attribute to the session. If such a message exists it will display it in a rounded green panel and remove that from the session (so it won’t be displayed again next time):

session_start();
if ($_SESSION['message'] ?? '') {
  echo '<div class="rounded bg-green-300 px-2 py-2">'.$_SESSION['message'].'</div>';
  unset($_SESSION['message']);
}

After that there are some variable initializations and we check if the HTTP request is POST (if the request is GET we’ll just disply the HTML):

if ($_SERVER["REQUEST_METHOD"] == "POST") {

For each of the inputs we check if they are empty or not and assign their values to the corresponding php variable. If the name is empty then we’ll set $formValid = false; and add an error message since this field is required. Then, if $formValid is not false we can do the actual action (for example write to the database). I’ve simulated that using a coin-toss with rand (so there’s a 50% possibility that the action will fail). If the action “failed” then nothing happened in the database so we should return the same page with the wsErr variable containing the error.

However if the action is successful that means that the data has been inserted to the database so we’ll need to set the flash message and do the redirect (the name of the page containing the form is /test.php so we’ll redirect to it):

$_SESSION['message'] = "Success! You have submitted the values: <b>" . $name . " / " . $comment . "</b>";
header('Location: ./test.php');
exit();

The two commands above (header and exit) will do the actual redirect in php. Since the session contains the message it will be displayed after the redirect has finished!

Conclusion

So following the above tutorial, here’s what you should absolutely do to submit an HTML form:

  • Use HTTP POST if the form is going to change data on the server; use HTTP GET otherwise (mainly for search/filter forms)
  • When using POST: Redirect when the form is valid and the action on the server has finished successfully; never return a 200 OK status when you’ve changed things in the server (database)
  • Use flash messages to pass information to the user after a redirect