/var/

Various programming stuff

Hello! If you are using an ad blocker but find something useful here and want to support me please consider disabling your ad blocker for this site.

Thank you,
Serafeim

Django dynamic tables and filters for similar models

Introduction

One of my favorite django apps is django-tables2: It allows you to easily create pagination and sorting enabled HTML tables to represent your model data using the usual djangonic technique (similar to how you create ModelForms). I use it to almost all my projects to represent the data, along with django-filter to create forms to filter my model data. I’ve written a nice SO answer with instructions on how to use django-filter along with django-tables2. This article will describe a technique that allows you to generate tables and filters for your models in the most DRY way!

The problem we’ll solve

The main tool django-tables2 offers is a template tag called render_table that gets an instance of a subclass of django_tables2.Table which contains a description of the table (columns, style etc) along with a queryset with the table’s data and outputs it to the page. A nice extra feature of render_table is that you could pass it just a simple django queryset and it will output it without the need to create the custom Table class. So you can do something like {% render_table User.objects.all() %} and get a quick output of your Users table.

In one of my projects I had three models that were used for keeping a different type of business log in the database (for auditing reasons) and was using the above feature to display these logs to the administrators, just by creating a very simple ListView (a different one for each Log type) and using the render_table to display the data. So I’d created three views limilar to this:

class AuditLogListView(ListView):
  model = AuditLog
  context_object_name = 'logs'

which all used a single template that contained a line {% render_table logs %} to display the table (the logs context variable contains the list/queryset of AuditLog s) so render_table will just output that list in a page. Each view of course had a different model attribute.

This was a nice DRY (but quick and dirty solution) that soon was not enough to fulfill the needs of the administrators since they neeeded to have default sorting, filtering, hide the primary key-id column etc. The obvious solution for that would be to just create three different Table subclasses that would more or less have the same options with only their model attributte different. I didn’t like this solution that much since it seemed non-DRY to me and I would instead prefer to create a generic Table (that wouldn’t have a model attributte) and would just output its data with the correct options — so instead of three Table classes I’d like to create just a single one with common options that would display its data (what render_table does).

Unfortunately, I couldn’t find a solution to this, since when I ommited the model attribute from the Table subclass nothing was outputed (there is no way to define fields to display in a Table without also defining the model). An obvious (and DRY) resolution would be to create a base Table subclass that would define the needed options and create three subclasses that would inherit from this class and override only the model attribute. This unfortunately was not possible becase inheritance does not work well with django-tables2!

Furthermore, there’s the extra hurdle of adding filtering to the above tables so that the admin’s would be able to quickly find a log message - if we wanted to use django-filter we’d need again to create three different subclasses (one for each log model type) of django_filter.FilterSet since django-filter requires you to define the model for which the filter will be created!

One cool way to resolve such problems is to create your classes dynamically when you need ‘em. I’ve already described a way to dynamically create forms in django in a previous post. Below, I’ll describe a similar technique which can be used to create both dynamic tables and filters. Using this methodology, you’ll be able to add a new CBV that displays a table with pagination, order and filtering for your model by just inheriting from a base class!

Adding the dynamic table

To create the DRY CBV we’ll use the SingleTableView (django_tables2.SingleTableView) as a base and override its get_table_class method to dynamically create our table class using type. Here’s how it could be done using a mixin (notice that this mixin should be used in a SingleTableView to override its get_table_class method):

class AddTableMixin(object, ):
  table_pagination = {"per_page": 25}

  def get_table_class(self):
      def get_table_column(field):
          if isinstance(field, django.db.models.DateTimeField):
              return tables.DateColumn("d/m/Y H:i")
          else:
              return tables.Column()

      attrs = dict(
          (f.name, get_table_column(f)) for
          f in self.model._meta.fields if not f.name == 'id'
      )
      attrs['Meta'] = type('Meta', (), {'attrs':{"class":"table"}, "order_by": ("-created_on", ) } )
      klass = type('DTable', (tables.Table, ), attrs)

      return klass

Let’s try to explain the get_table_class method: First of all, we’ve defined a local get_table_column function that will return a django-tables2 column depending on the field of the model. For example, in our case I wanted to use a django_tables2.DateColumn with a specific format when a DateTimeField is encountered and for all other model fields just use the stock Column. You may add other overrides here, for example add a TemplateColumn to properly render some data.

After that, we create a dictionary with all the attributes of the dynamic table model. The self.model field will contain the model Class of this SingleTableView, so using its _meta.fields will return the defined fields of that model. As we can see, I just use a generator expression to create a tuple with the name of the field and its column type (using get_table_column) excluding the ‘id’ column. So, attrs will be a dictionary of field names and column types. Here you may also exclude other columns you don’t want to display.

The Meta class of this table is crated using type which creates a parentless class by defining all its attributes in a dictionary and set it as the Meta key in the previously defined attrs dict. Finally, we create the actual django_tables2.Table subclass by inheriting from it and passing the attrs dict. We’ll see an example of what get_table_class returns later.

Creating a dynamic form for filtering

Let’s create another mixin that could be used to create a dynamic django.Form subclass to the CBV:

class AddFormMixin(object, ):
  def define_form(self):
      def get_form_field_type(f):
          return forms.CharField(required=False)

      attrs = dict(
          (f, get_form_field_type(f)) for
          f in self.get_form_fields() )

      klass = type('DForm', (forms.Form, ), attrs)

      return klass

  def get_queryset(self):
      form_class = self.define_form()
      if self.request.GET:
          self.form = form_class(self.request.GET)
      else:
          self.form = form_class()

      qs = super(AddFormMixin, self).get_queryset()

      if self.form.data and self.form.is_valid():
          q_objects = Q()
          for f in self.get_form_fields():
              if self.form.cleaned_data.get(f):
                  q_objects &= Q(**{f+'__icontains':self.form.cleaned_data[f]})

          qs = qs.filter(q_objects)

      return qs

  def get_context_data(self, **kwargs):
      ctx = super(AddFormMixin, self).get_context_data(**kwargs)
      ctx['form'] = self.form
      return ctx

The first method that will be called is the get_queryset method that will generate the dynamic form using define_form. This method has a get_form_field_type local function (similar to get_table_fields) that can be used to override the types of the fields (or just fallback to a normal CharField) and then create the attrs dictionary and forms.Form subclass in a similar way as the Table subclass. Here, we don’t want to create a filter form from all fields of the model as we did on table, so instead we’ll use a get_form_fields (don’t confuse it with the local get_form_field_type) method that returns the name of the fields that we want to use in the filtering form and needs to be defined in each CBV — the get_form_fields must be defined in classes that use this mixin.

After defining the form, we need to check if there’s anything to the GET dict — since we are just filtering the queryset we’d need to submit the form with a GET (and not a POST). We see that if we have data to our request.GET dictionary we’ll instantiate the form using this data (or else we’ll just create an empty form). To do the actual filtering, we check if the form is valid and create a django.models.db.Q object that is used to combine (by AND) the conditions. Each of the individual Q objects that will be combined (&=) to create the complete one will be created using the line Q(**{f+'__icontains':self.form.cleaned_data.get(f, '')}) (where f will be the name of the field) which is a nice trick: It will create a dictionary of the form {'action__icontains': 'test text'} and then pass this as a keyword argument to the Q (using the ** mechanism), so Q will be called like Q(action__icontains='test text') - this (using the **{key:val} trick) is the only way to pass dynamic kwargs to a function!

Finally, the queryset will be filtered using the combined Q object we just described.

Creating the dynamic CBV

Using the above mixins, we can easily create a dynamic CBV with a table and a filter form only by inheriting from the mixins and SingleTableView and defining the get_form_fields method:

class AuditLogListView(AddTableMixin, AddFormMixin, SingleTableView):
  model = AuditLog
  context_object_name = 'logs'

  def get_form_fields(self):
      return ('action','user__username', )

Let’s suppose that the AuditLog is defined as following:

class AuditLog(models.Model):
  created_on = models.DateTimeField( auto_now_add=True, editable=False,)
  user = models.ForeignKey(settings.AUTH_USER_MODEL, editable=False,)
  action = models.CharField(max_length=256, editable=False,)

Using the above AuditLogListView, a dynamic table and a dynamic form will be automaticall created whenever the view is visited. The Table class will be like this:

class DTable(tables.Table):
  created_on = tables.DateColumn("d/m/Y H:i")
  user = tables.Column()
  action = tables.Column()

  class Meta:
      attrs = {"class":"table"}
      order_by = ("-created_on", )

and the Form class like this:

class DForm(forms.Form):
  user__username = forms.CharField()
  action = forms.CharField()

An interesting thing to notice is that we can drill down to foreign keys (f.e. user__username) to create more interesting filters. Also we could add some more methods to be overriden by the implementing class beyond the get_form_fields. For example, instead of using self.model._meta.fields to generate the fields of the table, we could instead use a get_table_fields (similar to the get_form_fields) method that would be overriden in the implementing classes (and even drill down on foreign keys to display more data on the table using accessors).

Or, we could also define the form field types and lookups (instead of always using CharField and icontains ) in the get_form_fields — similar to django-filter.

Please notice that instead of creating a django form instance for filtering, we could instead create a django-filter instance with a similar methodology. However, I preferred to just use a normal django form because it makes the whole process more clear and removes a level of abstraction (we just create a django.Form subclass while, if we used django-filter we’d need to create a django-filter subclass which would create a django.Form subclass)!

Conclusion

Using the above technique we can quickly create a table and filter for a number of Models that all share the same properties in the most DRY. This technique of course is useful only for quick CBVs that are more or less the same and require little customization. Another interesting thing is that instead of creating different SingleTableView s we could instead create a single CBV that will get the content type of the Model to be viewed as a parameter and retrieve the model (and queryset) from the content type - so we could have a single CBV for all our table/filtering views !
A (little more) complex react and flux example

Introduction

In previous two parts of this series, we have seen how we could implement a not-so-simple single page application with full CRUD capabilities using react only (in the first part ) and then how to change it to use the flux architecture (in the second part).

In this, third, part, we will add some more capabilities to the previous app to prove how easy it is to create complex apps and continue the discussion on the Flux architecture. The source code of this project can be found at https://github.com/spapas/react-tutorial (tag name react-flux-complex).

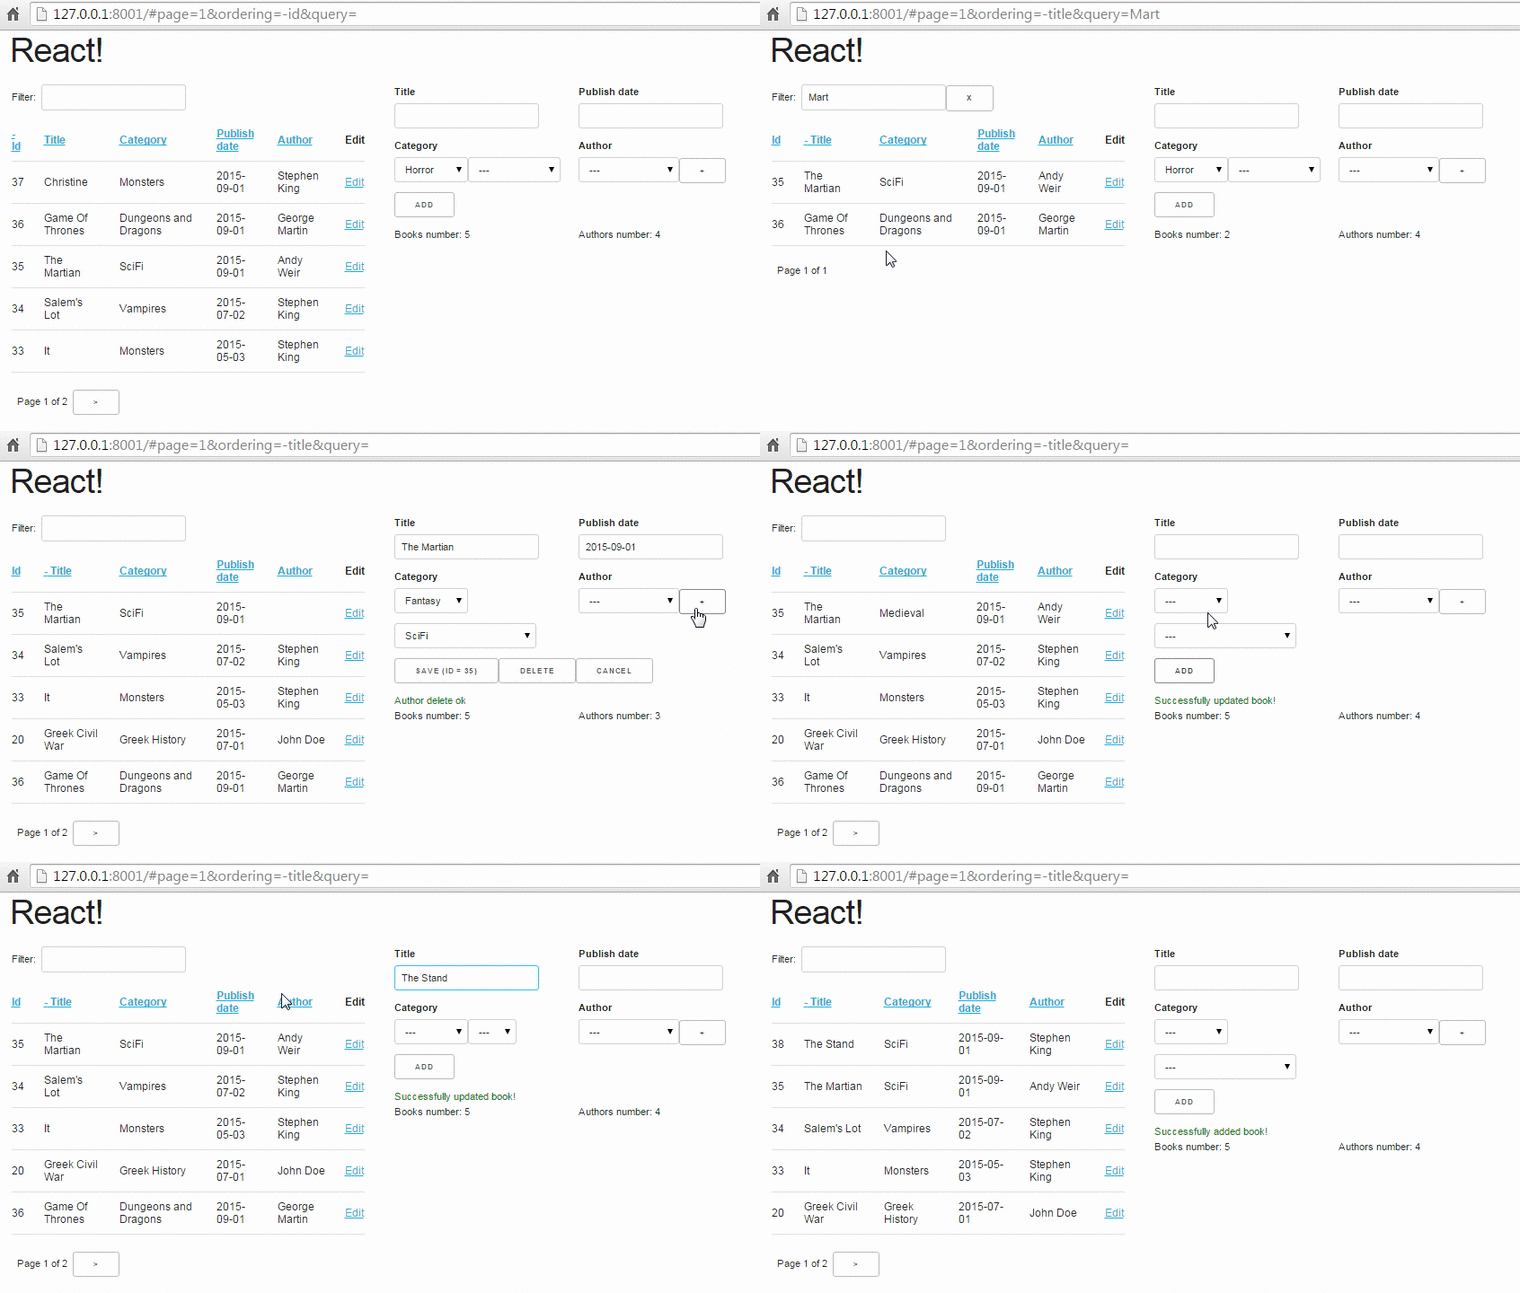
Here’s a demo of the final application:

Our project

We can see that, when compared to the previous version this one has:

  • Sorting by table columns
  • Pagination
  • Message for loading
  • Client side url updating (with hashes)
  • Cascading drop downs (selecting category will filter out subcategories)
  • Integration with jquery-ui datepicker
  • Add a child object (author)
  • Add authors with a modal dialog (popup)
  • Delete authors (using the “-” button)
  • Colored ajax result messages (green when all is ok, red with error)
  • A statistics panel (number of books / authors)

In the paragraphs below, beyond the whole architecture, we’ll see a bunch of techniques such as:

  • Creating reusable flux components
  • Integrating react with jquery
  • Creating cascading dropdowns
  • Updating URLs with hashes
  • Adding pagination/sorting/querying to a table of results
  • Displaying pop ups

More about Flux components

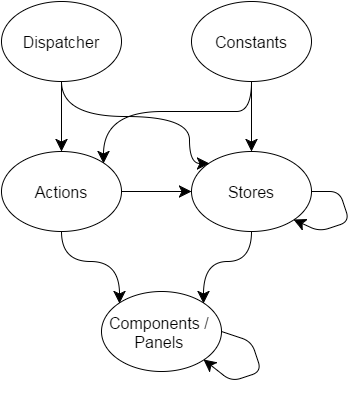
Before delving into the source code of the above application, I’d like to make crystal what is the proposed way to call methods in the flux chain and which types of components can include other types of components. Let’s take a look at the following diagram:

flux dependencies

The arrows display the dependencies of the Flux architecture - an arrow from X to Y means that a component of type Y could depend on an Component of type X (of example, a store could depend on an action or another store but not on a panel).

In more detail, we can see that in the top of the hierarchy, having no dependencies are the Dispatcher and the Constants. The Dispatcher is just a single component (which actually is a singleton - only one dispatcher exists in each single page react-flux application) that inherits from the Facebook’s dispatcher and is imported by the action components (since action methods defined in action components call the dispatch method of the dispatcher passing the correct parameters) and the stores which do the real actions when an action is dispatched, depending on the action type. The Constant components define constant values for the action types and are used by both the actions (to set the action types to the dispatch calls) and by the stores to be used on the switch statement when an action is dispatched. As an example, for BookActions we have the following

var BookConstants = require('../constants/BookConstants')
var AppDispatcher = require('../dispatcher/AppDispatcher').AppDispatcher;

var BookActions = {
    change_book: function(book) {
        AppDispatcher.dispatch({
            actionType: BookConstants.BOOK_CHANGE,
            book: book
        });
    },
// Other book actions [...]

and for BookStore

var $ = require('jquery');
var AppDispatcher = require('../dispatcher/AppDispatcher').AppDispatcher;
var BookConstants = require('../constants/BookConstants')

// [...]

BookStore.dispatchToken = AppDispatcher.register(function(action) {
    switch(action.actionType) {
        case BookConstants.BOOK_EDIT:
            _editBook(action.book);
        break;
// [...] other switch branches

An interesting thing to see is that the actions depend only on the Dispatcher and on the Constants, while the stores also depend on actions (not only from the same action types as the store type, for example AuthorStore depends on both AuthorActions and MessageActions) and on other stores. This means that the actions should be a “clean” component: Just declare your action methods whose only purpose is to pass the action type along with the required parameters to the dispatcher.

On the other hand, the stores are depending on both actions and other stores. The action dependency is because sometimes when something is done in a store we need to notify another store to do something as a response to that. For example, in our case, when a book is updated we need to notify the message store to show the “Book updated ok” message. This preferrably should not be done by directly calling the corresponding method on the message store but instead by calling the corresponding action of MessageAction and passing the correct parameters (actually, the method that updates the message in MessageStore should be a private method that is called only through the action).

One thing to notice here is that you cannot call (and dispatch) an action in the same call stack (meaning it is directly called) as of another dispatch or you’ll get a Invariant Violation: Dispatch.dispatch(...): Cannot dispatch in the middle of a dispatch. error in your javascript console. Let’s see an example of what this means and how to avoid it because its a common error. Let’s say that we have the following code to a store:

AppDispatcher.register(function(action) {
    switch(action.actionType) {
        case Constants.TEST_ERR:
            TestActions.action1();
        break;
        case Constants.TEST_OK1:
            setTimeout(function() {
                TestActions.action1();
            }, 0);

        break;
        case Constants.TEST_OK2:
            $.get('/get/', function() {
                TestActions.action1();
            });

        break;
    }
    return true;
});

Here, the TEST_ERR branch will throw an error because the TestAction.action1 is in the same call stack as this dispatch! On the other hand, both TEST_OK1 and TEST_OK2 will work: TEST_OK2 is the most usual, since most of the times we want to call an action as a result of an ajax call - however, sometimes we want to call an action without any ajax — in this case we use the setTimeout (with a timeout of 0 ms) in order to move the call to TestActions.action1() to a different call stack.

Now, as I mentioned before, there’s also a different-store dependency on stores. This dependency is needed because some stores may offer public methods for other stores to use (methods that don’t actually need to be dispatched through the dispatcher) and for the waitFor method , in case there are two different stores that respond to a single action and want to have one store executing its dispatch method before the other. (the waitFor method takes the dispatchToken, which is the result of Dispatcher.register of a different store as a parameter in order to wait for that action to finish).

Finally, the Panels depend on both actions (to initiate an action as a response to user input) and stores (to read the state of the each required store when it is changed). Of course, not all panels actually depend on stores, since as we already know the state of a React app should be kept as high in the hierarchy as possible, so a central component will get the state of a store and pass the required state attributes to its children through parameters. On the other hand, every component that responds to user input will have to import am action object and call the corresponding method — we should never pass callbacks from a parent to a child component as a parameter anymore unless we want to make the component reusable (more on this later).

Finally, as expected, because of their hierarchy the compoents depend on their child components (a BookTable depends on a BookTableRow etc).

Explaining the application components

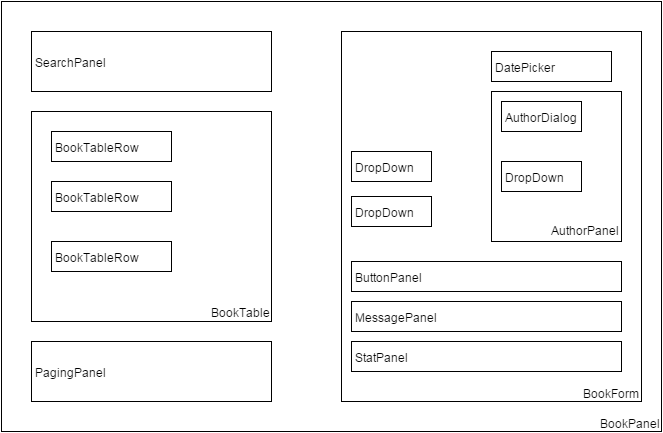
There are a lot of components that are needed for the above application. A bird’s eye view of the components and their hierarchies can be seen on the following figure:

Our components

We will first explain a bit the components that could be easily reused by other applications and after that the components that are specifically implemented for our book/author single page application.

Reusable application components

We can see that beyond the specific components (BookPanel, BookTable etc) there’s a bunch of more general components (DropDown, DatePicker, PagingPanel, SearchPanel, MessagePanel) that have names like they could be used by other applications (for example every application that wants to implement a DropDown could use our component) and not only by the Book-Author application. Let’s take a quick look at these components and if they are actually reusable:

DatePicker.react.js

The datepicker component has more or less the same structure as with the dropdown: It needs one parameter for its current value (props.value) and another as the callback to the function when the date is changed (once again this is required to have a reusable component):

var React = require('react');

var DatePicker = React.createClass({
    render: function() {
        return(
            <input type='text' ref='date' value={this.props.value} onChange={this.handleChange} />
        );
    },
    componentDidMount: function() {
        $(React.findDOMNode(this)).datepicker({ dateFormat: 'yy-mm-dd' });
        $(React.findDOMNode(this)).on('change', this.handleChange);
    },
    componentWillUnmount: function() {

    },
    handleChange: function() {
        var date = React.findDOMNode(this.refs.date).value
        this.props.onChange(date);
    }
});

module.exports.DatePicker = DatePicker ;

Another thing we can see here is how can integrate jquery components with react: When the component is mounted, we get its DOM component using React.findDomNode(this) and convert it to a datepicker. We also set its change function to be the passed callback.

PagingPanel.react.js

The paging panel is not actually a reusable component because it requires BookActions (to handle next and previous page clicks) - so it can’t be used by Authors (if authors was a table that is). However, we can easily change it to be reusable if we passed callbacks for next and previous page so that the component including PagingPanel would call the correct action on each click. Having a reusable PagingPangel is not needed for our application since only books have a table.

var React = require('react');
var BookActions = require('../actions/BookActions').BookActions;

var PagingPanel = React.createClass({
    render: function() {
        return(
            <div className="row">
                {this.props.page==1?'':<button onClick={this.onPreviousPageClick}>&lt;</button>}
                &nbsp; Page {this.props.page} of {this.getTotalPages()} &nbsp;
                {this.props.page==this.getTotalPages()?'':<button onClick={this.onNextPageClick} >&gt;</button>}
            </div>
        );
    },
    onNextPageClick: function(e) {
        e.preventDefault();
        BookActions.change_page(this.props.page+1)
    },
    onPreviousPageClick: function(e) {
        e.preventDefault();
        BookActions.change_page(this.props.page-1)
    },
    getTotalPages: function() {
        return Math.ceil(this.props.total / this.props.page_size);
    }
})

module.exports.PagingPanel = PagingPanel;

The component is very simple, it needs three parameters:

  • the current page (props.page)
  • the page size (props.page_size)
  • the total pages number (props.total)

and just displayd the current page along with buttons to go to the next or previous page (if these buttons should be visible of course).

SearchPanel.react.js

The SearchPanel is another panel that could be reusable if we’d passed a callbeck instead of calling the BookActions.search action directly. The promise behavior has been explained in the previous posts and is needed to buffer the queries to the server when a user types his search query.

var React = require('react');
var BookActions = require('../actions/BookActions').BookActions;

var SearchPanel = React.createClass({
    getInitialState: function() {
        return {
            search: this.props.query,
        }
    },
    componentWillReceiveProps: function(nextProps) {
      this.setState({
            search: nextProps.query
      });
    },
    render: function() {
        return (
            <div className="row">
                <div className="one-fourth column">
                    Filter: &nbsp;
                    <input ref='search' name='search' type='text' value={this.state.search} onChange={this.onSearchChange} />
                    {this.state.search?<button onClick={this.onClearSearch} >x</button>:''}
                </div>
            </div>
        )
    },
    onSearchChange: function() {
        var query = React.findDOMNode(this.refs.search).value;
        if (this.promise) {
            clearInterval(this.promise)
        }
        this.setState({
            search: query
        });
        this.promise = setTimeout(function () {
            BookActions.search(query);
        }.bind(this), 400);
    },
    onClearSearch: function() {
        this.setState({
            search: ''
        });
        BookActions.search('');
    }
});

module.exports.SearchPanel = SearchPanel;

As we can see, this panel is a little different than the previous ones because it actually handles its own local state: When the component should get properties from its parent compoent, its state will be updated to the query attribute - so the current value of the search query gets updated through properties. However, when the value of the search input is changed, we see that the local state is changed immediately but the BookActions.search (or the corresponding callback) gets called only when the timeout has passed!

The above means that we can type whatever we want on the search input, but it at first it will be used only locally to immediately update the value of the input and, only after the timeout has fired the search action will be called. If we hadn’t used the local state it would be much more difficult to have this consistent behavior (we’d need to add two actions, one to handle the search query value change and another to handle the timeout firing — making everythimg much more complicated).

MessagePanel

The MessagePanel is really interesting because it is a reusable component that actually has its own action and store module! This component can be reused in different applications that need to display message but not on the same application (because a single state is kept for all messages). If we wanted to use a different MessagePanel for Books or Authors then we’d need to keep both in the state and also it to the action to differentiate between messages for author and for book. Instead, by keeping a single Messages state for both Books and Authors we have a much more simple version.

MessagePanel.react.js

The MessagePanel component has a local state which responds to changes on MessageStore. When the state of MessageStore is changed the MessagePanel will be re-rendered with the new message.

var React = require('react');
var MessageStore = require('../stores/MessageStore').MessageStore;

var MessagePanel = React.createClass({
    getInitialState: function() {
        return {

        };
    },
    render: function() {
        return(
            <div className="row">
                {this.state.message?<div className={this.state.message.color}>{this.state.message.text}</div>:""}
            </div>
        );
    },
    _onChange: function() {
        this.setState(MessageStore.getState());
    },
    componentWillUnmount: function() {
        MessageStore.removeChangeListener(this._onChange);
    },
    componentDidMount: function() {
        MessageStore.addChangeListener(this._onChange);
    }
})

module.exports.MessagePanel = MessagePanel;

MessageStore.js

The MessageStore has a (private) state containing a message that gets updated only when the ccorresponding action is dispached. The store has a single state for all messages - it doesn’t care if the messages are for books or authors.

var $ = require('jquery');
var EventEmitter = require('events').EventEmitter;
var AppDispatcher = require('../dispatcher/AppDispatcher').AppDispatcher;
var BookConstants = require('../constants/BookConstants')

var _state = {
    message: {}
};

var MessageStore = $.extend({}, EventEmitter.prototype, {
    getState: function() {
        return _state;
    },
    emitChange: function() {
        this.emit('change');
    },
    addChangeListener: function(callback) {
        this.on('change', callback);
    },
    removeChangeListener: function(callback) {
        this.removeListener('change', callback);
    }
});

MessageStore.dispatchToken = AppDispatcher.register(function(action) {
    switch(action.actionType) {
        case BookConstants.MESSAGE_ADD:
            _state.message = action.message;
            MessageStore.emitChange();
        break;
    }
    return true;
});

module.exports.MessageStore = MessageStore;

MessageActions

Finally, there are two actions that are defined for the MessageStore: One for adding an ok message and one for adding an error message - both of which have the same message type (but pass a different color parameter).

var AppDispatcher = require('../dispatcher/AppDispatcher').AppDispatcher;
var BookConstants = require('../constants/BookConstants')

var MessageActions = {
    add_message_ok: function(msg) {
        AppDispatcher.dispatch({
            actionType: BookConstants.MESSAGE_ADD,
            message: {
                color: 'green',
                text: msg
            }
        });
    },
    add_message_error: function(msg) {
        AppDispatcher.dispatch({
            actionType: BookConstants.MESSAGE_ADD,
            message: {
                color: 'green',
                text: msg
            }
        });
    }
};

module.exports.MessageActions = MessageActions;

Non-reusable application components

I don’t want to discuss the source code for all the non-reusable components since some of them are more or less the same with the previous version and are easy to understand just by checking the source code (BookTableRow and ButtonPanel). However, I’ll discuss the other, more complex components starting from the inside of the react-onion:

BookTable.react.js

I want to display this component to discuss how sorting is implemented: Each column has a key which, when passed to django-rest-framework will sort the results based on that key (the __ does a join so by author__last_name we mean that we want to sort by the last_name field of the author of each book. Also, you can pass the key as it is to sort ascending or with a minus (-) in front (for example -author__last_name).

var React = require('react');
var BookTableRow = require('./BookTableRow.react').BookTableRow;
var BookActions = require('../actions/BookActions').BookActions;

var BookTable = React.createClass({
    render: function() {
        var rows = [];
        this.props.books.forEach(function(book) {
            rows.push(<BookTableRow key={book.id} book={book} />);
        });
        return (
            <table>
                <thead>
                    <tr>
                        <th><a href='#' onClick={this.onClick.bind(this, 'id')}>{this.showOrdering('id')} Id</a></th>
                        <th><a href='#' onClick={this.onClick.bind(this, 'title')}>{this.showOrdering('title')} Title</a></th>
                        <th><a href='#' onClick={this.onClick.bind(this, 'subcategory__name')}>{this.showOrdering('subcategory__name')} Category</a></th>
                        <th><a href='#' onClick={this.onClick.bind(this, 'publish_date')}>{this.showOrdering('publish_date')} Publish date</a></th>
                        <th><a href='#' onClick={this.onClick.bind(this, 'author__last_name')}>{this.showOrdering('author__last_name')} Author</a></th>
                        <th>Edit</th>
                    </tr>
                </thead>
                <tbody>{rows}</tbody>
            </table>
        );
    },
    onClick: function(v, e) {
        e.preventDefault();
        BookActions.sort_books(v);
    },
    showOrdering: function(v) {
        if (v==this.props.ordering) {
            return '+'
        } else if ('-'+v==this.props.ordering) {
            return '-'
        }
    }
});

module.exports.BookTable = BookTable ;

The only thing that needs explaining in this module is the line of the form

<th><a href='#' onClick={this.onClick.bind(this, 'id')}>{this.showOrdering('id')} Id</a></th>

that creates the title of each column and triggers ascending or descending sorting on this column by clicking on it. So, we can see that we’ve create an onClick function that actually expects a value - the key to that column. To allow passing that value, we use the bind method of the function object which will create new a function that has this key as its first parameter. If we didn’t want to use bind, we’d need to creatre 5 different function (onIdClick, onTitleClick etc)! The most common usage of bind is to actually bind a function to an object (that’s what the first parameter to this function does) so that calling this inside that function will refer to that object - here we leave the binding of the function to the same object and only do the parameter passing.

Also, the showOrdering checks if the current ordering is the same as that column’s key and displays either a + (for ascending) or - (for descending) in front of the column title.

AuthorDialog.react.js

This is a handmade pop-up dialog that gets displayed when a new author is added (the + button is clicked) using only css to center it on the screen when it is displayed. We can see that it is either visible on invisible based on the showDialog input property which actually is the only input this component requires. When it is visible and the ok or cancel button are pressed the corresponding action will be dispatched (which will actually close this popup by setting the showDialog to false):

var React = require('react');
var AuthorActions = require('../actions/AuthorActions').AuthorActions;

var AuthorDialog = React.createClass({

    render: function() {
        if (!this.props.showDialog) {
            return (
                <div />
            )
        } else {
            return(
                <div className='modal-dialog' id="dialog-form"  >
                    <label htmlFor="first_name">First name:</label> <input type='text' ref='first_name' name='first_name' /> <br />
                    <label htmlFor="last_name">Last name:</label> <input type='text' ref='last_name' name='last_name' /> <br />
                    <button onClick={this.onOk}>Ok</button>
                    <button onClick={this.onCancel} >Cancel</button>
                </div>

            );
        }
    },
    onCancel: function(e) {
        e.preventDefault();
        AuthorActions.hide_add_author();
    },
    onOk: function(e) {
        e.preventDefault();
        first_name = React.findDOMNode(this.refs.first_name).value;
        last_name = React.findDOMNode(this.refs.last_name).value;
        AuthorActions.add_author_ok({
            first_name: first_name,
            last_name: last_name
        });
    }
});

module.exports.AuthorDialog = AuthorDialog ;

AuthorPanel.react.js

The AuthorPanel displays the author select DropDown along with the + (add author) and - (delete author) buttons. It also contains the AuthorDialog which will be displayed or not depending on the value of the showDialog property.

var React = require('react');
var DropDown = require('./DropDown.react').DropDown;
var AuthorDialog = require('./AuthorDialog.react').AuthorDialog;
var AuthorActions = require('../actions/AuthorActions').AuthorActions;

var AuthorPanel = React.createClass({
    getInitialState: function() {
        return {};
    },
    render: function() {
        var authorExists = false ;
        if(this.props.authors) {
            var ids = this.props.authors.map(function(x) {
                return x.id*1;
            });

            if(ids.indexOf(1*this.props.author)>=0 ) {
                authorExists = true;
            }
        }

        return(
            <div className='one-half column'>
                <AuthorDialog showDialog={this.props.showDialog} />
                <label forHtml='date'>Author</label>
                <DropDown options={this.props.authors} dropDownValueChanged={this.props.onAuthorChanged} value={authorExists?this.props.author:''} />
                <button onClick={this.addAuthor} >+</button>
                {authorExists?<button onClick={this.deleteAuthor}>-</button>:""}
            </div>
        );
    },
    addAuthor: function(e) {
        e.preventDefault();
        console.log("ADD AUTHOR");
        AuthorActions.show_add_author();
    },
    deleteAuthor: function(e) {
        e.preventDefault();
        AuthorActions.delete_author(this.props.author);
        console.log("DELETE AUTHOR");
        console.log(this.props.author);
    },
});

module.exports.AuthorPanel = AuthorPanel;

As we can see, there are three properties that are passed to this component:

  • props.author: The currently selected author
  • props.authors: The list of all authors
  • props.onAuthorChanged: A callback that is called when the author is changed. Here, we could have used an action (just like for add/delete author) instead of a callback, however its not actually required. When the author is changed, it means that the currently edited book’s author is changed. So we could propagate the change to the parent (form) component that handles the book change along with the other changes (i.e title, publish date etc).

StatPanel.react.js

The StatPanel is an interesting, read-only component that displays the number of authors and books. This component requests updates from both the BookStore and AuthorStore - when their state is updated the component will be re-rendered with the number of books and authors:

var React = require('react');
var BookStore = require('../stores/BookStore').BookStore;
var AuthorStore = require('../stores/AuthorStore').AuthorStore;

var StatPanel = React.createClass({
    getInitialState: function() {
        return {};
    },
    render: function() {
        var book_len = '-';
        var author_len = '-';
        if(this.state.books) {
            book_len = this.state.books.length
        }
        if(this.state.authors) {
            author_len = this.state.authors.length
        }
        return(
            <div className="row">
                <div className="one-half column">
                    Books number: {book_len}
                </div>
                <div className="one-half column">
                    Authors number: {author_len}
                </div>
                <br />
            </div>
        );
    },
    _onBookChange: function() {
        this.setState({
            books:BookStore.getState().books
        });
    },
    _onAuthorChange: function() {
        this.setState({
            authors: AuthorStore.getState().authors
        });
    },
    componentWillUnmount: function() {
        AuthorStore.removeChangeListener(this._onAuthorChange);
        BookStore.removeChangeListener(this._onBookChange);
    },
    componentDidMount: function() {
        AuthorStore.addChangeListener(this._onAuthorChange);
        BookStore.addChangeListener(this._onBookChange);
    }
});

module.exports.StatPanel = StatPanel ;

We’ve added different change listeners in case we wanted to do some more computations for book or author change (instead of just getting their books / authors property). Of course the same behavior could be achieved with just a single change listener that would get both the books and authors.

BookForm.react.js

The BookForm is one of the most complex panels of this application (along with BookPanel) because it actually contains a bunch of other panels and has some callbacks for them to use.

We can see that, as explained before, when the current book form values are changed (through callbacks) the change_book action will be called.

var React = require('react');
var BookActions = require('../actions/BookActions').BookActions;
var DropDown = require('./DropDown.react.js').DropDown;
var StatPanel = require('./StatPanel.react.js').StatPanel;
var MessagePanel = require('./MessagePanel.react.js').MessagePanel;
var DatePicker = require('./DatePicker.react.js').DatePicker;
var ButtonPanel = require('./ButtonPanel.react.js').ButtonPanel;
var AuthorPanel = require('./AuthorPanel.react.js').AuthorPanel;
var CategoryStore = require('../stores/CategoryStore').CategoryStore;
var AuthorStore = require('../stores/AuthorStore').AuthorStore;
var loadCategories = require('../stores/CategoryStore').loadCategories;
var loadAuthors = require('../stores/AuthorStore').loadAuthors;

var BookForm = React.createClass({
    getInitialState: function() {
        return {};
    },
    render: function() {
        return(
            <form onSubmit={this.onSubmit}>
                <div className='row'>
                    <div className='one-half column'>
                        <label forHtml='title'>Title</label>
                        <input ref='title' name='title' type='text' value={this.props.book.title} onChange={this.onTitleChange} />
                    </div>
                    <div className='one-half column'>
                        <label forHtml='date'>Publish date</label>
                        <DatePicker ref='date' onChange={this.onDateChange} value={this.props.book.publish_date} />
                    </div>
                </div>
                <div className='row'>
                    <div className='one-half column'>
                        <label forHtml='category'>Category</label>
                        <DropDown options={this.state.categories} dropDownValueChanged={this.onCategoryChanged} value={this.props.book.category} />
                        <DropDown options={this.state.subcategories} dropDownValueChanged={this.onSubCategoryChanged} value={this.props.book.subcategory} />
                    </div>
                    <AuthorPanel authors={this.state.authors} author={this.props.book.author} onAuthorChanged={this.onAuthorChanged} showDialog={this.state.showDialog} />
                </div>

                <ButtonPanel book={this.props.book}  />
                <MessagePanel />
                <StatPanel  />
            </form>
        );
    },
    onSubmit: function(e) {
        e.preventDefault();
        BookActions.save(this.props.book)
    },
    onTitleChange: function() {
        this.props.book.title = React.findDOMNode(this.refs.title).value;
        BookActions.change_book(this.props.book);
    },
    onDateChange: function(date) {
        this.props.book.publish_date = date;
        BookActions.change_book(this.props.book);
    },
    onCategoryChanged: function(cat) {
        this.props.book.category = cat;
        this.props.book.subcategory = '';
        BookActions.change_book(this.props.book);
    },
    onSubCategoryChanged: function(cat) {
        this.props.book.subcategory = cat;
        BookActions.change_book(this.props.book);
    },
    onAuthorChanged: function(author) {
        this.props.book.author = author;
        BookActions.change_book(this.props.book);
    },
    _onChangeCategories: function() {
        this.setState(CategoryStore.getState());
    },
    _onChangeAuthors: function() {
        this.setState(AuthorStore.getState());
    },
    componentWillUnmount: function() {
        CategoryStore.removeChangeListener(this._onChangeCategories);
        AuthorStore.removeChangeListener(this._onChangeAuthors);
    },
    componentDidMount: function() {
        CategoryStore.addChangeListener(this._onChangeCategories);
        AuthorStore.addChangeListener(this._onChangeAuthors);
        loadCategories();
        loadAuthors();
    }
});

module.exports.BookForm = BookForm;

The above component listens for updates on both Category and Author store to update when the authors (when an author is added or deleted) and the categories are changed (for example to implement the cascading dropdown functionality), so the list of authors and the list of categories and subcategoreis are all stored in the local state. The book that is edited is just passed as a property - actually, this is the only property that this component needs to work.

BookPanel.react.js

Finally, BookPanel is the last component we’ll talk about. This is the central component of the application - however we’ll see that it is not very complex (since most user interaction is performed in other components). This component just listens on changes in the BookStore state and depending on the parameters either displays the “Loading” message or the table of books (depending on the state of ajax calls that load the books). The other parameters like the list of books, the ordering of the books etc are passed to the child components.

var React = require('react');
var BookStore = require('../stores/BookStore').BookStore;
var BookActions = require('../actions/BookActions').BookActions;
var SearchPanel = require('./SearchPanel.react').SearchPanel;
var BookTable = require('./BookTable.react').BookTable;
var PagingPanel = require('./PagingPanel.react').PagingPanel;
var BookForm = require('./BookForm.react').BookForm;

var reloadBooks = require('../stores/BookStore').reloadBooks;

var BookPanel = React.createClass({
    getInitialState: function() {
        return BookStore.getState();
    },
    render: function() {
        return(
            <div className="row">
                <div className="one-half column">
                    {
                        this.state.loading?
                        <div class='loading' >Loading...</div>:
                        <div>
                            <SearchPanel query={this.state.query} ></SearchPanel>
                            <BookTable books={this.state.books} ordering={this.state.ordering} />
                            <PagingPanel page_size='5' total={this.state.total} page={this.state.page} />
                        </div>
                    }
                </div>
                <div className="one-half column">
                    <BookForm
                        book={this.state.editingBook}
                    />
                </div>
                <br />
            </div>
        );
    },
    _onChange: function() {
        this.setState( BookStore.getState() );
    },
    componentWillUnmount: function() {
        BookStore.removeChangeListener(this._onChange);
    },
    componentDidMount: function() {
        BookStore.addChangeListener(this._onChange);
        reloadBooks();
    }
});

module.exports.BookPanel = BookPanel ;

The Actions

All actions are rather simple components without other dependencies as we’ve already discussed. They just define “actions” (which are simple functions) that create the correct parameter object type and pass it to the dispatcher. The only attribute that is required for this object is the actionType that should get a value from the constants. I won’t go into any more detail about the actions — please check the source code and all your questions will be resolved.

The Stores

First of all, all stores are defined through the following code that is already discussed in the previous part:

var MessageStore = $.extend({}, EventEmitter.prototype, {
    getState: function() {
        return _state;
    },
    emitChange: function() {
        this.emit('change');
    },
    addChangeListener: function(callback) {
        this.on('change', callback);
    },
    removeChangeListener: function(callback) {
        this.removeListener('change', callback);
    }
});

When the state of a store is changed its emitChange function will be called (I mean called manually from the code that actually changes the state and knows that it has actually been changed - nothing will be called automatically). When emitChange is called, all the components that listen for changes for this component (that have called addChangeListener of the store with a callback) will be notified (their callback will be called) and will use getState of the store to get its current state - after that, these components will set their own state to re-render and display the changes to the store.

Let’s now discuss the four stores defined — I will include only the parts of each file that are actually interesting, for everything else use the source Luke!

MessageStore.js

A very simple store that goes together with MessagePanel and MessageActions. It just keeps a state with the current message object and just changes this message when the MESSAGE_ADD message type is dispatched. After changing the message, the listeners (only one in this case) will be notified to update the displayed message:

var _state = {
    message: {}
};

MessageStore.dispatchToken = AppDispatcher.register(function(action) {
    switch(action.actionType) {
        case BookConstants.MESSAGE_ADD:
            _state.message = action.message;
            MessageStore.emitChange();
        break;
    }
    return true;
});

AuthorStore.js

Here we see that the local state has an array of the authors and a showDialog flag that controls the state of the add author popup. For the AUTHOR_ADD and HIDE_ADD_AUTHOR cases of the dispatch we just change the state of this flag and emit the change; the BookForm listens for changes to the AuthorStore and will pass the showDialog to the AuthorPanel as a property which in turn will pass it to AuthorDialog and it will display the panel (or not) depending on the value of that flag. This flag will also take a false value when the add author ajax call returns.

The showDialog flag is not related to the actual data but is UI-related. This is something that we should keep in mind when creating stores: Stores don’t only contain the actual data (like models in an MVC application) but they should also contain UI (controller/view in an MVC architecture) related information since that is also part of the state!

We can see that the ajax calls just issue the corresponding HTTP method to the authors_url and when they return the add_message_ok or add_message_error methods of MessageActions will be called. These calls are in a different call stack so everything will work fine (please remember the discussion about dispatches in different call stacks before).

Finally, on the success of _load_authors the map array method is called to transform the returned data as we want it:

var $ = require('jquery');

var _state = {
    authors: [],
    showDialog: false
}

var _load_authors = function() {
    $.ajax({
        url: _props.authors_url,
        dataType: 'json',
        cache: false,
        success: function(data) {
            _state.authors = data.map(function(a){
                return {
                    id: a.id,
                    name: a.last_name+' '+a.first_name
                }
            });
            AuthorStore.emitChange();
        },
        error: function(xhr, status, err) {
            MessageActions.add_message_error(err.toString());
        }
    });
};

var _deleteAuthor = function(authorId) {
    $.ajax({
        url: _props.authors_url+authorId,
        method: 'DELETE',
        cache: false,
        success: function(data) {
            _load_authors();
            MessageActions.add_message_ok("Author delete ok");
            AuthorActions.delete_author_ok();
        },
        error: function(xhr, status, err) {
            MessageActions.add_message_error(err.toString());
        }
    });
};

var _addAuthor = function(author) {
    $.ajax({
        url: _props.authors_url,
        dataType: 'json',
        method: 'POST',
        data:author,
        cache: false,
        success: function(data) {
            MessageActions.add_message_ok("Author add  ok");
            _state.showDialog = false;
            _load_authors();
        },
        error: function(xhr, status, err) {
            MessageActions.add_message_error(err.toString());
        }
    });

};

AuthorStore.dispatchToken = AppDispatcher.register(function(action) {
    switch(action.actionType) {
        case BookConstants.SHOW_ADD_AUTHOR:
            _state.showDialog = true;
            AuthorStore.emitChange();
        break;
        case BookConstants.HIDE_ADD_AUTHOR:
            _state.showDialog = false;
            AuthorStore.emitChange();
        break;
        case BookConstants.AUTHOR_ADD:
            _addAuthor(action.author);
        break;
        case BookConstants.AUTHOR_DELETE:
            _deleteAuthor(action.authorId);
        break;
    }
    return true;
});

CategoryStore.js

The CategoryStore has an interesting functionality concerning the load_subcategory function. This function is called whenever a book is changed (so its category form field may be changed and the subcategories may be reloaded based on this category) or is edited (so the category is that of the new book and once again the subcategories may need to because rerendered). It is important that we actually pass the current category to the book to the action. If for example we wanted to retrieve that from the state of the BookStore then we’d need to use the waitFor functionality of the dispatcher so that the category of the current book would be changed first then the load_category (that would read that value to read the subcategoreis) would be called after that.

Also, another thing to notice here is that there’s a simple subcat_cache that for each category contains the subcategories of that category so that we won’t do repeated ajax calls to reload the subcategories each time the category is changed.

var _state = {
    categories: [],
    subcategories: []
}

var _current_cat = ''
var _subcat_cache = []

var _load_categories = function() {
    $.ajax({
        url: _props.categories_url,
        dataType: 'json',
        cache: false,
        success: function(data) {
            _state.categories = data;
            CategoryStore.emitChange();
        },
        error: function(xhr, status, err) {
            console.error(this.props.url, status, err.toString());
        }
    });
};

var _load_subcategories = function(cat) {

    if(!cat) {
        _state.subcategories = [];
        CategoryStore.emitChange();
        return ;
    }
    if(_subcat_cache[cat]) {
        _state.subcategories = _subcat_cache[cat] ;
        CategoryStore.emitChange();
    }
    $.ajax({
        url: _props.subcategories_url+'?category='+cat,
        dataType: 'json',
        cache: false,
        success: function(data) {
            _state.subcategories = data;
            _subcat_cache[cat] = data;
            CategoryStore.emitChange();
        },
        error: function(xhr, status, err) {
            console.error(this.props.url, status, err.toString());
        }
    });
};

CategoryStore.dispatchToken = AppDispatcher.register(function(action) {
    switch(action.actionType) {
        case BookConstants.BOOK_EDIT:
        case BookConstants.BOOK_CHANGE:
            _load_subcategories(action.book.category);
        break;
        case BookConstants.BOOK_EDIT_CANCEL:
            _state.subcategories = [];
            CategoryStore.emitChange();
        break;
    }
    return true;
});

BookStore.js

Here, beyond the book-related functionality we have also implemented the URL updating. The getUrlParameter that returns the value of a URL parameter has been taken from http://stackoverflow.com/questions/19491336/get-url-parameter-jquery. Depending on the url parameters, we set some initial properties of the local state and, on the other hand, when the search query, ordering or page are changed, the _update_href function is called to update the url parameters. This is not really related to the flux architecture beyond the initialization of state.

Another thing to notice is that the when the _search is executed whenever there’s a change in the list of books (query is updated, sorting is changed, page is changed or when an author is deleted since the books that have that author should now display an empty field). The setTimeout in the _search ajax return is to simulate a 400ms delay (in order for the “Loading” text to be visible).

function getUrlParameter(sParam) {
    var sPageURL = $(location).attr('hash');
    sPageURL = sPageURL.substr(1)
    var sURLVariables = sPageURL.split('&');
    for (var i = 0; i < sURLVariables.length; i++)  {
        var sParameterName = sURLVariables[i].split('=');
        if (sParameterName[0] == sParam)  {
            return sParameterName[1];
        }
    }
}

var _page_init = 1*getUrlParameter('page');
if(!_page_init) _page_init = 1 ;
var _ordering_init = getUrlParameter('ordering');
if(!_ordering_init) _ordering_init = '' ;
var _query_init = getUrlParameter('query');
if(!_query_init) _query_init = ''

var _state = {
    loading: false,
    books: [],
    message:{},
    page: _page_init,
    total: 0,
    editingBook: {},
    query: _query_init,
    ordering: _ordering_init
}


var _search = function() {
    _state.loading = true;
    BookStore.emitChange();

    $.ajax({
        url: _props.url+'?search='+_state.query+"&ordering="+_state.ordering+"&page="+_state.page,
        dataType: 'json',
        cache: false,
        success: function(data) {
            // Simulate a small delay in server response
            setTimeout(function() {
                _state.books = data.results;
                _state.total = data.count;
                _state.loading = false;
                BookStore.emitChange();
            }, 400);
        },
        error: function(xhr, status, err) {
            _state.loading = false;
            MessageActions.add_message_error(err.toString());
            BookStore.emitChange();
        }
    });
};

var _reloadBooks = function() {
    _search('');
};


var _clearEditingBook = function() {
    _state.editingBook = {};
};

var _editBook = function(book) {
    _state.editingBook = book;
    BookStore.emitChange();
};

var _cancelEditBook = function() {
    _clearEditingBook();
    BookStore.emitChange();
};

var _update_href = function() {
    var hash = 'page='+_state.page;
    hash += '&ordering='+_state.ordering;
    hash += '&query='+_state.query;
    $(location).attr('hash', hash);
}

BookStore.dispatchToken = AppDispatcher.register(function(action) {
    switch(action.actionType) {
        case BookConstants.BOOK_EDIT:
            _editBook(action.book);
        break;
        case BookConstants.BOOK_EDIT_CANCEL:
            _cancelEditBook();
        break;
        case BookConstants.BOOK_SAVE:
            _saveBook(action.book);
        break;
        case BookConstants.BOOK_SEARCH:
            _state.query = action.query
            _state.page = 1;
            _update_href();
            _search();
        break;
        case BookConstants.BOOK_DELETE:
            _deleteBook(action.bookId);
        break;
        case BookConstants.BOOK_CHANGE:
            _state.editingBook = action.book;
            BookStore.emitChange();
        break;
        case BookConstants.BOOK_PAGE:
            _state.page = action.page;
            _update_href();
            _search();
        break;
        case BookConstants.AUTHOR_DELETE_OK:
            _search();
        break;
        case BookConstants.BOOK_SORT:
            _state.page = 1;
            if(_state.ordering == action.field) {
                _state.ordering = '-'+_state.ordering
            } else {
                _state.ordering = action.field;
            }
            _update_href();
            _search();
        break;
    }
    return true;
});

Conclusion

The application presented here has a number of techniques that will help you when you actually try to create a more complex react flux application. I hope that in the whole three part series I’ve thoroughly explained the flux architecture and how each part of (actions, stores, components) it works. Also, I tried to cover almost anything that somebody creating react/flux application will need to use — if you feel that something is not covered and could be integrated to the authors/book application I’d be happy to research and implement it!

django-rq redux: advanced techniques and tools

Introduction

In the previous django-rq article we presented a quick introduction to asynchronous job queues and created a small (but complete) project that used rq and django-rq to implement asynchronous job queues in a django project.

In this article, we will present some more advanced techniques and tools for improving the capabilities of our asynchronous tasks and integrate them to the https://github.com/spapas/django-test-rq project (please checkout tag django-rq-redux git checkout django-rq-redux)

Displaying your task progress

Sometimes, especially for long-running tasks it is useful to let the user (task initiator) know what is the status of each task he’s started. For this, I recommend creating a task-description model that will hold the required information for this task with more or less the following fields (please also check LongTask model of django-test-rq):

class LongTask(models.Model):
  created_on = models.DateTimeField(auto_now_add=True)
  name = models.CharField(max_length=128, help_text='Enter a unique name for the task',)
  progress = models.PositiveIntegerField(default=0)
  result = models.CharField(max_length=128, blank=True, null=True)

Now, when the view that starts the task is POST ed, you’ll first create the LongTask model instance with a result of 'QUEUED' and a progress of 0 (and a name that identifies your task) and then you’ll start the real task asynchronously by passing the LongTask instance, something like this (also check LongTaskCreateView):

long_task = LongTask.objects.create(...)
long_runnig_task.delay(long_task)

In your asynchronous job, the first thing you’ll need to do is to set its result to ‘STARTED’ and save it so that the user will immediately see when he’s job is actually started. Also, if you can estimate its progress, you can update its progress value with the current value so that the user will know how close he is to finishing. Finally, when the job finished (or if it throws an expectable exception) you’ll update its status accordingly. Here’s an example of my long_running_task that just waits for the specifid amount of seconds:

@job('django-test-rq-low')
def long_runnig_task(task):
  job = get_current_job()
  task.job_id = job.get_id()

  task.result = 'STARTED'

  duration_in_second_persentages = task.duration*1.0 / 100
  for i in range(100):
      task.progress = i
      task.save()
      print task.progress
      time.sleep(duration_in_second_persentages)

  task.result = 'FINISHED'
  task.save()
  return task.result

To have proper feedback I propose to have your task-description model instance created by the view that starts the asynchronous task and not by the actual task! This is important since the worker may be full so the asynchronous task will need a lot of time until is actually started (or maybe there are no running workers - more on this later) and the user will not be able to see his task instance anywhere (unless of course you provide him access to the actual task queue but I don’t recommend this).

Displaying your queue statistics

django-rq has a really nice dashboard with a lot of queue statistics ( instructions here https://github.com/ui/django-rq#queue-statistics and also on django-test-rq project) which I recommend to always enable.

Also, there’s the individual use django-rq-dashboard project that could be installed to display some more statistics, however the only extra statistic that you can see throuh django-rq-dashboard is the status of your scheduled jobs so I don’t recommend installing it if you don’t use scheduling.

Making sure that workers for your queue are actually running

Using the django-rq dashboard you can make sure that all queues have at least one worker. However, sometimes workers fail, or maybe you’ve forgotten to start your workers or not configured your application correctly (this happens to me all the time for test/uat projects). So, for tasks that you want to display feedback to the user, you can easily add a check to make sure that there are active workers using the following code:

from rq import Worker
import django_rq

redis_conn = django_rq.get_connection('default')
if len([
    x for x in Worker.all(connection=redis_conn)
        if 'django-test-rq-low' in x.queue_names()
]) == 0:
    # Error -- no workers

With Worker.all() you get all workers for a connection and the queue_names() method returns the names that each worker serves. So we check that we have at least one worker for that queue.

This check can be added when the job is started and display a feedback error to the user (check example in django-test-rq).

For quick tasks (for example sending emails etc) you should not display anything to the user even if no workers are running (since the task will be queued and will be executed eventually when the workers are started) but instead send an email to the administrators so that they will start the workers.

Checking how many jobs are in the queue

To find out programatically how many jobs are actually in the queue (and display a message if the queue has too many jobs etc) you’ll need to use the Queue class, something like this:

from rq import Queue

redis_conn = django_rq.get_connection('default')
queue = Queue('django-test-rq-default', connection=redis_conn)
print queue.name
print len(queue.jobs)

Better exception handling

When a job fails, rq will put it in a failed jobs queue and finish with it. You (as administrator) won’t get any feedback and the user (unless he has access to that failed jobs queue) won’t be able to do anything aboutt this job.

In almost all cases you can’t rely only on this behavior but instead you have to install a custom exception handler. Using the custom exception handler you can do whatever you want for each failed job. For instance, you can create a new instance of a FailedTask model which will have information about the failure and the original task allow the user (or administrator) to restart the failed task after he’s fixed the error conditions.

Or, if you want to be informed when a job is failed, you can just send an email to ADMINS and fall back to the default behavior to enqueue the failed task the failed jobs queue (since job exception handlers can be chained).

A simple management command that starts a worker for a specific queue and installs a custom exception handler follows:

from django.conf import settings
from django.core.management.base import BaseCommand

import django_rq
from rq import Queue, Worker

def my_handler(job, *exc_info):
    print "FAILURE"
    print job
    print exc_info

class Command(BaseCommand):
    def handle(self, *args, **options):
        redis_conn = django_rq.get_connection('default')

        q = Queue(settings.DJANGO_TEST_RQ_LOW_QUEUE, connection=redis_conn)
        worker = Worker([q], exc_handler=my_handler, connection=redis_conn)
        worker.work()

This handler is for demonstration purposes since it just prints a message to the console (so please do not use it)!

Multiple django-apps, single redis db

One thing to keep in mind is that the only thing that seperates the queues are their name. If you have many django applications that define a “default” (or “low”, “hight” etc) and they all use the same redis database to store their queue, the workers of each application won’t know which jobs belong to them and they’ll end up dequeuing the wrong job types. This will lead to an exception or, if you are really unlucky to a very nasty bug!

To avoid this, you can either use a different redis database (not database server) for each of your apps or add a prefix with the name of your app to your queue names:

Each redis database server can host a number of databases that are identified by a number (that’s what the /0 you see in redis://127.0.0.1:6379/0 means) and each one of them has a totally different keyspace. So, if you use /0 in an application and /1 in another application, you’ll have no problems. This solution has the disadvantage that you need to be really careful to use different database numbers for your projects and also the number of possible databases that redis can use is limited by a configuration file (so if you reach the maximum you’ll need to also increase that number)!

Instead of this, you can avoid using the ‘default’ queue, and use queues that contain your application name in their name, for example, for the sample project you could create something like ‘django-test-rq-default’, ‘django-test-rq-low’, ‘django-test-rq-high’ etc. You need to configure the extra queues by adding them to the RQ_QUEUES dictionary (check settings.py of django-test-rq) and then put the jobs to these queues using for example the job decorator (@job('django-test-rq-default')) and run your workers so that they will retrieve jobs from these queues (python manage.py rqworker django-test-rq-default) and not the default one (which may contain jobs of other applications).

If you use the default queue, and because you’ll need to use its name to many places, I recommend to add a (f.i) QUEUE_NAME = 'django-test-rq-default' setting and use this instead of just a string to be totally DRY.

Update 13/09/2015: Please notice that using a single redis database server (either with multiple numeric databases or in the same database using a keyword in keys to differentiate the apps) is not recommended as commenter Itamar Haber pointed out to me!

This is because for speed reasons redis uses a single thread to handle all requests (regardless if they are in the same or different numerical databases), so all resources may be used by a single, redis hungry, application and leave all others to starve!

Therefore, the recommended solution is to have a different redis server for each different application. This does not mean that you need to have different servers, just to run different instances of redis binding to different IP ports. Redis uses very little resourecs when it is idle (empty instance uses ~ 1 MB RAM) so you can run a lot of instances in a single server.

Long story short, my proposal is to have a redis.conf inside your application root tree (next to manage.py and requirements.txt) which has the redis options for each application. The options in redis.conf that need to be changed per application is the port that this redis instance will bind (this port also needs to be passed to django settings.py) and the pid filename if you daemonize redis — I recommend using a tool like supervisord instead so that you won’t need any daemonizing and pid files for each per-app-redis-instance!

Low level debugging

In this section I’ll present some commands that you can issue to your redis server using a simple telnet connection to get various info about your queues. You probably will never need to issue these commands to actually debug, but they will answer some of your (scientific) questions! In the following, > is things I type, # are comments, [...] is more output and everything else is the output I get:

> telnet 127.0.0.1 6379

# You won't see anything at first but you'll be connected and you can try typing things

> INFO

$1020
redis_version:2.4.10
redis_git_sha1:00000000
# [...]
db0:keys=83,expires=2
db1:keys=26,expires=1 # My redis server has two databases

# Now you'll see what you type!

> SELECT 1
+ OK # Now queries will be issued to database 1
> SELECT 0
+ OK # Now queries will be issued to database 0

KEYS rq* # List all rq related queues
*25
$43
rq:job:1d7afa32-3f90-4502-912f-d58eaa049fb1
$43
rq:queue:django-test-rq-low
$43
[...]

> SMEMBERS rq:workers # See workers
*1
$26
rq:worker:SERAFEIM-PC.6892

> LRANGE rq:queue:django-test-rq-low 0 100 # Check queued jobs
*2
$36
def896f4-84cb-4833-be6a-54d917f05271
$36
53cb1367-2fb5-46b3-99b2-7680397203b9

> HGETALL rq:job:def896f4-84cb-4833-be6a-54d917f05271 # Get info about this job
*16
$6
status
$6
queued
$11
description
$57
tasks.tasks.long_runnig_task(<LongTask: LongTask object>)
$10
created_at
$20
2015-09-01T09:04:38Z
$7
timeout
$3
180
$6
origin
$18
django-test-rq-low
$11
enqueued_at
$20
2015-09-01T09:04:38Z
$4
data
$409
[...] # data is the pickled parameters passed to the job !

> HGET rq:job:def896f4-84cb-4833-be6a-54d917f05271 status # Get only status
$6
queued

For more info on querying redis you can check the redis documentation and especially http://redis.io/topics/data-types and http://redis.io/commands.

Conclusion

Using some of the above techniques will help you in your asynchronous task adventures with rq. I’ll try to keep this article updated with any new techniques or tools I find in the future!

A comprehensive React and Flux tutorial part 2: Flux

Introduction

In the first part of this series we implemented a not-so-simple one page application with full CRUD capabilities. In this part, we will modify that application to make it use the Flux architecture. The full source code can be found at https://github.com/spapas/react-tutorial (tag name react-flux). In the next part, we will create an even more complex application using react/flux!

I recommend reading Facebook’s Flux overview before reading this article — please read it even if you find some concepts difficult to grasp (I know I found it difficult the first time I read it), I will try to explain everything here. Also, because a rather large number of extra components will need to be created, we are going to split our javascript code to different files using browserify - you can learn how to use browserify here.

Flux components

To implement the Flux architecture, an application needs to have at least a store and a dispatcher.

The store is the central place of truth for the application and the dispacher is the central place of communications. The store should hold the state (and any models/DAOs) of the application and notify the react components when this state is changed. Also, the store will be notified by the dispatcher when an action happens (for example a button is clicked) so that it will change the state. As a flow, we can think of something like this:

a ui action on a component (click, change, etc) ->
 ^   dispatcher is notified ->
 |   store is notified (by the dispacher)->
 |   store state is changed ->
 └─  component is notified (by the store) and updated to reflect the change

One thing to keep in mind is that although each flux application will have only one dispatcher, it may have more stores, depending on the application’s architecture and separation of concerns. If there are more than store, all will be notified by the dispatcher and change their state (if needed of course). The ui will pass the action type and any optional parameters to the dispatcher and the dispatcher will notify all stores with these parameters.

An optional component in the Flux architecture is the Action. An action is a store related class that acts as an intermediate between the ui and the dispatcher. So, when a user clicks a button, an action will be called that will notify the dispatcher. As we will see we can just call the dispatcher directly from the components ui, but calling it through the Action makes the calls more consistent and creates an interface.

The react-flux version

Since we are using browserify, we will include a single file in our html file with a <script> tag and everything else will be included through the require function. We have the following packages as requirements for browserify:

"dependencies": {
  "flux": "^2.0.3",
  "jquery": "^2.1.4",
  "react": "^0.13.3",
  "reactify": "^1.1.1"
}

Also, in order to be able to use JSX with browserify, will use the reactify transform. To apply it to your project, change the scripts of your package.json to:

"scripts": {
  "watch": "watchify -v -d static/main.js -t reactify -o static/bundle.js",
  "build": "browserify static/main.js -t reactify  | uglifyjs -mc warnings=false > static/bundle.js"
},

main.js

The main.js file will just render the BookPanel component (the components.js file contains the source for all React components) and call the reloadBooks function from stores.js that will reload all books from the REST API:

var React = require('react');
var components = require('./components');
var stores = require('./stores');

React.render(<components.BookPanel url='/api/books/' />, document.getElementById('content'));

stores.reloadBooks();

constants.js

Before going into more complex modules, let’s present the constants.js which just exports some strings that will be passed to the dispatcher to differentiate between each ui action:

module.exports = {
    BOOK_EDIT: 'BOOK_EDIT',
    BOOK_EDIT_CANCEL: 'BOOK_EDIT_CANCEL',
    BOOK_SAVE: 'BOOK_SAVE',
    BOOK_SEARCH: 'BOOK_SEARCH',
    BOOK_DELETE: 'BOOK_DELETE',
};

As we can see, these constants are exported as a single object so when we do something like var BookConstants = require('./constants') we’ll the be able to refer to each constant through BookConstants.CONSTANT_NAME.

actions.js

The actions.js creates the dispatcher singleton and a BookActions object that defines the actions for books.

var BookConstants = require('./constants')
var Dispatcher = require('flux').Dispatcher;
var AppDispatcher = new Dispatcher();

var BookActions = {
    search: function(query) {
        AppDispatcher.dispatch({
            actionType: BookConstants.BOOK_SEARCH,
            query: query
        });
    },
    save: function(book) {
        AppDispatcher.dispatch({
            actionType: BookConstants.BOOK_SAVE,
            book: book
        });
    },
    edit: function(book) {
        AppDispatcher.dispatch({
            actionType: BookConstants.BOOK_EDIT,
            book: book
        });
    },
    edit_cancel: function() {
        AppDispatcher.dispatch({
            actionType: BookConstants.BOOK_EDIT_CANCEL
        });
    },
    delete: function(bookId) {
        AppDispatcher.dispatch({
            actionType: BookConstants.BOOK_DELETE,
            bookId: bookId
        });
    }
};

module.exports.BookActions = BookActions;
module.exports.AppDispatcher = AppDispatcher;

As we can see, the BookActions is just a collection of methods that will be called from the ui. Instead of calling BookActions.search() we could just call the dispatch method with the correct parameter object (actionType and optional parameter), both the BookActions object and the AppDispatcher singleton are exported.

The dispatcher is imported from the flux requirement: It offers a functionality to register callbacks for the various actions as we will see in the next module. This is a rather simple class that we could implement ourselves (each store passes a callback to the dispatcher that is called on the dispatch method, passing actionType and any other parameters). The dispatcher also offers a waitFor method that can be used to ensure that the dispatch callback for a store will be finished before another store’s dispatch callback ( when the second store uses the state of the first store — for example when implementing a series of related dropdowns ).

stores.js

The next module we will discuss is the stores.js that contains the BookStore object.

var $ = require('jquery');
var EventEmitter = require('events').EventEmitter;
var AppDispatcher = require('./actions').AppDispatcher;
var BookConstants = require('./constants')

var _state = {
    books: [],
    message:"",
    editingBook: null
}

var _props = {
    url: '/api/books/'
}

var _search = function(query) {
    $.ajax({
        url: _props.url+'?search='+query,
        dataType: 'json',
        cache: false,
        success: function(data) {
            _state.books = data;
            BookStore.emitChange();
        },
        error: function(xhr, status, err) {
            console.error(this.props.url, status, err.toString());
            _state.message = err.toString();
            BookStore.emitChange();
        }
    });
};

var _reloadBooks = function() {
    _search('');
};

var _deleteBook = function(bookId) {
    $.ajax({
        url: _props.url+bookId,
        method: 'DELETE',
        cache: false,
        success: function(data) {
            _state.message = "Successfully deleted book!"
            _clearEditingBook();
            _reloadBooks();
        },
        error: function(xhr, status, err) {
            console.error(this.props.url, status, err.toString());
            _state.message = err.toString();
            BookStore.emitChange();
        }
    });
};

var _saveBook = function(book) {
    if(book.id) {
        $.ajax({
            url: _props.url+book.id,
            dataType: 'json',
            method: 'PUT',
            data:book,
            cache: false,
            success: function(data) {
                _state.message = "Successfully updated book!"
                _clearEditingBook();
                _reloadBooks();
            },
            error: function(xhr, status, err) {
                _state.message = err.toString()
                BookStore.emitChange();
            }
        });
    } else {
        $.ajax({
            url: _props.url,
            dataType: 'json',
            method: 'POST',
            data:book,
            cache: false,
            success: function(data) {
                _state.message = "Successfully added book!"
                _clearEditingBook();
                _reloadBooks();
            },
            error: function(xhr, status, err) {
                _state.message = err.toString()
                BookStore.emitChange();
            }
        });
    }
};

var _clearEditingBook = function() {
    _state.editingBook = null;
};

var _editBook = function(book) {
    _state.editingBook = book;
    BookStore.emitChange();
};

var _cancelEditBook = function() {
    _clearEditingBook();
    BookStore.emitChange();
};

var BookStore = $.extend({}, EventEmitter.prototype, {
    getState: function() {
        return _state;
    },
    emitChange: function() {
        this.emit('change');
    },
    addChangeListener: function(callback) {
        this.on('change', callback);
    },
    removeChangeListener: function(callback) {
        this.removeListener('change', callback);
    }
});

AppDispatcher.register(function(action) {
    switch(action.actionType) {
        case BookConstants.BOOK_EDIT:
            _editBook(action.book);
        break;
        case BookConstants.BOOK_EDIT_CANCEL:
            _cancelEditBook();
        break;
        case BookConstants.BOOK_SAVE:
            _saveBook(action.book);
        break;
        case BookConstants.BOOK_SEARCH:
            _search(action.query);
        break;
        case BookConstants.BOOK_DELETE:
            _deleteBook(action.bookId);
        break;
    }
    return true;
});

module.exports.BookStore = BookStore;
module.exports.reloadBooks = _reloadBooks;

The stores.js module exports only the BookStore object and the reloadBooks method (that could also be called from inside the module since it’s just called when the application is loaded to load the books for the first time). All other objects/funtions are private to the module.

As we saw, the _state objects keep the global state of the application which are the list of books, the book that is edited right now and the result message for any update we are doing. The ajax methods are more or less the same as the ones in the react-only version of the application. However, please notice that when the ajax methods return and have to set the result, instead of setting the state of a React object they are just calling the emitChange method of the BookStore that will notify all react objects that “listen” to this store. This is possible because the ajax (DAO) methods are in the same module with the store - if we wanted instead to put them in different modules, we’d just need to add another action (e.g ReloadBooks) that would be called when the ajax method returns — this action would call the dispatcher which would in turn update the state of the store.

We can see that we are importing the AppDispatcher singleton and, depending on the action type we call the correct method that changes the state. So when a BookActions action is called it will call the corresponding AppDispatcher.register case branch which will call the corresponding state-changing function.

The BookStore extends the EventEmitter object (so we need to require the events module) in order to notify the React components when the state of the store is changed. Instead of using EventEmitter we could just implement the emit change logic ourselves by saving all the listener callbacks to an array and calling them all when there’s a state change (if we wanted to also add the ‘change’ parameter to group the listener callbacks we’d just make the complex more complex, something not needed for our case):

var BookStore = {
    listeners: [],
    getState: function() {
        return _state;
    },
    emitChange: function() {
        var i;
        for(i=0;i<this.listeners.length;i++) {
            this.listeners[i]();
        }
    },
    addChangeListener: function(callback) {
        this.listeners.push(callback);
    },
    removeChangeListener: function(callback) {
        this.listeners.splice(this.listeners.indexOf(callback), 1);
    }
};

components.js

Finally, the components.js module contains all the React components. These are more or less the same with the react-only version with three differences:

  • When something happens in the ui, the corresponding BookAction action is called with the needed parameter — no callbacks are passed between the components
  • The BookPanel component registers with the BookStore in order to be notified when the state changes and just gets its state from the store — these values are propagated to all other components through properties
  • The BookForm and SearcchPanel now hold their own temporary state instead of using the global state — notice that when a book is edited this book will be propagated to the BookForm through the book property, however BookForm needs to update its state through the componentWillReceiveProps method.
var React = require('react');
var BookStore = require('./stores').BookStore;
var BookActions = require('./actions').BookActions;

var BookTableRow = React.createClass({
    render: function() {
        return (
            <tr>
                <td>{this.props.book.id}</td>
                <td>{this.props.book.title}</td>
                <td>{this.props.book.category}</td>
                <td><a href='#' onClick={this.onClick}>Edit</a></td>
            </tr>
        );
    },
    onClick: function(e) {
        e.preventDefault();
        BookActions.edit(this.props.book);
    }
});

var BookTable = React.createClass({
    render: function() {
        var rows = [];
        this.props.books.forEach(function(book) {
            rows.push(<BookTableRow key={book.id} book={book} />);
        });
        return (
            <table>
                <thead>
                    <tr>
                        <th>Id</th>
                        <th>Title</th>
                        <th>Category</th>
                        <th>Edit</th>
                    </tr>
                </thead>
                <tbody>{rows}</tbody>
            </table>
        );
    }
});

var BookForm = React.createClass({
    getInitialState: function() {
        if (this.props.book) {
            return this.props.book;
        } else {
            return {};
        }
    },
    componentWillReceiveProps: function(props) {
        if (props.book) {
            this.setState(props.book);
        } else {
            this.replaceState({});
        }
    },
    render: function() {
        return(
            <form onSubmit={this.onSubmit}>
                <label forHtml='title'>Title</label><input ref='title' name='title' type='text' value={this.state.title} onChange={this.onFormChange} />
                <label forHtml='category'>Category</label>
                <select ref='category' name='category' value={this.state.category} onChange={this.onFormChange} >
                    <option value='CRIME' >Crime</option>
                    <option value='HISTORY'>History</option>
                    <option value='HORROR'>Horror</option>
                    <option value='SCIFI'>SciFi</option>
                </select>
                <br />
                <input type='submit' value={this.state.id?"Save (id = " +this.state.id+ ")":"Add"} />
                {this.state.id?<button onClick={this.onDeleteClick}>Delete</button>:""}
                {this.state.id?<button onClick={this.onCancelClick}>Cancel</button>:""}
                {this.props.message?<div>{this.props.message}</div>:""}
            </form>
        );
    },
    onFormChange: function() {
        this.setState({
            title: React.findDOMNode(this.refs.title).value,
            category: React.findDOMNode(this.refs.category).value
        })
    },
    onSubmit: function(e) {
        e.preventDefault();
        BookActions.save(this.state)
    },
    onCancelClick: function(e) {
        e.preventDefault();
        BookActions.edit_cancel()
    },
    onDeleteClick: function(e) {
        e.preventDefault();
        BookActions.delete(this.state.id)
    }
});

var SearchPanel = React.createClass({
    getInitialState: function() {
        return {
            search: '',
        }
    },
    render: function() {
        return (
            <div className="row">
                <div className="one-fourth column">
                    Filter: &nbsp;
                    <input ref='search' name='search' type='text' value={this.state.search} onChange={this.onSearchChange} />
                    {this.state.search?<button onClick={this.onClearSearch} >x</button>:''}
                </div>
            </div>
        )
    },
    onSearchChange: function() {
        var query = React.findDOMNode(this.refs.search).value;
        if (this.promise) {
            clearInterval(this.promise)
        }
        this.setState({
            search: query
        });
        this.promise = setTimeout(function () {
            BookActions.search(query);
        }.bind(this), 200);
    },
    onClearSearch: function() {
        this.setState({
            search: ''
        });
        BookActions.search('');
    }
});

var BookPanel = React.createClass({
    getInitialState: function() {
        return BookStore.getState();
    },
    render: function() {
        return(
            <div className="row">
                <div className="one-half column">
                    <SearchPanel></SearchPanel>
                    <BookTable books={this.state.books} />
                </div>
                <div className="one-half column">
                    <BookForm
                        book={this.state.editingBook}
                        message={this.state.message}
                    />
                </div>
                <br />
            </div>
        );
    },
    _onChange: function() {
        this.setState( BookStore.getState() );
    },
    componentWillUnmount: function() {
        BookStore.removeChangeListener(this._onChange);
    },
    componentDidMount: function() {
        BookStore.addChangeListener(this._onChange);
    }
});

module.exports.BookPanel = BookPanel ;

Only the BookPanel is exported — all other react components will be private to the module.

We can see that, beyond BookPanel, the code of all other components are more or less the same. However, not having to pass callbacks for state upddates is a huge win for readability and DRYness.

Explaining the data flow

I’ve added a bunch of console.log statements to see how the data/actions flow between all the components when the “Edit” book is clicked. So, when we click “Edit” we see the following messages to our console:

Inside BookTableRow.onClick
Inside BookActions.edit
Inside AppDispatcher.register
Inside AppDispatcher.register case BookConstants.BOOK_EDIT
Inside _editBook
Inside BookStore.emitChange
Inside BookPanel._onChange
Inside BookForm.componentWillReceiveProps
Inside BookForm.render

First of all the onClick method of BookTableRow will be called (which is the onClick property of the a href link) which will call BookActions.edit and pass it the book of that specific row. The edit method will create a new dispatcher object by setting the actionType and passing the book and pass it to AppDispatcher.register. register will go to the BookConstants.BOOK_EDIT case branch which will call the private _editBook function. _editBook will update the state of the store (by setting the _state.editingBook property and will call the BookStore.emitChange method which calls the dispatcher’s emit method, so all listening components will update. We only have one component that listens to this emit, BookPanel whose _onChange method is called. This method gets the application state from the BookStore and updates its own state. Now, the state will be propagated through properties - for example, for BookForm, first its componentWillReceiveProps method will be called (with the new properties) and finally its render method!

So the full data flow is something like this:

user action/callback etc ->
  component calls action ->
    dispatcher informes stores ->
      stores set their state ->
        state holding components are notified and update their state ->
          all other components are updated through properties

A better code organization

As you’ve seen, I’ve only created four javascript modules (components, stores, actions and constants) and put them all in the same folder. I did this for clarity and to keep everything together since our tutorial is a very small project. Facebook proposes a much better organization that what I did as can be seen in the TodoMVC tutorial: Instead of putting everything to a single folder, create a different foloder for each type of object: actions (for all your actions), components (for all your React components), constants and stores and put inside the objects each in a different javascript module, for example, the components folder should contain the following files:

  • BookTable.react.js
  • BookTableRow.react.js
  • BookForm.react.js
  • BookPanel.react.js
  • SearchPanel.react.js

Each one will export only the same-named React component and require only the components that it uses.

If you want to see the code of this tutorial organized like this go to the tag react-flux-better-organization.

Conclusion

In this two-part series we saw how we can create a full CRUD application with React.js and how can we enable it with the Facebook proposed Flux architecture. Comparing the react-only with the react-flux version we can see that we added a number of objects in the second version (dispatcher, store, actions, constants) whose usefulness may not be obvious from our example. However, our created application (and especially the better organized version) is war-ready and can easily fight any complexities that we throw to it! Unfortunately, if we really wanted to show the usefulness of the Flux architecture we’d need to create a really complex application that won’t be suitable for a tutorial.

However, we can already understand the obvious advantages of the React / Flux architecture:

  • Components can easily be re-used by changing their properties - DRY
  • Easy to grasp (but a little complex) data flow between components and stores
  • Separation of concerns - react components for the view, stores to hold the state/models, dispatcher to handle the data flow
  • Really easy to test - all components are simple objects and can be easily created fom tests
  • Works well for complex architectures - one dispatcher, multiple stores/action collections, react components only interact with actions and get their state from stores

I’ve tried to make the above as comprehensive as possible for the readers of these posts (and also resolve some of my own questions). I have to mention again that although React/Flux may seem complex at a first glance, when it is used in a complex architecture it will shine and make everything much easier. Everything is debuggable and we can always understand what’s really going on! This is in contrast with more complex frameworks that do various hidden stuff (two way data binding, magic in the REST etc) where, although it is easier to create a simple app, moving to something more complex (and especially debugging it) is a real nightmare!

A comprehensive React and Flux tutorial part 1: React

Update 15/12/2015: Added some insights for form validation.

Introduction

React is a rather new library from Facebook for building dynamic components for web pages. It introduces a really simple, fresh approach to javascript user interface building. React allows you to define composable and self-contained HTML components through Javascript (or a special syntax that compiles to javascript named JSX) and that’s all — it doesn’t force you into any specific framework or architecture, you may use whatever you like. It’s like writing pure HTML but you have the advantage of using classes with all their advantages for your components (self-contained, composable, reusable, mixins etc).

Although React components can be used however you like in your client-side applications, Facebook proposes a specific architecture for the data flow of your events/data between the components called Flux. It’s important to keep in your mind that Flux is not a specific framework but a way to organize the flow of events and data in your applicition. Unfortunately, although Flux is a rather simple architecture it is a little difficult to understand without a proper example (at least it was difficult for me to understand by reading the Facebook documentation and some tutorials I found).

So, in this two-part tutorial we are going to build a (not-so-simple) single page CRUD application using React and Flux. Two versions of the same application will be built and explained: One with React (this part) only and one with React and Flux (part two). This will help us understand how Flux architecture fits to our project and why it greatly improves the experience with React.

Warning: This is not an introduction to react. Before reading this you need to be familiar with basic react usage, having read at least the following three pages from react documentation:

Our project

We are going to built a CRUD single-page application for editing views, let’s take a look at how it works:

Our project

Our application will be seperated to two panels: In the left one the user will be able to filter (search) for a book and in the right panel she’ll be able to add / edit / delete a book. Everything is supported by a django-rest-framework implemented REST API. You can find the complete source code at https://github.com/spapas/react-tutorial. I’ve added a couple of git tags to the source history in order to help us identify the differences between variou stages of the project (before and after integrating the Flux architecture).

Django-rest-framework is used in the server-side back-end to create a really simple REST API - I won’t provide any tutorial details on that (unless somebody wants it !), however you may either use the source code as is or create it from scratch using a different language/framework or even just a static json file (however you won’t see any changes to the data this way).

For styling (mainly to have a simple grid) we’ll use skeleton. For the ajax calls and some utils we’ll use jquery.

All client-side code will be contained in the file static/main.js. The placeholder HTML for our application is:

<html>
  <!-- styling etc ignored -->
<body>
  <h1>Hello, React!</h1>
  <div class="container"><div id="content"></div></div>
</body>
<script src="//fb.me/react-0.13.3.js"></script>
<script src="//fb.me/JSXTransformer-0.13.3.js"></script>
<script src="//code.jquery.com/jquery-2.1.3.min.js"></script>
<script type="text/jsx" src="{% static 'main.js' %}"></script>
</html>

We are using the version 0.13.3 of react and the same version of the JSXTransformer to translate JSX code to pure javascript.

A top-level view of the components

The following image shows how our components are composed:

Our components

So, the main component of our application is BookPanel which contains three components:

  • SearchPanel: To allow search (filtering) books based on their title/category
  • BookForm: To add/update/delete books
  • BookTable: To display all available books - each book is displayed in a BookTableRow component.

BookPanel is the only component having state — all other components will be initialized by property passing. The BookPanel element will be mounted to the #content element when the page loads.

The react-only version

The first version, using only react (and not flux) will use BookPanel as a central information HUB.

SearchPanel

SearchPanel renders an input element with a value defined by the search key of this component’same properties. When this is changed the onSearchChanged method of the component will be called, which in turn, retrieves the value of the input (using refs) and passes it to the properties onSearchChanged callback function. Finally, with the line {this.props.search?<button onClick={this.props.onClearSearch} >x</button>:null} we check if the search property contains any text and if yes, we display a clear filter button that will call properties onClearSearch method:

var SearchPanel = React.createClass({
  render: function() {
    return (
      <div className="row">
        <div className="one-fourth column">
          Filter: &nbsp;
          <input ref='search' type='text' value={this.props.search} onChange={this.onSearchChanged} />
          {this.props.search?<button onClick={this.props.onClearSearch} >x</button>:null}
        </div>
      </div>
    )
  },
  onSearchChanged: function() {
    var query = React.findDOMNode(this.refs.search).value;
    this.props.onSearchChanged(query);
  }
});

So, this component has three properties:

  • search which is the text to display in the input box
  • onSearchChanged (callback) which is called when the contents of the input box are changed
  • onClearSearch (callback) which is called when the button is pressed

Notice that this component doesn’t do anything - for all actions it uses the callbacks passed to it —this means that exactly the same component would easily be reused in a totally different application or could be duplicated if we wanted to have a different search component for the book title and category.

Another thing to notice is that the local onSearchChanged method is defined only to help us retrieve the value of the input and use it to call the onSearchChanged callback. Instead, we could just call the passed this.props.onSearchChanged — however to do this we’d need a way to find the value of the input. This could be done if we added a ref to the included SearchPanel from the parent component, so we’d be able to use something like React.findDOMNode(this.refs.searchPanel.refs.search).value to find out the value of the input (see that we use a ref to go to the searchPanel component and another ref to go to input component).

Both versions (getting the value directly from the child component or using the callback) could be used, however I believe that the callback version defines a more clear interface since the parent component shouldn’t need to know the implementation details of its children.

BookTableRow

BookTableRow will render a table row by creating a simple table row that will contain the title and category attributes of the passed book property and an edit link that will call the handleEditClickPanel property by passing the id of that book:

var BookTableRow = React.createClass({
  render: function() {
    return (
      <tr>
        <td>{this.props.book.title}</td>
        <td>{this.props.book.category}</td>
        <td><a href='#' onClick={this.onClick}>Edit</a></td>
      </tr>
    );
  },
  onClick: function(id) {
    this.props.handleEditClickPanel(this.props.book.id);
  }
});

This component is used by BookTable to render each one of the books.

BookTable

This component create the left-side table using an array of BookTableRow``s by passing it each one of the books of the ``books array property. The handleEditClickPanel property is retrieved from the parent of the component and passed as is to the row.

var BookTable = React.createClass({
  render: function() {
    var rows = [];
    this.props.books.forEach(function(book) {
      rows.push(<BookTableRow key={book.id} book={book} handleEditClickPanel={this.props.handleEditClickPanel}  />);
    }.bind(this));
    return (
      <table>
        <thead>
          <tr>
            <th>Title</th>
            <th>Category</th>
            <th>Edit</th>
          </tr>
        </thead>
        <tbody>{rows}</tbody>
      </table>
    );
  }
});

The key attribute is used by React to uniquely identify each component - we are using the id (primary key) of each book. Before continuing with the other components, I’d like to explain what is the purpose of that strange bind call!

Interlude: The bind function method

bind is a method of the function javascript object, since in javascript functions are objects! This method is useful for a number of things, however here we use it to set the this keyword of the anonymous function that is passed to foreach to the this keyword of the render method of BookTable, which will be the current BookTable instance.

To make things crystal: Since we are using an anonymous function to pass to forEach, this anonymous function won’t have a this keyword set to the current BookTable object so we will get an error that this.props is undefined. That’s why we use bind to set this to the current BookTable. If instead of using the anonymous function we had created a createBookTableRow method inside the BookTable object that returned the BookTableRow and passed this.createBookTableRow to forEach, we wouldn’t have to use bind (notice that we’d also need to make rows a class attribute and refer to it through this.rows for this to work).

BookForm

BookForm will create a form to either create a new book or update/delete an existing one. It has a book object property - when this object has an id (so it is saved to the database) the update/delete/cancel buttons will be shown, when it doesn’t have an id the add button will be shown.

var BookForm = React.createClass({
  render: function() {
    return(
      <form onSubmit={this.props.handleSubmitClick}>
        <label forHtml='title'>Title</label><input ref='title' name='title' type='text' value={this.props.book.title} onChange={this.onChange}/>
        <label forHtml='category'>Category</label>
        <select ref='category' name='category' value={this.props.book.category} onChange={this.onChange} >
          <option value='CRIME' >Crime</option>
          <option value='HISTORY'>History</option>
          <option value='HORROR'>Horror</option>
          <option value='SCIFI'>SciFi</option>
        </select>
        <br />
        <input type='submit' value={this.props.book.id?"Save (id = " +this.props.book.id+ ")":"Add"} />
        {this.props.book.id?<button onClick={this.props.handleDeleteClick}>Delete</button>:null}
        {this.props.book.id?<button onClick={this.props.handleCancelClick}>Cancel</button>:null}
        {this.props.message?<div>{this.props.message}</div>:null}
      </form>
    );
  },
  onChange: function() {
    var title = React.findDOMNode(this.refs.title).value;
    var category = React.findDOMNode(this.refs.category).value;
    this.props.handleChange(title, category);
  }
});

As we can see, this component uses many properties — most are passed callbacks functions for various actions:

  • book: This will either be a new book object (without and id) when adding one or an existing (from the database) book when updating one.
  • message: To display the result of the last operation (save/delete) — this is passed by the parent and probably it would be better if I had put it in a different component (and added styling etc).
  • handleSubmitClick: Will be called when the submit button is pressed to save the form (either by adding or updating).
  • handleCancelClick: Will be called when the cancel button is pressed — we decide that we want actually want to edit a book.
  • handleDeleteClick: Will be called when the delete button is pressed.
  • handleChange: Will be called whenever the title or the category of the currently edited book is changed through the local onChange method. The onChange will retrieve that values of title and category and pass them to handleChange to do the state update. As already discussed, we could retrieve the values immediately from the parent but this creates a better interface to our component.

BookPanel

The BookPanel component will contain all other components, will keep the global state and will also act as a central communications HUB between the components and the server. Because it is rather large class, I will explain it in three parts:

Component methods

In the first part of BookPanel, its react component methods will be presented:

var BookPanel = React.createClass({
  getInitialState: function() {
    return {
      books: [],
      editingBook: {
        title:"",
        category:"",
      },
      search:"",
      message:""
    };
  },
  render: function() {
    return(
      <div className="row">
        <div className="one-half column">
          <SearchPanel
            search={this.state.search}
            onSearchChanged={this.onSearchChanged}
            onClearSearch={this.onClearSearch}
          />
          <BookTable books={this.state.books} handleEditClickPanel={this.handleEditClickPanel} />
        </div>
        <div className="one-half column">
          <BookForm
            book={this.state.editingBook}
            message={this.state.message}
            handleChange={this.handleChange}
            handleSubmitClick={this.handleSubmitClick}
            handleCancelClick={this.handleCancelClick}
            handleDeleteClick={this.handleDeleteClick}
          />
        </div>
      </div>
    );
  },
  componentDidMount: function() {
    this.reloadBooks('');
  },
  // To be continued ...

getInitialState is called the first time the component is created or mounted (attached to an HTML component in the page and should return the initial values of the state - here we return an object with empty placeholders. componentDidMount will be called after the component is mounted and that’s the place we should do any initializationn — here we call the reloadBooks method (with an empty search string) to just retrieve all books. Finally, the render method creates a div that will contain all other components and initializes their properties with either state variables or object methods (these are the callbacks that were used in all other components).

Non-ajax object methods

// Continuing from above
onSearchChanged: function(query) {
  if (this.promise) {
    clearInterval(this.promise)
  }
  this.setState({
    search: query
  });
  this.promise = setTimeout(function () {
    this.reloadBooks(query);
  }.bind(this), 200);
},
onClearSearch: function() {
  this.setState({
    search: ''
  });
  this.reloadBooks('');
},
handleEditClickPanel: function(id) {
  var book = $.extend({}, this.state.books.filter(function(x) {
    return x.id == id;
  })[0] );

  this.setState({
    editingBook: book,
    message: ''
  });
},
handleChange: function(title, category) {
  this.setState({
    editingBook: {
      title: title,
      category: category,
      id: this.state.editingBook.id
    }
  });
},
handleCancelClick: function(e) {
  e.preventDefault();
  this.setState({
    editingBook: {}
  });
},
// to be continued ...

All the above function change the BookPanel state so that the properties of the child components will also be updated:

  • onSearchChanged is called when the search text is changed. The behavior here is interesting: Instead of immediately reloading the books, we create a timeout to be executed after 200 ms (also notice the usage of the bind function method to allow us call the reloadBooks method). If the user presses a key before these 200 ms, we cancel the previous timeout (using clearInterval) and create a new one. This technique greatly reduces ajax calls to the server when the user is just typing something in the search box — we could even increase the delay to reduce even more the ajax calls (but hurt the user experience a bit since the user will notice that his search results won’t be updated immediately).
  • onClearSearch is called when the clear filter button is pressed and removes the search text and reloads all books.
  • handleEditClickPanel is called when the edit link of a BookTableRow is clicked. The book with the passed id will be found (using filter) and then a clone of it will be created with ($.extend) and will be used to set the editingBook state attribute. If instead of the clone we passed the filtered book object we’d see that when the title or category in the BookForm were changed they’d also be changed in the BookTableRow!
  • handleChange just changes the state of the currently edited book based on the values passed (it does not modify the id of the book)
  • handleCancelClick when the cancel editing is pressed we clear the editingBook state attribute. Notice the e.preventDefault() method that needs to be there in order to prevent the form from submitting since the form submitting would result in an undesirable full page reload!

Ajax object methods

Finally, we need a buncch of object methods that use ajax calls to retrieve or update books:

  // Continuing from above
  reloadBooks: function(query) {
    $.ajax({
      url: this.props.url+'?search='+query,
      dataType: 'json',
      cache: false,
      success: function(data) {
        this.setState({
          books: data
        });
      }.bind(this),
      error: function(xhr, status, err) {
        console.error(this.props.url, status, err.toString());
        this.setState({
          message: err.toString(),
          search: query
        });
      }.bind(this)
    });
  },
  handleSubmitClick: function(e) {
    e.preventDefault();
    if(this.state.editingBook.id) {
      $.ajax({
        url: this.props.url+this.state.editingBook.id,
        dataType: 'json',
        method: 'PUT',
        data:this.state.editingBook,
        cache: false,
        success: function(data) {
          this.setState({
            message: "Successfully updated book!"
          });
          this.reloadBooks('');
        }.bind(this),
        error: function(xhr, status, err) {
          console.error(this.props.url, status, err.toString());
          this.setState({
            message: err.toString()
          });
        }.bind(this)
      });
    } else {
      $.ajax({
        url: this.props.url,
        dataType: 'json',
        method: 'POST',
        data:this.state.editingBook,
        cache: false,
        success: function(data) {
          this.setState({
            message: "Successfully added book!"
          });
          this.reloadBooks('');
        }.bind(this),
        error: function(xhr, status, err) {
          console.error(this.props.url, status, err.toString());
          this.setState({
            message: err.toString()
          });
        }.bind(this)
      });
    }
    this.setState({
      editingBook: {}
    });
  },
  handleDeleteClick: function(e) {
  e.preventDefault();
  $.ajax({
    url: this.props.url+this.state.editingBook.id,
    method: 'DELETE',
    cache: false,
    success: function(data) {
      this.setState({
          message: "Successfully deleted book!",
          editingBook: {}
      });
      this.reloadBooks('');
    }.bind(this),
    error: function(xhr, status, err) {
      console.error(this.props.url, status, err.toString());
      this.setState({
          message: err.toString()
      });
    }.bind(this)
    });
  },
});
  • reloadBooks will try to load the books using an ajax GET and pass its query parameter to filter the books (or get all books if query is an empty string). If the ajax call was successfull the state will be updated with the retrieved books and the search text (to clear the search text when we reload because of a save/edit/delete) while if there was an error the state will be updated with the error message. The books will be returned as a json array of book objects.
  • handleSubmitClick checks if the state’s editingBook has an id and will do either a POST to create a new book or a PUT to update the existing one. Depending on the result of the operation will either reload books and clear the editingBook or set the error message.
  • handleDeleteClick will do a DELETE to delete the state’s editingBook and clear it.

Notice that all success and error functions above were binded to this so that they could update the state of the current BookPanel object.

After each succesfull ajax call we do a reload to the books to keep the state between server and client side consistent. We could instead update the book array immediately before doing the ajax call - however this would increase complexity (what should happen if an error happens at the ajax call) without improving the UX that much. A better solution would be to add a loading css animation.

Local state

One thing to keep in mind is that there should only be one place of truth for the state and that the state should be as high in the component hierarch as possible. All changes should be propagated to thhe child components through properties. That’s the only way to be sure of the your data flow: When a change should happen (either because of a user action or an asynchronous call e.g ajax or timeout) just go to the state-holding component up in the hierarchy and change its state. Then the changes will be propagated in a top-down fashion from that component to its children.

The above paragraph does not mean that the state should be contained in just a single component! For example, let’s say that we had an AuthorPanel in the same web application and both BookPanel and AuthorPanel would be contained in a BookAuthorPanel. In this case, we should keep a different state object for BookPanel and AuthorPanel, we wouldn’t need to combine them into a single object contained in the BookAuthorPanel since they are unrelated!

One decision that we took in BookForm (and also to the SearchPanel before) is to not keep a local state for the book that is edited but move it to BookPanel. This means that whenever the value of the title or category is changed the parent component will be informed (through handleChange) so that it will change its state and the new values will be passed down to BookForm as properties so our changes will be reflected to the inputs. To make it more clear, when you press a letter on the title input:

  • the onChange method of BookForm will be called,
  • it will get the values of both title and category fields
  • and call handleChange with these values.
  • The handleChange method of BookPanel will update the editingBook state attribute,
  • so the book property of BookForm will be also updated
  • and the new value of the title will be displayed (since the components will be re-rendered due to the state update)

Conceptually, the above seems like a lot of work for just pressing a simple key! However, due to how react is implemented (virtual DOM) it won’t actually introduce any performance problems in our application. If nevertheless we wanted to have a local state of the currently edited book inside the BookForm then we’d need to use state.book and update the state using the componentWillReceiveProps method of BookForm: If we have a book to edit in the properties then copy it to the state or else just create an empty book. Also, the onChange method of the BookForm won’t need to notify the parent component that there is a state change (but only update the local state) and of course when the submit button is pressed the current book should be passed to the parent component (to either save it or delete it) since it won’t know the book that is currently edited.

So we could either have a local state object for the edited book in the BookForm or just save it as a property of the global state object in BookPanel — both solutions are correct. What wouldn’t be correct is if we had two copies of the same information in both the states of BookPanel and BookForm, for example the book id that is edited.

Adding form validation

Commenter Nitish Kumar made a nice comment about how we could do some validating to our form fields.

First of all, this adds to the complexity of the application so maybe it would be better to do it in the flux-architectured version. However, it’s not really difficult to also have form validation using react-only:

Here’s what we need:

  • A property (or properties) to pass the errors for each form field to the BookForm component
  • A way to display the form errors if they exist in BookForm
  • Execute an error handler when the form contents change and update the state if there’s an error

As an example, I’d like to check that the book title is not written in uppercase, so I will add another attribute to the book propery of BookForm called titleError and display it if it is defined, something like this:

{this.props.book.titleError?<div>{this.props.book.titleError}</div>:null}

Now, the handleChange method of BookPanel should do the actual check and change the sate, so I’m changing it like this:

handleChange: function(title, category) {
    var titleError = undefined;
    if(title.length > 1 && title === title.toUpperCase()) {
        titleError='Please don\'t use only capital letters for book titles';
    }
    this.setState({
        editingBook: {
            title: title,
            titleError: titleError,
            category: category,
            id: this.state.editingBook.id
        }
    });
},

So, the titleError attribute of editingBook will be defined only if there’s an error.

Finally, we must remember to not create/update the book if there’s an error so we add the following check to the handleSubmitClick method:

if(this.state.editingBook.titleError) {
    this.setState({
        message: "Please fix errors!"
    });
    return ;
}

The above could be easily generalized for checks on multiple fields. I am not really fond of doing the form validation in the BookPanel component (I’d prefer to do it on BookForm or even better on the corresponding field - if it was a component) however this would mean that I’d need to keep a local state with the error to the BookForm (please see the discussion of the previous paragraph).

I’ve added a new tag named react-only-validation to the https://github.com/spapas/react-tutorial/ repository that contains the changes to have the validation.

Conclusion to the first part

We just created a not-so-simple React single page application offering CRUD for an object. This application of course could be improved by adding a pagination component to the table, but I’m going to leave that as an excersie to the reader: To do that, I propose to create another component named TablePager that would have two properties: currentPage and a changePageTo callback. The currentPage would also be needed to added to the global state. When the changePageTo` is called by the ``TablePager it would update the global currentPage and will do a reloadBooks that will use the currentPage to fetch the correct page.

For application state keeping, we have selected to store all state attributes in BookPanel, for every state changing action we create a method that we pass in the child components so that the children can call it when the state needs to be updated.

As we will see in the next part, with Flux, Facebook proposes a design pattern for where to store the state and how to update it. We’ll see how to convert our React application to also use Flux and find out how Flux will help us when developing complex client-side applications!