/var/

Various programming stuff

Hello! If you are using an ad blocker but find something useful here and want to support me please consider disabling your ad blocker for this site.

Thank you,
Serafeim

Better Django inlines

Django has a feature called inlines which can be used to edit multiple related objects at once. You’ll get a single view that will contain a single html form that includes a different Django form for each object, edit any of them and submit them all to be saved.

This feature is heavily used when you have objects that have a parent-child relation between them. For example, a book and a testimonial for each book. Each testimonial will belong to a single book and from a UX point of view it seems better to be able to edit all testimonials for each book at the same time.

The biggest disadvantage of inlines is that, because of how Django works, their interface is very primitive: For adding new objects, you need to define the number of empty forms that will be included for each inline. The user can fill them up and press save. Then the objects will be created and the user will get new empty forms to fill. To understand this better, let’s suppose that you have defined 3 empty forms (which is the default) and the user wants to create 10 inline objects. The flow will be:

  • The user sees the 3 empty forms and fills them with data.
  • The user presses save to POST the data.
  • The user sees the 3 new objects and another 3 empty forms.
  • The user fills the 3 empty forms with data.
  • The user presses save to POST the data.
  • The user sees the 6 new objects and another 3 empty forms.
  • The user fills the 3 empty forms with data.
  • The user presses save to POST the data.
  • The user sees the 9 new objects and another 3 empty forms.
  • The user fills 1 empty form with data.
  • The user presses save to POST the data.
  • The user sees the 10 new objects and another 3 empty forms.

As you can see the user is filling up the available forms and presses save all the time to get the new forms to display the objects. This makes the experience very problematic and confuses users that are not familiar with it. Also, when deleting objects, the user will see a delete checkbox for each object which needs to select and press save to actually delete the object. This is also counter-intuitive because it’s not easy for the user to understand that the object will be deleted when he saves the form.

In this article I’ll present a way to improve the experience of inlines: We’ll have a way to add new inlines without the need to save the form all the time. Also we’ll be able to improve the behavior of the delete button so it has a better UX.

The work in this article is published in this github repository: https://github.com/spapas/inlinesample.

The project implements a Book model containing multiple testimonials and editions. For each book you use inlines to add/edit the Book, its testimonials and editions in the same form. Also, I have included two ways to add/edit a book: Using the traditional django inlines way and using the javascript way I propose here.

Models

The models used in this project are the following:

from django.db import models


class Book(models.Model):
    title = models.CharField(max_length=256)
    author = models.CharField(max_length=256)


class Edition(models.Model):
    book = models.ForeignKey(Book, on_delete=models.CASCADE)
    publisher = models.CharField(max_length=256)
    year = models.IntegerField()
    pages = models.IntegerField()


class Testimonial(models.Model):
    book = models.ForeignKey(Book, on_delete=models.CASCADE)
    name = models.CharField(max_length=256)
    testimonial = models.TextField()

As you can see they are very simple; each edition and testimonial has a foreign key to a book.

Views

For the views I’m going to use the django-extra-views package that provides a bunch of useful inline-related Class Based Views:

from django.views.generic import ListView
from extra_views import (
    CreateWithInlinesView,
    UpdateWithInlinesView,
    InlineFormSetFactory,
)
from . import models


class BookListView(ListView):
    model = models.Book

    def get_queryset(self):
        return super().get_queryset().prefetch_related("edition_set", "testimonial_set")


class EditionInline(InlineFormSetFactory):
    model = models.Edition
    fields = ["publisher", "year", "pages"]
    factory_kwargs = {"extra": 1}


class TestimonialInline(InlineFormSetFactory):
    model = models.Testimonial
    fields = ["name", "testimonial"]
    factory_kwargs = {"extra": 1}


class BetterMixin:
    def get_template_names(self):
        if self.request.GET.get("better"):
            return ["books/book_better_form.html"]
        return super().get_template_names()

    def get_success_url(self):
        return "/"


class BookCreateView(BetterMixin, CreateWithInlinesView):
    model = models.Book
    inlines = [EditionInline, TestimonialInline]
    fields = ["title", "author"]


class BookUpdateView(BetterMixin, UpdateWithInlinesView):
    model = models.Book
    inlines = [EditionInline, TestimonialInline]
    fields = ["title", "author"]

As you can see for starts we add a BookListView that will be mapped to the / URL. This displays a table with all the books along with links to add a new or edit an existing book using both the traditional and better approach.

Then we define two classes inheriting from InlineFormSetFactory: EditionInline and TestimonialInline. These classes define our inlines: We set a model for them, the fields that will be displayed and pass extra parameters if needed. In this case we pass factory_kwargs = {"extra": 1} to have a single extra form for each inline. If we didn’t pass this Django would create 3 extra forms for each inline. Notice that if we were only using the better inlines we’d pass 0 to the extra parameter since it’s not really needed here. However because we use the same inlines for both the traditional and the better inlines I’m using 1 here (or else we wouldn’t be able to add new objects on the traditional approach).

Then we define a BetterMixin; the only thing it does it to return a different html template if the user visits the better views and override the get_sucess_url method to return to “/”. As you can understand from this, the only difference between the traditional and better approach is the template.

Finally, we’ve got two views for adding/editing a new book. We inherit from CreateWithInlinesView and UpdateWithInlinesView and set their model, inlines and fields attributes to the correct values.

Traditional templates

The traditional book_form.html template is like this:

{% extends "base.html" %}
{% load crispy_forms_tags %}
{% block html_title %}Book form{% endblock%}
{% block page_title %}Book form{% endblock%}

{% block content %}
    <form method='POST'>
        {% csrf_token %}
        <div class="card w-full bg-base-100 shadow-xl card-bordered card-compact border border-gray-900">
            <div class="card-body">
                <h2 class="card-title">Book</h2>
                {{ form|crispy }}
            </div>
        </div>

        {% include "partials/_inline_set_simple.html" with formset=inlines.0 title="Editions" %}
        {% include "partials/_inline_set_simple.html" with formset=inlines.1 title="Testimonials" %}

        <input type='submit' class='btn bg-blue-600' value='Save'>
        <a href='/' class='btn bg-gray-600'>Back</a>
    </form>
{% endblock %}

I’m using tailwind css for the templates. As you can see we get a two important context variables: form and inlines. The form is the main object form (book) and the inlines is the list of inlines (editions and testimonials). Notice that I’m using a partial template for each of the inlines to improve re-usability. The _inline_set_simple.html is like this:

{% load crispy_forms_tags %}

<div class="card w-full bg-base-100 shadow-xl card-bordered card-compact border border-gray-900">
  <div class="card-body">
    <h2 class="card-title">{{ title }}</h2>
    {{ formset.management_form }}
    {% for form in formset %}
      <div class='flex border rounded p-1 m-1'>
        {% for field in form %}
          <div class='flex-col mx-2 my-2'>
            {{ field|as_crispy_field }}
          </div>
        {% endfor %}
      </div>
    {% endfor %}
  </div>
</div>

This uses the django-crispy-forms package to improve form handling. See this article for a tutorial on using django-crispy-forms.

Notice that i’m doing formset=inlines[n], so each inline will have a management_form that is used internally by django and a bunch of forms (1 for each object). Each form will have the fields we defined for that inline with the addition of the delete checkbox.

This is enough to get the basic function. The user will get the following form when adding a new book:
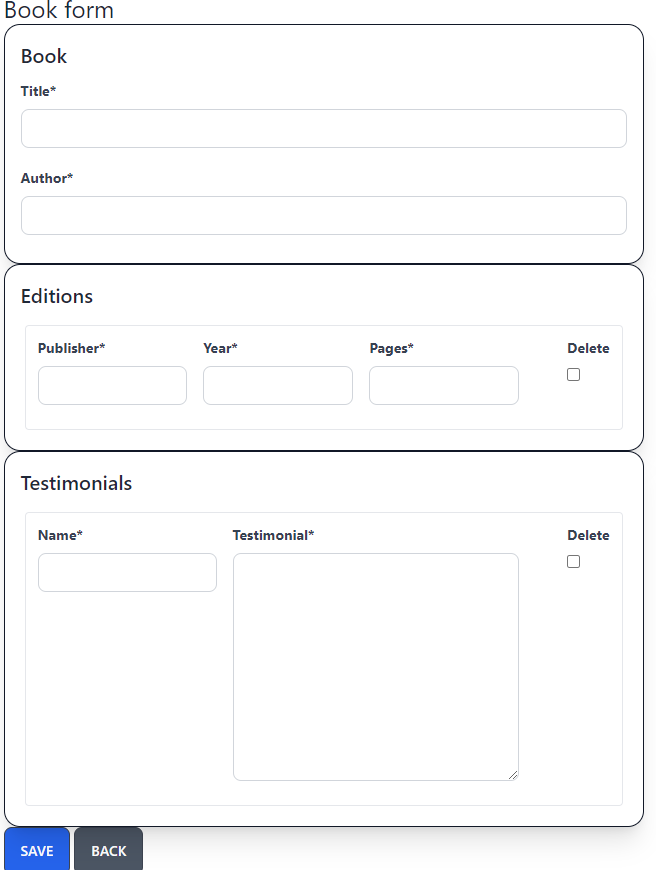
The traditional book form

As we already discussed, the user fills the info and presses save if he wants to add more testimonials or editions.

Better templates

Let’s now take a peek at the book_better_form.html template:

{% extends "base.html" %}
{% load crispy_forms_tags static %}
{% block html_title %}Book better form{% endblock%}
{% block page_title %}Book better form{% endblock%}

{% block content %}
    <form method='POST'>
        {% csrf_token %}
        <div class="card w-full bg-base-100 shadow-xl card-bordered card-compact border border-gray-900">
            <div class="card-body">
                <h2 class="card-title">Book</h2>
                {{ form|crispy }}
            </div>
        </div>

        {% include "partials/_inline_set.html" with inline_name='edition_set' inline_title="Editions" formset=inlines.0 %}
        {% include "partials/_inline_set.html" with inline_name='testimonial_set' inline_title="Testimonials" formset=inlines.1 %}

        <input type='submit' class='btn bg-blue-600' value='Save'>
        <a href='/' class='btn bg-gray-600'>Back</a>
    </form>

<script src="{% static 'inline-editor.js' %}"></script>

{% endblock %}

This is similar to the book_form.html with the following differences:

  • We include the partials/_inline_set.html partial template passing it the inline_name which is used to identify the inline. We also pass it the actual inline formset object and a title.
  • We include some custom javascript called inline-editor.js that is used to handle the inline formset.

Notice here that we need to use the correct inline_name and not whatever we want! Usually it will be child_name_set but to be sure we can easily find it by taking a peek at the management form django will generate for us (we’ll see something like testimonial_set-TOTAL_FORMS, so we know that the name is testimonial_set).

The partial _inline_set.html is a little more complex:

<div id='better_inline_{{ inline_name }}' class="card w-full bg-base-100 shadow-xl card-bordered card-compact border border-gray-900">
    <div class="card-body">
        <h2 class="card-title">
            {{ inline_title }}
            <button class='btn btn-primary' type="button bg-blue-500" id="add-form-{{ inline_name }}">Add</button>
        </h2>
        {% if formset.non_form_errors %}
            <div class="alert alert-danger">{{ formset.non_form_errors }}</div>
        {% endif %}

        <template id="empty-form-{{ inline_name }}">
            <div class='flex border border-primary rounded p-1 m-1 inline-form'>
                {% for field in formset.empty_form %}
                    {% include "partials/_inline_field.html" %}
                {% endfor %}
            </div>
        </template>

        {{ formset.management_form }}

        {% for form in formset %}
            <div class='flex border rounded p-1 m-1 inline-form'>
                {% for field in form %}
                    {% include "partials/_inline_field.html" %}
                {% endfor %}
            </div>
        {% empty %}
            <div class='flex p-1 m-1 inline-form'></div>
        {% endfor %}
    </div> <!-- card body -->
</div><!-- card -->

We use the inline_name we passed to generate a unique id for this inline to reference it in the javascript. Then we have an add new form button. We also add an empty form template that we’ll use to copy over when adding a new form. The formset.empty_form is generated by django. After we include the management_form we enumerate the forms using a for loop. Notice the empty div <div class='flex p-1 m-1 inline-form'></div> when there are no forms, we need that to help us position the place of the forms to be added as will be explained later. The same inline-form class is used on the empty template and on the existing forms.

This uses the _inline_field.html partial template which is like this:

{% load widget_tweaks %}
{% load crispy_forms_tags %}

{% if field.field.widget.input_type == 'hidden' %}
    {{ field }}
{% else %}
    <div class='flex-col my-1 mx-2'>
        {% if "DELETE" in field.name  %}
            {{ field|add_class:""|attr:"onclick:delClick(this)"|as_crispy_field }}
        {% elif field.name == "testimonial" %}
            {{ field|attr:"rows:2"|as_crispy_field }}
        {% else %}
            {{ field|as_crispy_field }}
        {% endif %}
    </div>
{% endif %}

In this template we add an onclick function called delClick when the user clicks the delete checkbox. We could also do various other stuff like hide the delete checkbox and add a delete button instead but i’m leaving it as an exercise to the reader.

Better templates js

Let’s now take a peek at the actual javascript. First of all we define a function named inlinEditor:

function inlineEditor(inlineSetName) {
    let tmpl = document.querySelector('#empty-form-' + inlineSetName);
    let counter = document.querySelector('[name=' + inlineSetName + '-TOTAL_FORMS]')

    document.querySelector('#add-form-' + inlineSetName).addEventListener('click', ev => {
        ev.preventDefault()

        let newForm = tmpl.content.cloneNode(true);
        newForm.querySelectorAll('[id*=__prefix__]').forEach(el => {
            el.id = el.id.replace('__prefix__', counter.value);
            if (el.name) el.name = el.name.replace('__prefix__', counter.value);
        });

        newForm.querySelectorAll('[for*=__prefix__]').forEach(el => {
            el.htmlFor = el.htmlFor.replace('__prefix__', counter.value);
        })

        counter.value = 1 + Number(counter.value);
        let last_element_selector = 'form #better_inline_' + inlineSetName + ' .inline-form:last-of-type'
        document.querySelector(last_element_selector).insertAdjacentElement('afterend', newForm.children[0])
    })
}

This initially function saves the empty form template and the number of forms in the inline. The number of the forms initially is provided by the django management form. Then we add a click event to the add button for that particular inline. When the user clicks the add button we’ll add a new empty form to the end of the existing forms. This works like this:

Each of the inline forms has an id that has the following form inline_name-NUMBER-field_name, so for example for the first form of editions publisher we’ll get something like edition_set-0-publisher. The empty form has the string __prefix__ instead of the number so it will be edition_set-__prefix__-publisher. To create the new form we clone the empty form template and replace the __prefix__ on the elements with the correct number (based on the total number of forms). Then we increase the number of forms and insert the new form next to the element with the last_element_selector we define there. As you can see this selector will find the last element that is inside our inline and has a class of inline-form. That’s why we need the inline-form class to all three cases as we discussed above

Beyond this, we also have the implementation of delClick that adds a red-border class to form of the element that was clicked (notice the parentElement.parentElement thingie):

function delClick(el) {
    if(el.checked) {
        el.parentElement.parentElement.parentElement.classList.add('border-red-500')
    } else {
        el.parentElement.parentElement.parentElement.classList.remove('border-red-500')
    }
}

Finally, we generate the inlineEditors when the dom is loaded:

document.addEventListener('DOMContentLoaded', function(event) {
    inlineEditor('edition_set');
    inlineEditor('testimonial_set');
})

Please notice that here we also need to use the correct name of the inlines (both here and in the template).

Conclusion

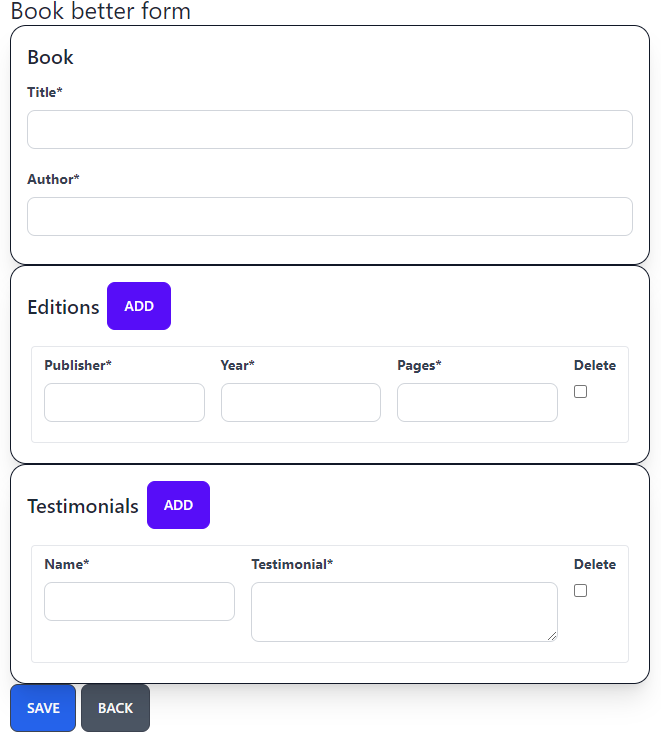
Using the better approach our book form will be like this:
The better book form

Now the user can click the add button and a new form will be added in the end of the current list of forms. Also when he clicks the delete button he’ll get a red border around the form to be deleted.

Before finishing this tutorial I’d like to point out some things that you need to be extra careful about, especially since you are probably going to use your own html structure:

  • Don’t forget to use the correct name for the inlines in the partial template and when initializing it with inlineEditor
  • Make sure to add the inline-form class to an empty div if there are no forms in the inline, to the existing forms of the inline and to the empty template
  • Be careful on where you’ll add classes to the delClick handler; it depends on the structure of your html
Using clojure from Windows

In this small article I’m going to post a guide on how to install and use clojure from Windows using good old’ cmd.exe.

Unfortunately, most guides on the official clojure site have instructions on using Clojure from Windows through Powershell or WSL. For my own reasons I hate both these approaches and only use the cmd.exe to interact with the Windows command line.

There are more or less two approaches to using clojure. Using leiningen or using the clj tools. The clojure official guide seems to be biased towards clj tools. However I think that leiningen may be easier for new users. I’ll cover both approaches here.

Warning Before doing anything else please make sure to install Java. You need a version of java that is at least 1.8. Try running java -version in cmd.exe to make sure you have java and it is the correct version.

Leiningen

To install leiningen you just download the lein.bat file from their page and put it in a folder in your PATH. You’ll then run lein and it will download all dependencies and install itself!

To start a clojure repl to be able to play with clojure you write lein repl. If everything went smooth you should see a prompt and if you write (+ 1 2) you should get 3. To exit press ctrl+d or write exit.

To start a new project you’ll use lein new [template name] [project name]. For example, to create a new app you’ll write: lein new app leinapp. You’ll get a new directory called leinapp. The important stuff in this directory are:

  • project.clj: The basic descriptor of your project; here you can set various attrs of your project and also add dependencies
  • src\leinapp: The source directory of your project. This is where you’ll put your code.
  • test\leinapp: Add tests here

There should be a core.clj file inside your src\leinapp folder. The main function is the entry point of the app. Try running lein run from the project folder and you should get the output of the main function.

Add this to the end of the core.clj to define a foo function:

(defn foo []
  "bar")

And run lein repl. You should get a repl command prompt for your application in the leinapp.core namespace (if you named your app leinapp). Type (foo) and you should see "bar".

To create a stand alone jar with your code (called uberjar) you can use lein uberjar. This will create a file named target\uberjar\leinapp-0.1.0-SNAPSHOT-standalone.jar. Then try java -jar target\uberjar\leinapp-0.1.0-SNAPSHOT-standalone.jar (notice I’m still on the leinapp project folder) and you’ll see the output of main!

clj

Using the clj is a more modern approach to clojure development. As I said before the official clojure page seems to be biased towards using this approach. The problem is that it seems to require Powershell to run as you can see on the clj on Windows page.

Thankfully, the good people at the clojurians slack pointed me to deps.clj project. This is an implementation of clj in clojure and can be installed natively on Windows by downloading the .zip from the releases page. This zip should contain a deps.exe file. Put that executable it in your path. You can also rename it to clj.exe if you want. Also if you have the powershell installed you can run this command from cmd.exe PowerShell -Command "iwr -useb https://raw.githubusercontent.com/borkdude/deps.clj/master/install.ps1 | iex" to install it automatically.

You can now run deps and you should get a clojure repl similar to lein repl.

To create a new project skeleton you can use the use the deps-new project. To install it run the following command from cmd.exe: deps -Ttools install io.github.seancorfield/deps-new "{:git/tag """v0.4.9"""}" :as new (please notice that there are various problems with the quoting on windows but this command should work fine).

To create a new app run: deps -Tnew app :name organization/depsapp and you’ll get your app in the depsapp folder. If you want a similar form as with lein, try deps -Tnew app :name depsapp/core :target-dir depsapp. Now the depsapp folder will contain:

  • deps.edn: The basic descriptor of your project; here you can set various attrs of your project and also add dependencies. This more or less changes the project.clj we got from leiningen.
  • src\depsapp: The source directory of your project. This is where you’ll put your code.
  • test\depsapp: Add tests here

To run the project, try: deps -M -m depsapp.core or deps  -M:run-m or deps  -X:run-x to directly run the greet function (run-m and run-x are aliases defined in deps.edn take a peek).

To start a REPL, run deps. Notice this will start on the user namespace, so you’ll need to do something like:

user=> (require 'depsapp.core)
nil
user=> (depsapp.core/foo)
"bar"

to run a (foo) function that you’ve added in the core.clj file.

To run the tests use: deps -T:build test.

To create the uberjar you’ll run: deps -T:build ci (tests must pass). Then execute it directly using java -jar target\core-0.1.0-SNAPSHOT.jar.

Also, notice that it’s really simple to create a new project with deps without the deps-new. For example, create a folder named manualapp and in this folder create a deps.edn file containing just the string {}. Then add another folder named src with a hello.clj file containing something like:

(ns hello)

(defn foo []
  "bar")

(defn run [opts]
  (println "Hello world"))

You can then open a REPL on the project using deps or run the run function using deps -X hello/run.

VSCode integration

Both leining and clj projects can easily be used with VSCode. First of all, install the calva package in your VSCode. Then, open your clojure project in VScode and press ctrl+shift+p to bring up the command pallete. Here write “Jack” (from jack-in) and select it (also this has the shortctut ctrl+alt+c ctrl+alt+j). Select the correct project type (leiningen or deps.edn). A repl will be opened to the side; you can then go to your core.clj file and run ctrl+alt+c enter to load the current file.

Then you can move to the repl on the side and run the function with (foo) or run (-main). Also you can write (foo) in your source file and press ctrl+enter to execute it and see the result; the ctrl+enter will execute the form where your cursor is. See this for more.

PDFs in Django like it’s 2022!

In a previous article I had written a very comprehensive guide on how to render PDFs in Django using tools like reportlab and xhtml2pdf. Although these tools are still valid and work fine I have decided that usually it’s way too much pain to set them up to work properly.

Another common way to generate PDFs in the Python world is using the weasyprint library. Unfortunately this library has way too many requirements and installing it on Windows is worse than putting needles in your eyes. I don’t like needles in my eyes, thank you very much.

There are various other ways to generate PDFs like using a report server like Japser or SQL Server Reporting Services but these are too “enterpris-y” for most people and require another server, a learning curve, etc.

I was actually so disappointed by the status of PDF generation today that in some recent projects instead of the PDF file I generated an HTML page with a nice pdf-printing stylesheet and instructed the users to print it as PDF (from the browser) so as to generate the PDF themselves!

However, recently I found another way to generate PDFs in my Django projects which I’d like to share with you: Using the wkhtmltopdf tool. The wkhtmltopdf is a command line program that has binaries for more or less every operating system. It’s a single binary that you can download and put it in a directory, you don’t need to run another server or any fancy installation. Only an executable. To use it? You call it like wkhtmltopdf http://google.com google.pdf and it will download the url and generate the pdf! It’s as simple as that! This tool is old and heavily used but only recently I researched its integration with Django.

Please notice that there’s actually a django-wkhtmltopdf library for integrating wkhtmltopdf with django. However I din’t have good results while trying to use it (maybe because of my Windows dev environment). Also, implementing the integration myself allowed my to more easily understand what’s happening and better debug the wkhtmltopdf. However YMMV, after you read this small post to understand how the integration works you can try django-wkhtmltopdf to see if it works in your case.

In any way, the first thing you need to do is download and install wkhtmltopdf for your platform and save its full path in your settings.py like this:

# For linux
WKHTMLTOPDF_CMD = '/usr/local/bin/wkhtmltopdf'

# or for windows
WKHTMLTOPDF_CMD = r'c:\util\wkhtmltopdf.exe'

Notice that I’m using the full path. I have observed that even if you put the binary to a directory in the system PATH it won’t be picked (at least in my case) thus I recommend using the full path.

Now, let’s suppose we’ve got a DetailView (let’s call it SampleDetailView) that we’d like to render as PDF. We can use the following CBV for that:

from subprocess import check_output
from django.template import Context, Template
from django.template.loader import get_template
from tempfile import NamedTemporaryFile
import os

class SamplePdfDetailView(SampleDetailView):
  def get_resp_from_file(self, filename, context):
      template = get_template(filename)
      resp = template.render(context)
      return resp

  def get_resp_from_string(self, template_str, context):
      template = Template(template_str)
      resp = template.render(Context(context))
      return resp

  def render_to_response(self, context):
      context['pdf'] = True
      # We can use either
      resp = self.get_resp_from_string("<h1>Hello, world! {{ object }}</h1>", context)
      # or
      # resp = self.get_resp_from_file('test_pdf.html', context)

      tempfile = NamedTemporaryFile(mode='w+b', buffering=-1,
                                    suffix='.html', prefix='tmp',
                                    dir=None, delete=False)

      tempfile.write(resp.encode('utf-8'))
      tempfile.flush()
      tempfile.close()
      cmd = [
          settings.WKHTMLTOPDF_CMD,
          '--page-size', 'A4', '--encoding', 'utf-8',
          '--footer-center', '[page] / [topage]',
          '--enable-local-file-access',  tempfile.name, '-']
      # print(" ".join(cmd))
      out = check_output(cmd)

      os.remove(tempfile.name)
      return HttpResponse(out, content_type='application/pdf')

We can put the pdf view on our url patterns right next to our DetailView i.e:

[
  ...
  path(
      "detail/<int:pk>/",
      permission_required("core.user")(
          views.SampleDetailView.as_view()
      ),
      name="detail",
  ),
  path(
      "detail/<int:pk>/pdf/",
      permission_required("core.user")(
          views.SamplePdfDetailView.as_view()
      ),
      name="detail_pdf",
  ),
  ...
]

Let’s try to understand how this works: First of all notice that we have two options, either create a PDF from an html string or from a normal template file. For the first option we pass the full html string to the get_resp_from_string and the context and we’ll get the rendered html (i.e the context will be applied to the template). For the second option we pass the filename of a django template and the context. Notice that there’s a small difference on how the template.render() method is called in the two methods.

After that we’ve got an html file saved in the resp string. We want to give this to wkhtmltopdf so as to be converted to PDF. To do that we first create a temporary file using the NamedTemporaryFile class and write the resp to it. Then we call wkhtmltopdf passing it this temporary file. Notice we use the subprocess.check_output function that will capture the output of the command and return it.

Finally we delete the temporary file and return the pdf as an HttpResponse.

We call the wkhtmltopdf like this:

c:\util\wkhtmltopdf.exe --page-size A4 --encoding utf-8 --footer-center [page] / [topage] --enable-local-file-access C:\Users\serafeim\AppData\Local\Temp\tmp_lh5r6f9.html -

The page-size can be changed to letter if you are in the US. The encoding should be utf-8. The —footer-center option adds a footer to the PDF page with the current page and the total number of pages. The —enable-local-file-access is very important since it allows wkhtmltopdf to access local files (in the filesystem) and not only remote ones. After that we’ve got the full path of our temporary file and following is the - which means that the pdf output will be on the stdout (so we’ll capture it with check_output).

Notice that there’s a commented out print command before the check_output call. If you have problems you can call this command from your command line to debug the wkhtmltopdf command (don’t forget to comment out the os.remove line to keep the temporary file). Also, wkhtmltopdf will output some stuff while rendering the command, for example something like:

Loading pages (1/6)
Counting pages (2/6)
Resolving links (4/6)
Loading headers and footers (5/6)
Printing pages (6/6)
Done

You can pass the --quiet option to hide this output. However the output is useful to see what wkhtmltopdf is doing in case there are problems so I recommend leaving it on while developing. Let’s take a look at a problematic output:

Loading pages (1/6)
Error: Failed to load file:///static/bootstrap/css/bootstrap.min.css, with network status code 203 and http status code 0 - Error opening /static_edla/bootstrap/css/govgr_bootstrap.min.css: The system cannot find the path specified.
[...]
Counting pages (2/6)
Resolving links (4/6)
Loading headers and footers (5/6)
Printing pages (6/6)
Done

The above output means that our template tries to load a css file that wkhtmltopdf can’t find and errors out! To understand this error, I had a line like this in my template:

<link href="{% static 'bootstrap/css/bootstrap.min.css' %}" rel="stylesheet">

which will be converted to a link like `/static/bootstrap/css/bootstrap.min.css. However notice that I tell wkhtmltopdf to render a file from my temporary directory, it doesn’t know where that link points to! Following this thing you need to be extra careful to include everything in your HTML-pdf template and not use any external links. So all styles must be inlined in the template using <style> tags and all images must be converted to data images with base64, something like:

<img src='data:image/png;base64,...>

To do that in python for a dynamic image you can use something like:

import base64

def convert_to_data(image):
  return 'data:image/xyz;base64,{}'.format(base64.b64encode(image).decode('utf-8'))

and then use that as your image src (notice I’m using image/xyz here for an arbitrary image, please use the correct image type if you know it i.e image/png or image/jpg).

If you’ve got a static image you want to include you can convert it to base64 using an online service like this, or read it with python and convert it:

import base64

with open('static/images/image.png', 'rb') as image:
  print(base64.b64encode(image.read()).decode('utf-8'))

Instead of a DetailView we could use the same approach for any kind of CBV. If you are to use the PDF response to multiple CBVs I recommend exporting the functionality to a mixin and inheriting from that also (see my CBV guide for more).

Finally, the big question in the room is why should I convert my template to a file and pass that to wkhtmltopdf, can’t I use the URL of my template, i.e pass wkhtmltopdf something like http://example.com/app/detail/321/?

By all means you can! This will also enable you to avoid using inline styles and media!! However keep in mind that the usual case is that this view will not be public but will need an authenticated user to access it; wkhtmltopdf is publicly trying to access it, it doesn’t have any rights to it so you’ll get a 404 or 403 error! Of course you can start an adventure on authenticating it somehow (and maybe doing something stupid) or you can just follow my lead and render it to a file :)

A forward and reverse proxy primer for the layman

Before some days I’d written an answer on HN where I explained as simply as possible how a forward and a reverse proxy is working and what is the difference between them. In this article I’m going to extend this answer a bit to make it a full post and clarify some things even more.

Forward and reverse proxies is an important concept that a lot of technical people aren’t familiar with. HTTP Proxying is a process of forwarding (HTTP) requests from one server to the other. So when an HTTP client issues a request to the server, the request will pass through the proxy server and be forwarded to the destination server (called the origin server). This explanation is true both for forward and reverse proxying.

Forward Proxy

A forward proxy is used when an HTTP Client (i.e a browser) wants to access resources in the internet but isn’t allowed to connect directly to the public internet so instead uses the proxy.

Usually companies don’t allow unrestricted access to the internet from their internal network. Thus the internal users would need to use a proxy to access the internet. This is the concept of the forward proxy. What happens is that when an internal user want to access an internet resource (i.e www.google.com) her client (i.e browser) will ask a specific server (the proxy server) for that resource. The client needs to be configured properly with the address of the proxy server.

So instead of http://www.google.com the browser will access http://proxy.company.com/?url=www.google.com and the proxy will fetch the results and return them to you. If the browser wants to access https://www.google.com without a configured proxy server it will get a network error.

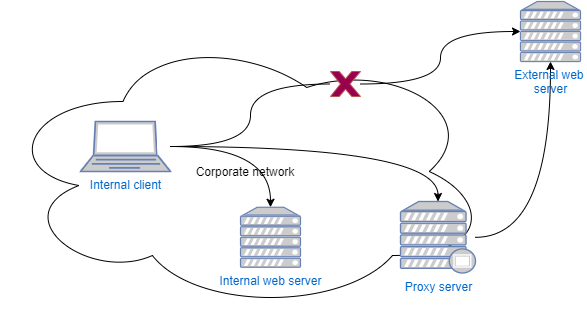
Here’s an image that explains this:

Forward proxy

The internal client can access the internal web server directly without problems. However he cannot access the internet server directly so he needs to use the proxy to access it.

One thing that needs to be made crystal is that the fact that your browser works with the proxy does not mean that any other HTTP clients you use will also work. For example, you may want to run curl or wget to download some files from an external server; these programs will not work without setting a proxy (usually by setting the http_proxy and https_proxy environment variables or by passing a parameter). Also, the proxy only works for HTTP requests. If you are in a private network without external access you will not be able to access non-HTTP resources. For example you will not be able to access your non-company mail server (which uses either IMAP or POP3) from behind your company’s network. Typically, you’ll use a web client for accessing your mails.

So it seems that using a proxy heavily restricts the internal users usage of internet. What are the advantages of using a forward proxy?

  • Security: Since the internal computers of a company will not have internet access there’s no easy way for attackers to access these computers.
  • Content moderation: The company through the proxy can block access to various internet sites (i.e social network, gaming etc) that the users shouldn’t access during work.
  • Caching: The proxy server can have a cache so when multiple users access the same internet resource it will downloaded only once saving the company’s bandwidth.

Especially the security thing is so important that almost all corporate (or university etc) networks will use a proxy server and never allow direct access to the internet.

A well known, open source forward proxy server is Squid.

Reverse proxy

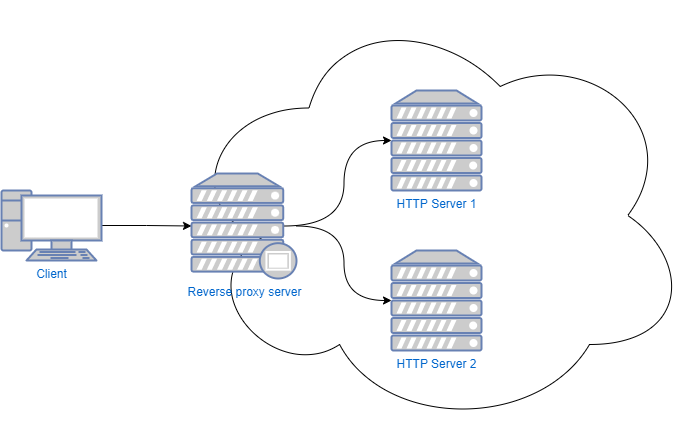
A reverse proxy is an HTTP server that “proxies” (i.e forwards) some (or all) requests it receives to a different HTTP server and returns the answer back. For example, a company may have a couple of HTTP servers in its internal network. These servers have private addresses and cannot be accessed through the internet. To allow external users to access these servers, the company will configure a reverse proxy server that will forward the requests to the internal servers as seen in the picture:

Reverse proxy

What happens is that the proxy server will forward requests that fulfill some specific criteria to other web servers. The criteria may be requests that have * a specific host (forward the requests that have a hostname of www.server1.company.com to the internal server named server1 and www.server2.company.com to the internal server named server2) * or a specific port (forward requests in the port 81 to server1 and requests in the port 82 to server2) * or even a particular path (forward requests with the path www.company.com/server1 to server1 and requests with the path www.company.com/server2 to server2)

or even other criteria that may be decided.

Let’s see some example of reverse proxying:

  • A characteristic example of reverse proxy is the well-known 3-tier architecture (web server / app server / database server). The web server is used to serve all requests but it “proxies” (forwards) some of the requests to the app server. This is used because the web server cannot serve dynamic replies but can serve static replies like for example files.
  • Offloading the SSL (https) security to a particular web server. This server will store the private key of your certificate and terminate the SSL connections. It will then forward the requests to the internal web servers using plain HTTP.
  • An HTTP load balancer will proxy the requests to a set of other servers based on some algorithm to share the load (i.e the HAProxy software load balancer or even a hardware load balancer)
  • A reverse proxy can be used to act as a security and DOS “shield” for your web servers. It will check the requests for common attack patterns and forward them to your servers only if they are safe
  • A reverse proxy can be used for caching; it will return cached versions of resources if they are available to avoid overloading the application servers
  • A CDN (content delivery network) is more or less a set of glorified reverse proxy servers that act as a first step for serving the user’s requests (based on the geographic location) also offering security protection and caching (this is what akamai or cloudflare do)

As can be seen from the previous examples there are a lot of apps that do reverse proxying, for example apache HTTP, nginx, HAProxy, varnish cache et al.

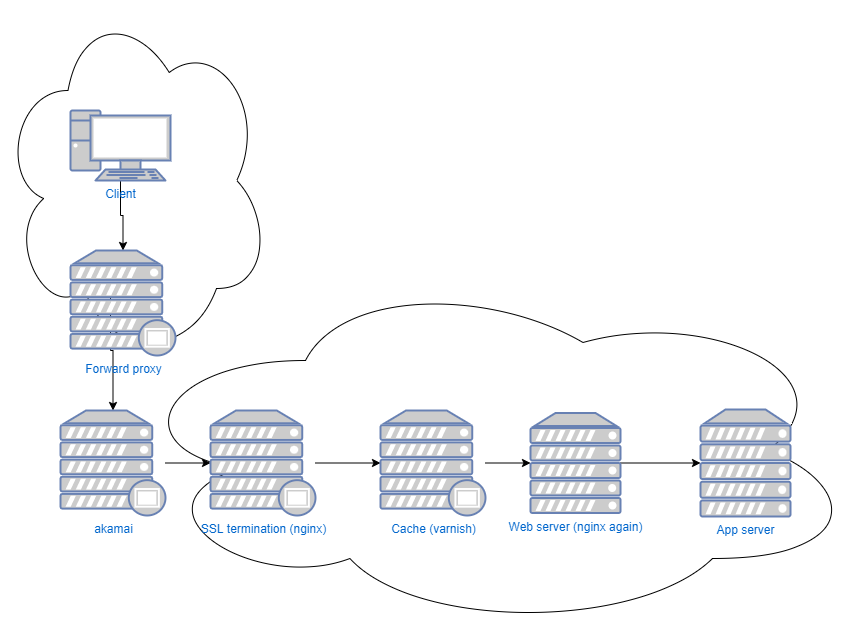
Notice that while there’s only one forward proxy, there could be a (large) chain of reverse proxies when accessing a remote server. Let’s take a look at a rather complex scenario: A user in a corporate network will access an application in another network. In this case the user’s request may pass through:

forward proxy (squid) -> security server / CDN (akamai) -> ssl termination (nginx) -> caching (varnish) -> web server (nginx again) -> app server (tomcat or gunicorn or IIS etc) as can be seen on the following image:

Reverse proxy

Notice that is this case (which is not uncommon) there are six (05) servers between your client and the application server!

One common problem with this is that unless all the intermediate servers are configured properly (by properly modifying and passing the X-Forwarded-For header) you won’t be able to retrieve the IP of the user that did the initial request.

Token Authentication for django-rest-framework

Introduction

In a a previous article I explained how to authenticate for your django-rest-framework API using the django-rest-auth package. Since then I have observed that various things have changed and most importantly that the library I used there (django-rest-auth) is not updated anymore and has been superseded by another one. Also, some of my information there is contradictory, especially the parts that deal with the session authentication and csrf protection.

Thus I’ve written this new article that betters describes a recommended authentication workflow using tokens. This workflow does not rely on sessions at all. Beyond that, is more or less the same as the previous one with some updates and clarifications where needed.

I have also updated the accompanying project of the previous article which can be found on https://github.com/spapas/rest_authenticate.

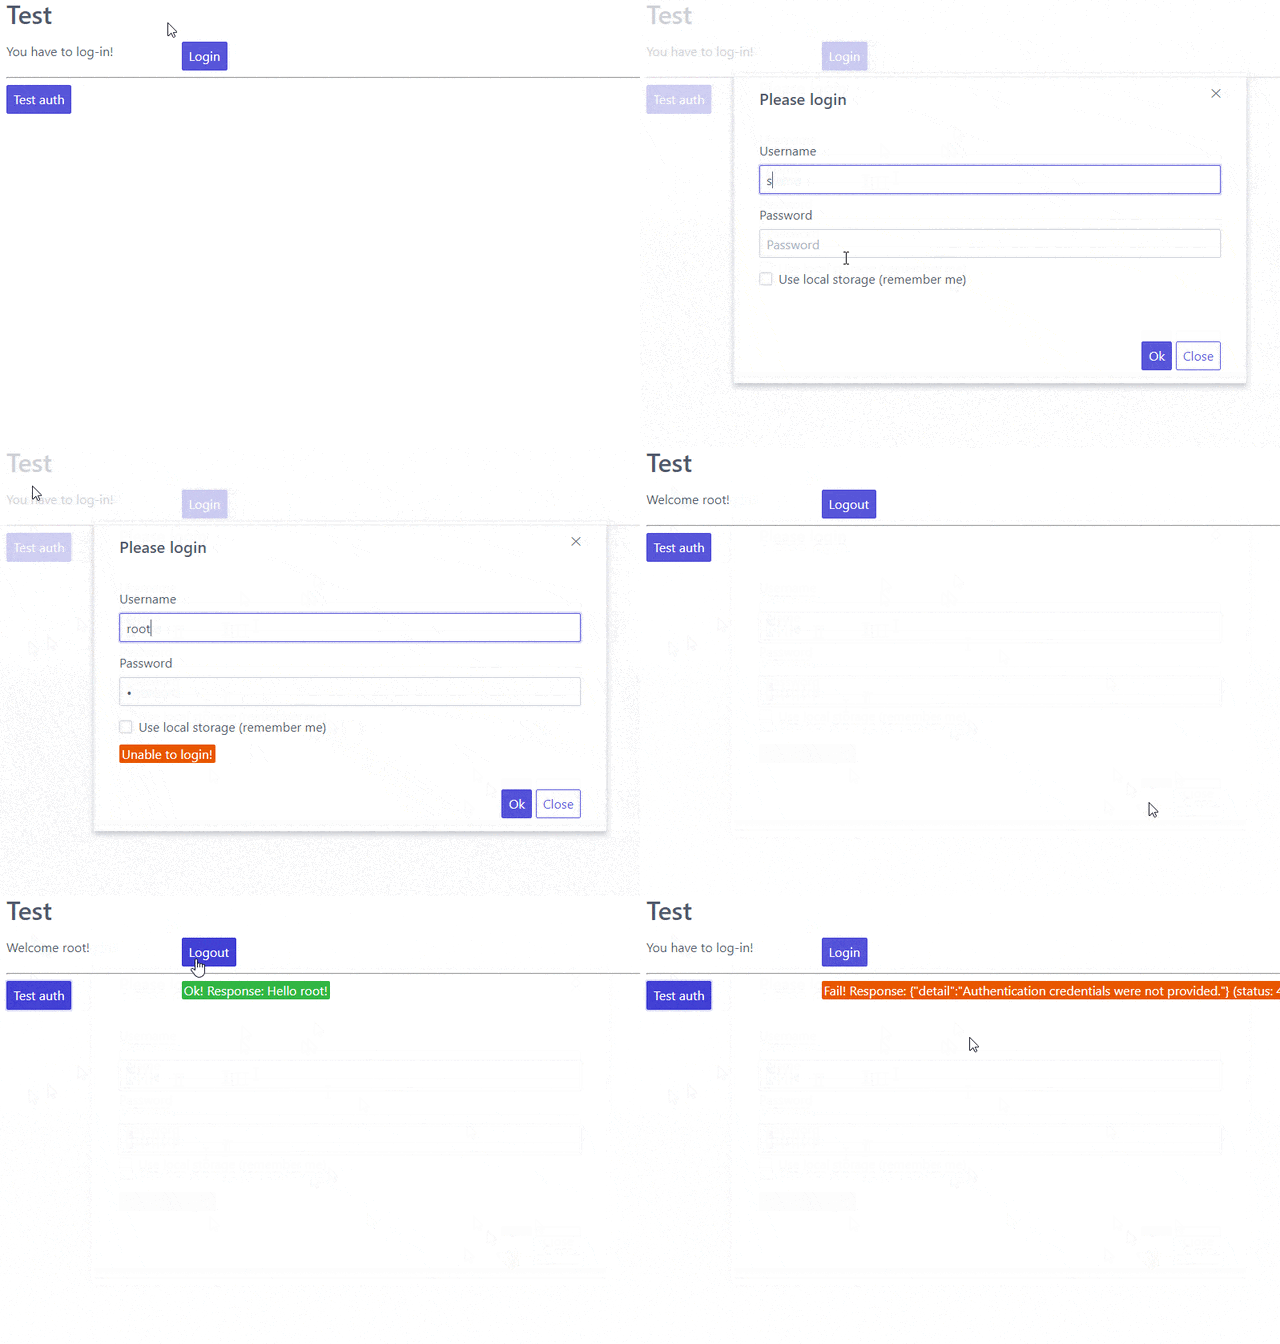
Before continuing with the tutorial, let’s take a look at what we’ll build here:

Our project

This is a single html page (styled with spectre.css) that checks if the user is logged in and either displays the login or logout button (using javascript). When you click the login you’ll get a modal in which you can enter your credentials which will be submitted through REST to the authentication endpoint and depending on the response will set a javascript variable (and a corresponding session/local storage key). Then you can use the “Test auth” button that works only on authenticated users and returns their username. Finally, notice that after you log out the “test auth” button returns a 403 access denied.

The javascript client uses token authentication so you can run the client in the same server as the server or in a completely different server (if you are using the proper CORS headers of course).

Some theory

Here I will try to explain a bunch of important concepts:

Sessions

After you log in with Django normally, your authentication information is saved to the session. The session is a bucket of information that the Django application saves about your visit — to distinguish between different visitors a cookie with a unique value named sessionid will be used. So, your web browser will send this cookie with each page request thus allowing Django to know which bucket of information is yours (and if you’ve authenticated know who are you). This is not a Django related concept but a general one (supported by most if not all HTTP frameworks) and is used to add state to an otherwise stateless medium (HTTP).

Since the sessionid cookie is sent not only with traditional but also with Ajax request it can be used to authenticate REST requests after you’ve logged in. This is what is used by default in django-rest-framework is a very good solution for most use cases: You login to django and you can go ahead and call the REST API through Ajax; the sessionid cookie will be sent along with the request and you’ll be authenticated automatically.

Now, although the session authentication is nice for using in browsers, you may need to access your API through a desktop or a mobile application where, setting the cookies yourself is not the optimal solution. Also, you may have an SPA that needs to access an API in a different domain; using using cookies for this is not easy - if possible at all.

CSRF protection

One important thing that you should be aware if you are going to use session authentication for your API is the CSRF protection. This is a mechanism that helps prevent cross-site request forgery (CSRF) attacks. A CSRF attack works like this: Let’s suppose that site A is a bank, and has a form with an email and a money amount. When the user submits the form via POST it will send this much money to the entered email using Paypal. Now, site B is a malicious site. When the user visits site B, it will automatically generate a POST request containing the malicious user’s email and the money he wants and submit it to site A. Now, if the user is authenticated with sessions on site A then site A will think that this is a valid form submission and will actually process the form as normally and send the money to the malicious user!

As you can understand this is a very serious and easy to exploit attack. To prevent this attack, the CSRF protection is used: In order to submit the form on site A, the request must contain a unique string (the CSRF token) that is generated automatically by site A. Thankfully, site B cannot access this token and thus cannot submit the form.

The CSRF situation is only related to sessions. If you are not using sessions then CSRF protection is not needed because there’s no way for site B to submit the form on site A (for example, with TokenAuthentication, site B cannot access the token that site A has).

However if you are using sessions then you must be extra careful to protect your POST views against CSRF attacks. Django does this by default so you don’t need to do anything fancy. However, when you actually want to submit a form using an API with sessions you must be careful to also include the CSRF token as explained in the Django docs about the topic (CSRF protection).

Tokens

For cases where you can’t use the session to authenticate, django-rest-framework offers a different authentication method called TokenAuthentication_. Using this method, each user of the Django application is correlated with a random string (Token) which is passed along with each request at its header thus the Django app can authenticate the user using this token. The token is retrieved when the user logs using his credentials and is saved in the browser.

One thing that may seem strange is that since both the session cookie and a token are set through HTTP Headers why all the fuss about tokens? Why not just use the session cookie and be done with it? Well, there are various reasons - here’s a rather extensive article explaining some of them. Some of the reasons are that a token can be valid forever while the session is something ephemeral - beyond authorization information, sessions may keep various other data for a web application and are expired after some time to save space. Also, since tokens are used for exactly this (authentication) they are much easier to use and reason about. Finally, as I’ve already explained, sharing cookies by multiple sites is not something you’d like to do. Actually, to make things easier for you just follow this rule: If your API will be run on a different domain than your client (i.e api.example.com and www.example.com) or your client not run on the web (i.e. is a desktop/mobile app) then you must not use session authentication. Use token authentication as proposed here or whatever else you may want that doesn’t rely on sessions.

CORS

Another thing that must concern the people that will want to use an API is the CORS situation. By default cross-origin requests are not allowed, i.e site B cannot issue Ajax requests to site A. Each server can be configured to allow cross-origin requests from other servers. This means that if you have a server api.example.com that is used as a backend and a server www.example.com that will serve your front-end, you can configure api.example.com to allow requests only from www.example.com.

By default Django does not allow any cross origin requests and you need to use the django-cors-headers package to properly configure it.

Notice that CORS protection is enforced by the Browser. For example if you have build a mobile app and are consuming an API in api.example.com then CORS protection does not apply to your http client.

Installation & configuration

The project will use django-rest-framework, dj-rest-auth and django-cors-headers.

To install django-rest-framework and dj-rest-auth just follow the instructions here i.e just add 'rest_framework', 'rest_framework.authtoken' and 'dj_rest_auth' to your INSTALLED_APPS in settings.py and run migrate.

To install django-cors-headers follow the the setup instructions: Add "corsheaders" to your INSTALLED_APPS and "django.middleware.common.CommonMiddleware" to your MIDDLEWARE in settings.py. Then you can use the CORS_ALLOWED_ORIGINS setting to configure which origins are allowed to make requests to your project. Let’s suppose that you are running your project at 127.0.0.1:8000 and you want to allow requests from a client running at 127.0.0.1:8001. You can do this by adding the following to your settings.py: CORS_ALLOWED_ORIGINS = ['http://127.0.0.1:8001', 'http://localhost:8001']. Actually, try running the project with and without that setting and see how the javascript client behaves.

Since I won’t be adding any other apps to this project (no models are actually needed), I’ve added two directories static and templates to put static files and templates there. This is configured by adding the 'DIRS' attribte to TEMPLATES, like this:

TEMPLATES = [
    {
        'BACKEND': 'django.template.backends.django.DjangoTemplates',
        'DIRS': [
            os.path.join(BASE_DIR, 'templates'),
        ],
        // ...

and adding the STATICFILES_DIRS setting:

STATICFILES_DIRS = [
    os.path.join(BASE_DIR, "static"),
]

The remaining setting are the default as were created by django-admin startproject.

Urls

I have included the the following urls to urls.py:

urlpatterns = [
    path('admin/', admin.site.urls),
    path('test_auth/', TestAuthView.as_view(), name='test_auth', ),
    path('rest-auth/logout/', LogoutViewEx.as_view(), name='rest_logout', ),
    path('rest-auth/login/', LoginView.as_view(), name='rest_login', ),
    path('', HomeTemplateView.as_view(), name='home', ),
] + static(settings.STATIC_URL, document_root=settings.STATIC_ROOT)

These are: The django-admin, a test_auth view (that works only for authenticated users and returns their username), a view (LogoutViewEx) that overrides the rest-auth REST logout-view (I’ll explain why this is needed in a minute), the rest-auth REST login-view, the home template view (which is the only view implemented) and finally a mapping of your static files to the STATIC_URL.

The LoginView is the default provided by the dj-rest-auth project. One thing to consider is that this view will check if the credentials you pass are valid and return a valid token for your user. However, it will also optionally login the user using sessions (i.e create a new session and return a sessionid cookie). This is configured by the REST_SESSION_LOGIN option which by default is True.

To test this functionality, try logging in using this login view with a superuser and then visit the django-admin. You will see that you are already logged in. Now, logout and add (or change) REST_SESSION_LOGIN=False to your settings.py. Login again from the rest view and now if you visit the django-admin you should see that you need to login again.

Another way to test this is by checking out the response headers of the POST to rest-auth/login/ from your browser’s development tools. When you are using REST_SESSION_LOGIN=True (or you haven’t defined it since by default it is true) you’ll see the following Set-Cookie line:

sessionid=pw8rp7l7yy33lk7geuxbczaleh35w9je; expires=Wed, 08 Sep 2021 08:29:40 GMT; HttpOnly; Max-Age=1209600; Path=/; SameSite=Lax

This cookie won’t be set if you login again with REST_SESSION_LOGIN=False.

The views

I’ve defined three views in this application - the HomeTemplateView, the TestAuthView and the LogoutViewEx view that overrides the normal LogoutView of django-rest-auth.

HomeTemplateView

The HomeTemplateView is a simple TemplateView that just displays an html page and loads the client side code - we’ll talk about it later in the front-side section. This is more or less similar (without the django-stuff) with the standalone client page that can be found on client/index.html.

TestAuthView

The TestAuthView is implemented like this:

class TestAuthView(APIView):
    authentication_classes = (authentication.TokenAuthentication,)
    permission_classes = (permissions.IsAuthenticated,)

    def get(self, request, format=None):
        return Response("Hello {0}!".format(request.user))

    def post(self, request, format=None):
        return Response("Hello {0}! Posted!".format(request.user))

This is very simple however I’d like to make a few comments about the above. First of all you see that I’ve defined both a get and a post method. When you use the token authentication you’ll see that the post method will work without the need to provide a csrf token as already discussed before.

Authentication and permission

Notice that both authentication_classes and permission_classes are included in the TestAuthView. These options define:

  • which method will be used for authenticating access to the REST view i.e finding out if the user requesting access has logged in and if yes what’s his username (in our case only TokenAuthentication will be used)
  • if the user is authorized (has permission) to call this REST view (in our case only authenticated users will be allowed)

The authentication and permission classes can be set globally in your settings.py using REST_FRAMEWORK['DEFAULT_AUTHENTICATION_CLASSES'] and REST_FRAMEWORK['DEFAULT_PERMISSION_CLASSES'] or defined per-class like this. If I wanted to have the same authentication and permission classes defined in my settings.py so I wouldn’t need to set these options per-class I’d add the following to my settings.py:

REST_FRAMEWORK = {
    'DEFAULT_AUTHENTICATION_CLASSES': (
        'rest_framework.authentication.TokenAuthentication',
    ),
    'DEFAULT_PERMISSION_CLASSES': (
        'rest_framework.permissions.IsAuthenticated',
    ),
}

Please keep in mind that you haven’t defined these in your views or your settings, they will have the following default values:

REST_FRAMEWORK = {
    'DEFAULT_AUTHENTICATION_CLASSES': (
        'rest_framework.authentication.SessionAuthentication',
        'rest_framework.authentication.BasicAuthentication'
    ),
    'DEFAULT_PERMISSION_CLASSES': (
        'rest_framework.permissions.AllowAny',
    ),
}

The above mean that if you don’t define authentication and permission classes anywhere then the REST views will use either session authentication (i.e the user has logged in normally using the Django login views as explained before) or HTTP basic authentication (the request provides the credentials in the header using traditional HTTP Basic authentication) and also that all users (logged in or not) will be allowed to call all APIs (this is probably not something you want).

Tokens

The TokenAuthentication that we are using for the TestAuthView means that for every request a valid token must be passed (there’s no concept of state in HTTP so you need to pass it whenever you communicate with the server).

The tokens are normal object instances of rest_framework.authtoken.models.Token and you can take a look at them (or even add one) through the Django admin (auth token - tokens). You can also even do whatever you normally would do to an object instance, for example:

>>> [ (x.user, x.key) for x in Token.objects.all()]
[(<User: root>, 'db4dcc1b9d00d1af74fb3cb41e1f9e673208485b')]

To authenticate with a token (using TokenAuthentication), you must add an extra header to your request with the format Authorization: Token token for example in the previous case root would add Authorization: Token db4dcc1b9d00d1af74fb3cb41e1f9e673208485b. To do this you’ll need something client-side code which we’ll see in the next section.

To debug your authentication with curl you can just do something like this:

curl http://127.0.0.1:8000/test_auth/ -H "Authorization:Token db4dcc1b9d00d1af74fb3cb41e1f9e673208485b"

Try it with a valid and invalid token and without providing a token at all and see the response each time.

dj-rest-auth

So, django-rest-framework provides the model (Token) and the mechanism (add the extra Authentication header) for authentication with Tokens. What it does not provide is a simple way to create/remove tokens for users: This is where the dj-rest-auth project comes to the rescue! Its login and logout REST views will automatically create (and delete) tokens for the users that are logging in.

As already described above, the login view will also authenticate the user using the session when the REST_SESSION_LOGIN is set to True (default) - this means that if a user logs in using the login REST endpoint he’ll then be logged in normally to the site and be able to access non-REST parts of the site (for example the django-admin).

Also, if the user logs in through the dj-rest-auth REST end point and if you have are using SessionAuthentication to one of your views then he’ll be able to authenticate to these views without the need to pass the token (make sure you understand why).

LogoutViewEx

Finally, let’s take a look at the LogoutViewEx:

class LogoutViewEx(LogoutView):
    authentication_classes = (authentication.TokenAuthentication,)

This class only defines the authentication_classes attribute. Is this really needed? Well, it depends on you project. If you take a look at the source code of LogoutView (https://github.com/iMerica/dj-rest-auth/blob/master/dj_rest_auth/views.py#L131) you’ll see that it does not define authentication_classes. This, as we’ve already discussed, means that it will fall-back to whatever you have defined in the settings (or the defaults of django-rest-framework).

So, if you haven’t defined anything in the settings then you’ll get the by default the SessionAuthentication and BasicAuthentication methods (hint: not the TokenAuthentication). This means that you won’t be able to logout when you pass the token (but will be able to logout from the web-app after you login - why?). So to make everything crystal and be able to reason better about the behavior I specifically define the LogoutViewEx to use the TokenAuthentication to properly log out your user. This of course means that you need to pass the token to your logout view also or else there won’t be any way to associate the request with a user to log out.

The client side scripts

I’ve included all client-side code to a home.html template that is loaded from the HomeTemplateView. Also, the same code has been included in client/index.html. This is a completely standalone javascript client that you can run in a different http server than your Django server, for example by running py -3 -m  http.server 8001 from the client folder and visiting http://127.0.0.1:8001.

The client-side code has been implemented only with jQuery because I think this is the library that most people are familiar with - and is really easy to be understood even if you are not familiar with it. It more or less consists of five sections in html:

  • A user-is-logged-in section that displays the username and the logout button
  • A user-is-not-logged-in section that displays a message and the login button
  • A test-auth section that displays a button for calling the TestAuthView with GET defined previously and outputs its response
  • A test-auth POST section that displays a button for calling the TestAuthView with POST defined previously and outputs its response
  • The login modal

Here’s the html (using spectre.css for styling):

<div class="container grid-lg">
<h2>Test</h2>
<div class="columns" id="non-logged-in">
    <div class='column col-3'>
        You have to log-in!
    </div>
    <div class='column col-3'>
        <button class="btn btn-primary"  id='loginButton'>Login</button>
    </div>
</div>
<div class="columns" id="logged-in">
    <div class='column col-3'>
        Welcome <span id='span-username'></span>!
    </div>
    <div class='column col-3'>
        <button class="btn btn-primary"  id='logoutButton'>Logout</button>
    </div>
</div>
<hr />
<div class="columns" id="test">
    <div class='column col-3'>
        <button class="btn btn-primary"  id='testAuthButton'>Test auth</button>
    </div>
    <div class='column col-9'>
        <div id='test-auth-response' ></div>
    </div>
</div>
<hr />
<div class="columns" id="test">
    <div class='column col-3'>
        <button class="btn btn-primary"  id='testAuthPostButton'>Test auth (POST)</button>
    </div>
    <div class='column col-9'>
        <div id='test-auth-post-response' ></div>
    </div>
</div>
</div>

<div class="modal" id="login-modal">
    <a href="#close" class="modal-overlay close-modal" aria-label="Close"></a>
    <div class="modal-container">
        <div class="modal-header">
            <a href="#close" class="btn btn-clear float-right close-modal" aria-label="Close"></a>
            <div class="modal-title h5">Please login</div>
        </div>
        <div class="modal-body">
            <div class="content">
                <form>
                    {% csrf_token %}
                    <div class="form-group">
                        <label class="form-label" for="input-username">Username</label>
                        <input class="form-input" type="text" id="input-username" placeholder="Name">
                    </div>
                    <div class="form-group">
                        <label class="form-label" for="input-password">Password</label>
                        <input class="form-input" type="password" id="input-password" placeholder="Password">
                    </div>
                    <div class="form-group">
                        <label class="form-checkbox" for="input-local-storage">
                            <input type="checkbox" id="input-local-storage" /> <i class="form-icon"></i>  Use local storage (remember me)
                        </label>
                    </div>
                </form>
                <div class='label label-error mt-1 d-invisible' id='modal-error'>
                    Unable to login!
                </div>
            </div>
        </div>
        <div class="modal-footer">

            <button class="btn btn-primary" id='loginOkButton' >Ok</button>
            <a href="#close" class="btn close-modal" >Close</a>
        </div>
    </div>
</div>

The html is very simple and I don’t think I need to explain much - notice that the #logged-in and #non-logged-in sections are mutually exclusive (I use $.show() and $.hide() to show and hide them) but the #test section is always displayed so you’ll be able to call the test REST API when you are and are not authenticated. For the modal to be displayed you need to add an active class to its #modal container.

For the javascript, let’s take a look at some initialization stuff:

var g_urls = {
    'login': '{% url "rest_login" %}',
    'logout': '{% url "rest_logout" %}',
    'test_auth': '{% url "test_auth" %}',
};
var g_auth = localStorage.getItem("auth");
if(g_auth == null) {
    g_auth = sessionStorage.getItem("auth");
}

if(g_auth) {
    try {
        g_auth = JSON.parse(g_auth);
    } catch(error) {
        g_auth = null;
    }
}

var initLogin = function() {
    if(g_auth) {
        $('#non-logged-in').hide();
        $('#logged-in').show();
        $('#span-username').html(g_auth.username);
        if(g_auth.remember_me) {
            localStorage.setItem("auth", JSON.stringify(g_auth));
        } else {
            sessionStorage.setItem("auth", JSON.stringify(g_auth));
        }
    } else {
        $('#non-logged-in').show();
        $('#logged-in').hide();
        $('#span-username').html('');
        localStorage.removeItem("auth");
        sessionStorage.removeItem("auth");
    }
    $('#test-auth-response').html("");
    $('#test-auth-post-response').html("");
};

First of all, I define a g_urls window/global object that will keep the required REST URLS (login/logout and test auth). These are retrieved from Django using the {% url %} template tag and are not hard-coded (in the js only client they are hard-coded of course). After that, I check to see if the user has authenticated before. Notice that because this is client-side code, I need to do that every time the page loads or else the JS won’t be initialized properly! The user login information is stored to an object named g_auth and contains three attributes: username, key (token) and remember_me.

To keep the login information I use either a key named auth to either the localStorage or the sessionStorage. The sessionStorage is used to save info for the current browser tab (not window) while the localStorage saves info for ever (until somebody deletes it). Thus, localStorage can be used for implementing a “remember me” functionality.

The final function we define here, initLogin (which is called a little later) checks to see if there is login information and hides/displays the correct things in html. It will also set the local or session storage (depending on remember me value).

After that, we have some client side code that is inside the $() function which will be called after the page has completely loaded:

$(function () {
    initLogin();

    $('#loginButton').click(function() {
        $('#login-modal').addClass('active');
    });

    $('.close-modal').click(function() {
        $('#login-modal').removeClass('active');
    });

    $('#testAuthButton').click(function() {
        $.ajax({
            url: g_urls.test_auth,
            method: "GET",
            beforeSend: function(request) {
                if(g_auth) {
                    request.setRequestHeader("Authorization", "Token " + g_auth.key);
                }
            }
        }).done(function(data) {
            $('#test-auth-response').html("<span class='label label-success'>Ok! Response: " + data);
        }).fail(function(data) {
            $('#test-auth-response').html("<span class='label label-error'>Fail! Response: " + data.responseText + " (status: " + data.status+")</span>");
        });
    });

    $('#testAuthPostButton').click(function() {
        // Same as with the GET
    });

    // continuing below ...

The first thing happening here is to call the initLogin function to properly initialize the page and then we add a couple of handlers to the click buttons of the #loginButton (which just displays the modal by adding the active class ), .close-modal class (there are multiple ways to close the modal thus I use a class which just removes that active class) and finally to the #testAuthButton and #testAuthPostButton#. These button will do a GET and POST request to the g_urls.test_auth we defined before. The important thing to notice here is that we add a beforeSend attribute to the $.ajax request which, if g_auth is defined, adds an Authorization header with the token in the form that django-rest-framework TokenAuthentication expects and as we’ve already discussed above:

beforeSend: function(request) {
    if(g_auth) {
        request.setRequestHeader("Authorization", "Token " + g_auth.key);
    }
}

If this ajax call returns without errors (the done part of the ajax call) we just add the data to a green label else if there’s an error (fail part) we add the response text and status to a red label. You can try clicking the buttons and you see that only if you’ve logged in you will succeed in this call. Also, notice that both GET and POST requests work normally without the need to also include a csrf token (I hope you understand why by now).

Let’s now take a look at the #loginOkbutton click handler (inside the modal):

$('#loginOkButton').click(function() {
    var username = $('#input-username').val();
    var password = $('#input-password').val();
    var remember_me = $('#input-local-storage').prop('checked');
    if(username && password) {
        console.log("Will try to login with ", username, password);
        $('#modal-error').addClass('d-invisible');
        $.ajax({
            url: g_urls.login,
            method: "POST",
            data: {
                username: username,
                password: password
            }
        }).done(function(data) {
            console.log("DONE: ", username, data.key);
            g_auth = {
                username: username,
                key: data.key,
                remember_me: remember_me
            };
            $('#login-modal').removeClass('active');
            initLogin();
        }).fail(function(data) {
            console.log("FAIL", data);
            $('#modal-error').removeClass('d-invisible');
        });
    } else {
        $('#modal-error').removeClass('d-invisible');
    }
});

All three user inputs (username, password, remember_me) are read from the form and if both username and password have been defined an Ajax request will be done to the g_urls.login url. We pass username and password as the request data. Now, if there’s an error (fail) I just display a generic message (by removing it’s d-invisible class) while, if the request was Ok I retrieve the key (token) from the response, initialize the g_auth object with the username, key and remember_me values and call initLogin to show the correct divs and save to the session/local storage.

Finally, here’s the code for logout (still inside the $(function () {):

    $('#logoutButton').click(function() {
        console.log("Trying to logout");
        $.ajax({
            url: g_urls.logout,
            method: "POST",
            beforeSend: function(request) {
                request.setRequestHeader("Authorization", "Token " + g_auth.key);
            }
        }).done(function(data) {
            console.log("DONE: ", data);
            g_auth = null;
            initLogin();
        }).fail(function(data) {
            console.log("FAIL: ", data);
        });
    });

}); // End of $(function () {

The code here is very simple - just do a POST to the g_urls.logout and if everything is ok delete the g_auth values and call initLogin() to show the correct divs and remove the auth key from local/session storage. Notice that when you POST to the logout REST end-point, you need to also add the Authorization header with the token or else (since we’ve defined only TokenAuthentication for the authentication_classes for the LogoutViewEx class) there won’t be any way to correlate the request with the user and log him out!

Conclusion

Using the info presented on this article you should be able to properly login and logout to Django using REST and also call REST end-points using the TokenAuthentication.

I recommend using the curl utility to try to call the rest end point with various parameters to see the response. Also, you change the LogoutViewEx with the default django-rest-auth LogoutView and then try logging out through the web-app and through curl and see what happens when you try to access the test-auth end-point.

As a final remark, a couple of thing to note:

  • You can use the django-rest-knox package to improve the functionality and security of your REST tokens (by allowing multiple tokens per user, storing them hashed in the database and configuring expiration times for the tokens)
  • If you are using Apache and mod_wsgi to run you Django project you need to set the WSGIPassAuthorization option to on in order to pass the Authorization header to your Django app.